About this document
This document explains how to import Labels or Tags in SAFE.
Introduction
Tags are the metadata elements that you apply to the cloud resources. They are the key-value pairs that help you identify resources based on settings relevant to your organization.
SAFE users can automatically import the Tags. This helps users create multi-cloud asset groups based on tags and labels, enabling them to manage cyber risk for those groups.
Import Tags from AWS into SAFE
1. Make sure that AWS integration is configured under Integrations. Refer to the AWS Integration Guide.
2. Create custom fields for technology corresponding to the tag keys you want to import into SAFE. You can create the custom fields from the Settings > Custom Fields.
3. In the next AWS sync, the system will automatically update the custom field values. Alternatively, you can manually trigger a sync by navigating to Integrations > AWS.
Notes
The system imports only those tags from AWS for which the corresponding custom fields are present in SAFE.
On every subsequent scan, the system updates the custom field values automatically.
Import Tags from Azure Subscriptions into SAFE
Make sure that Azure integration is configured under Safe Hooks. Refer to the Azure Integration Guide.
Create custom fields for technology corresponding to the Azure tag keys you want to import into SAFE. You can create the custom fields from the Settings > Custom Fields.
In the next Azure sync, the system will automatically update the custom field values. Alternatively, you can manually trigger a sync by navigating to SAFE Hooks > Azure.
Notes
The system imports only those tags from Azure for which the corresponding custom fields are present in SAFE.
On every subsequent scan, the system automatically updates the custom field values.
Import Labels from Google Cloud Platform (GCP) into SAFE
Make sure that GCP integration is configured under Safe Hooks. Refer to the GCP Integration Guide.
Create custom fields for technology corresponding to the Azure tag keys you want to import into SAFE. You can create the custom fields from the Settings > Custom Fields.
In the next GCP sync, the system will update the custom field values automatically. Alternatively, you can manually trigger a sync using the SAFE API. Refer to the GCP Integration Guide.
Notes
The system imports only those labels from GCP for which the corresponding custom fields are present in SAFE.
On every subsequent scan, the system updates the custom field values automatically.
Import Tags from Wiz into SAFE
1. Make sure that Wiz integration is configured under Integrations. Refer to the Wiz Integration Guide.
2. Create custom fields for technology corresponding to the tag keys you want to import into SAFE. You can create the custom fields from the Settings > Custom Fields. Refer to Custom Fields.
3. In the next Wiz sync, the system will automatically update the custom field values. Alternatively, you can manually trigger a sync by navigating to Integrations > Wiz.
Notes
The system imports only those tags from Wiz for which the corresponding custom fields are present in SAFE.
On every subsequent scan, the system updates the custom field values automatically.
Import Tags from CrowdStrike Falcon into SAFE
SAFE now supports pulling tags from CrowdStrike. To pull tags, follow the steps below:
Log in to SAFE.
Navigate to Settings > Custom Fields.
Click on the Add Custom Field button.
Enter the Name cs-falcon-tags. Keep the Custom Field Type field as Any and the Multi-Valued field as Yes.
Click on the Add button.
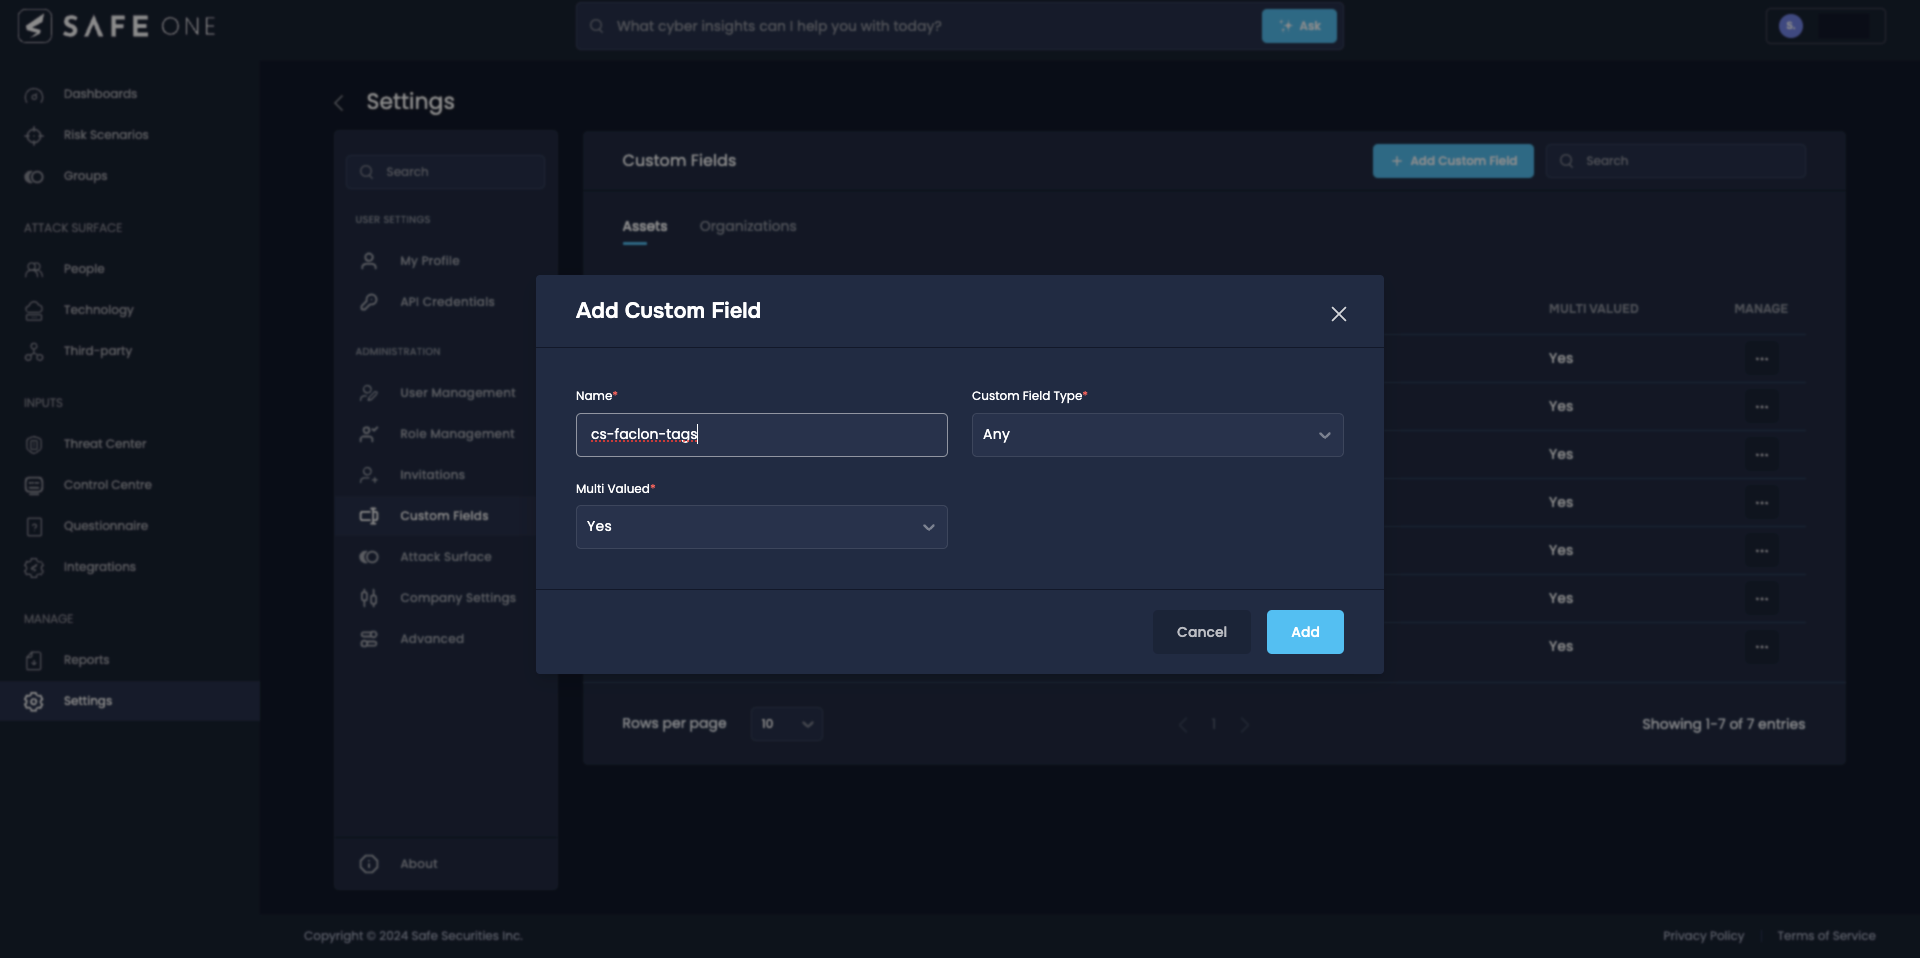
To view/filter the pulled tags, follow the steps below:
Log in to SAFE.
Navigate to Technology
Add column Custom Field: cs-falcon-tags to view the pulled tags against the asset.
Filtering on the pulled tags is also supported.
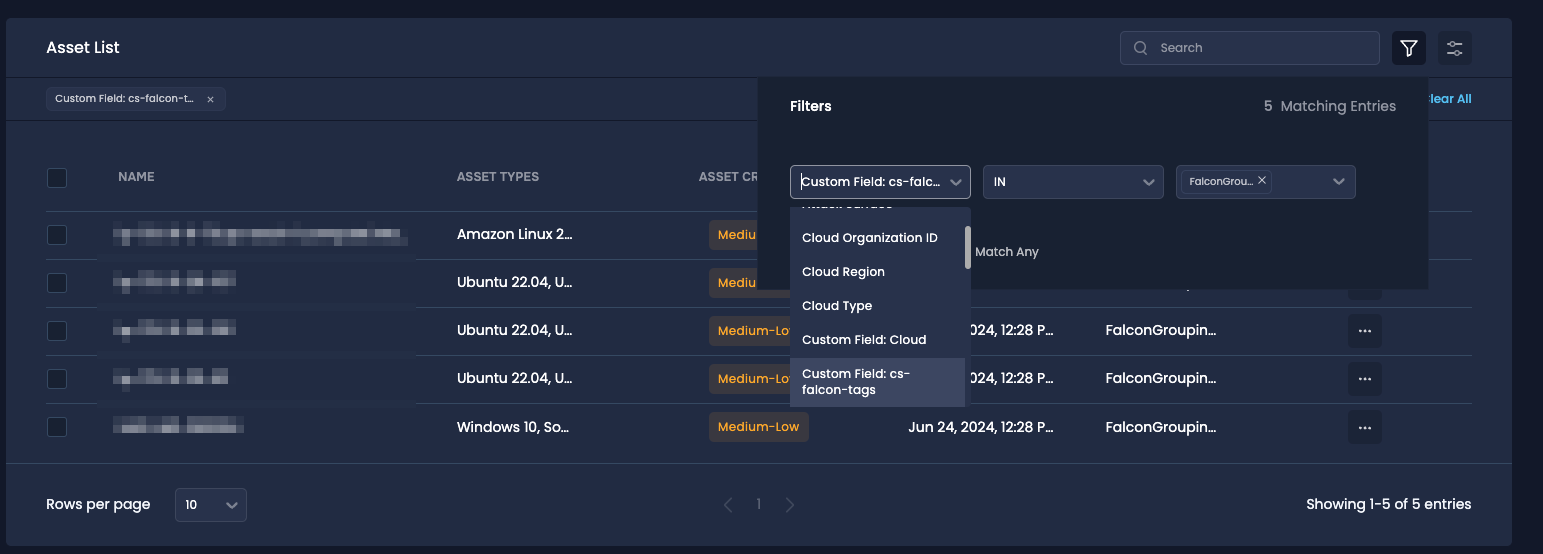
The custom field is case-sensitive. The custom field's name must be exactly this
cs-falcon-tagsfor the tags to be pulled in. The CrowdStrike tags will be populated in the created custom field.Import Tags from CrowdStrike Falcon Exposure Management into SAFE
SAFE now supports pulling tags from CrowdStrike Falcon Exposure Management. To pull tags, follow the steps below:
Log in to SAFE.
Navigate to Settings > Custom Fields.
Click on the Add Custom Field button.
Enter the Name cs-exposure-mgmt-tags. Keep the Custom Field Type field as Any and the Multi-Valued field as Yes.
Click on the Add button.
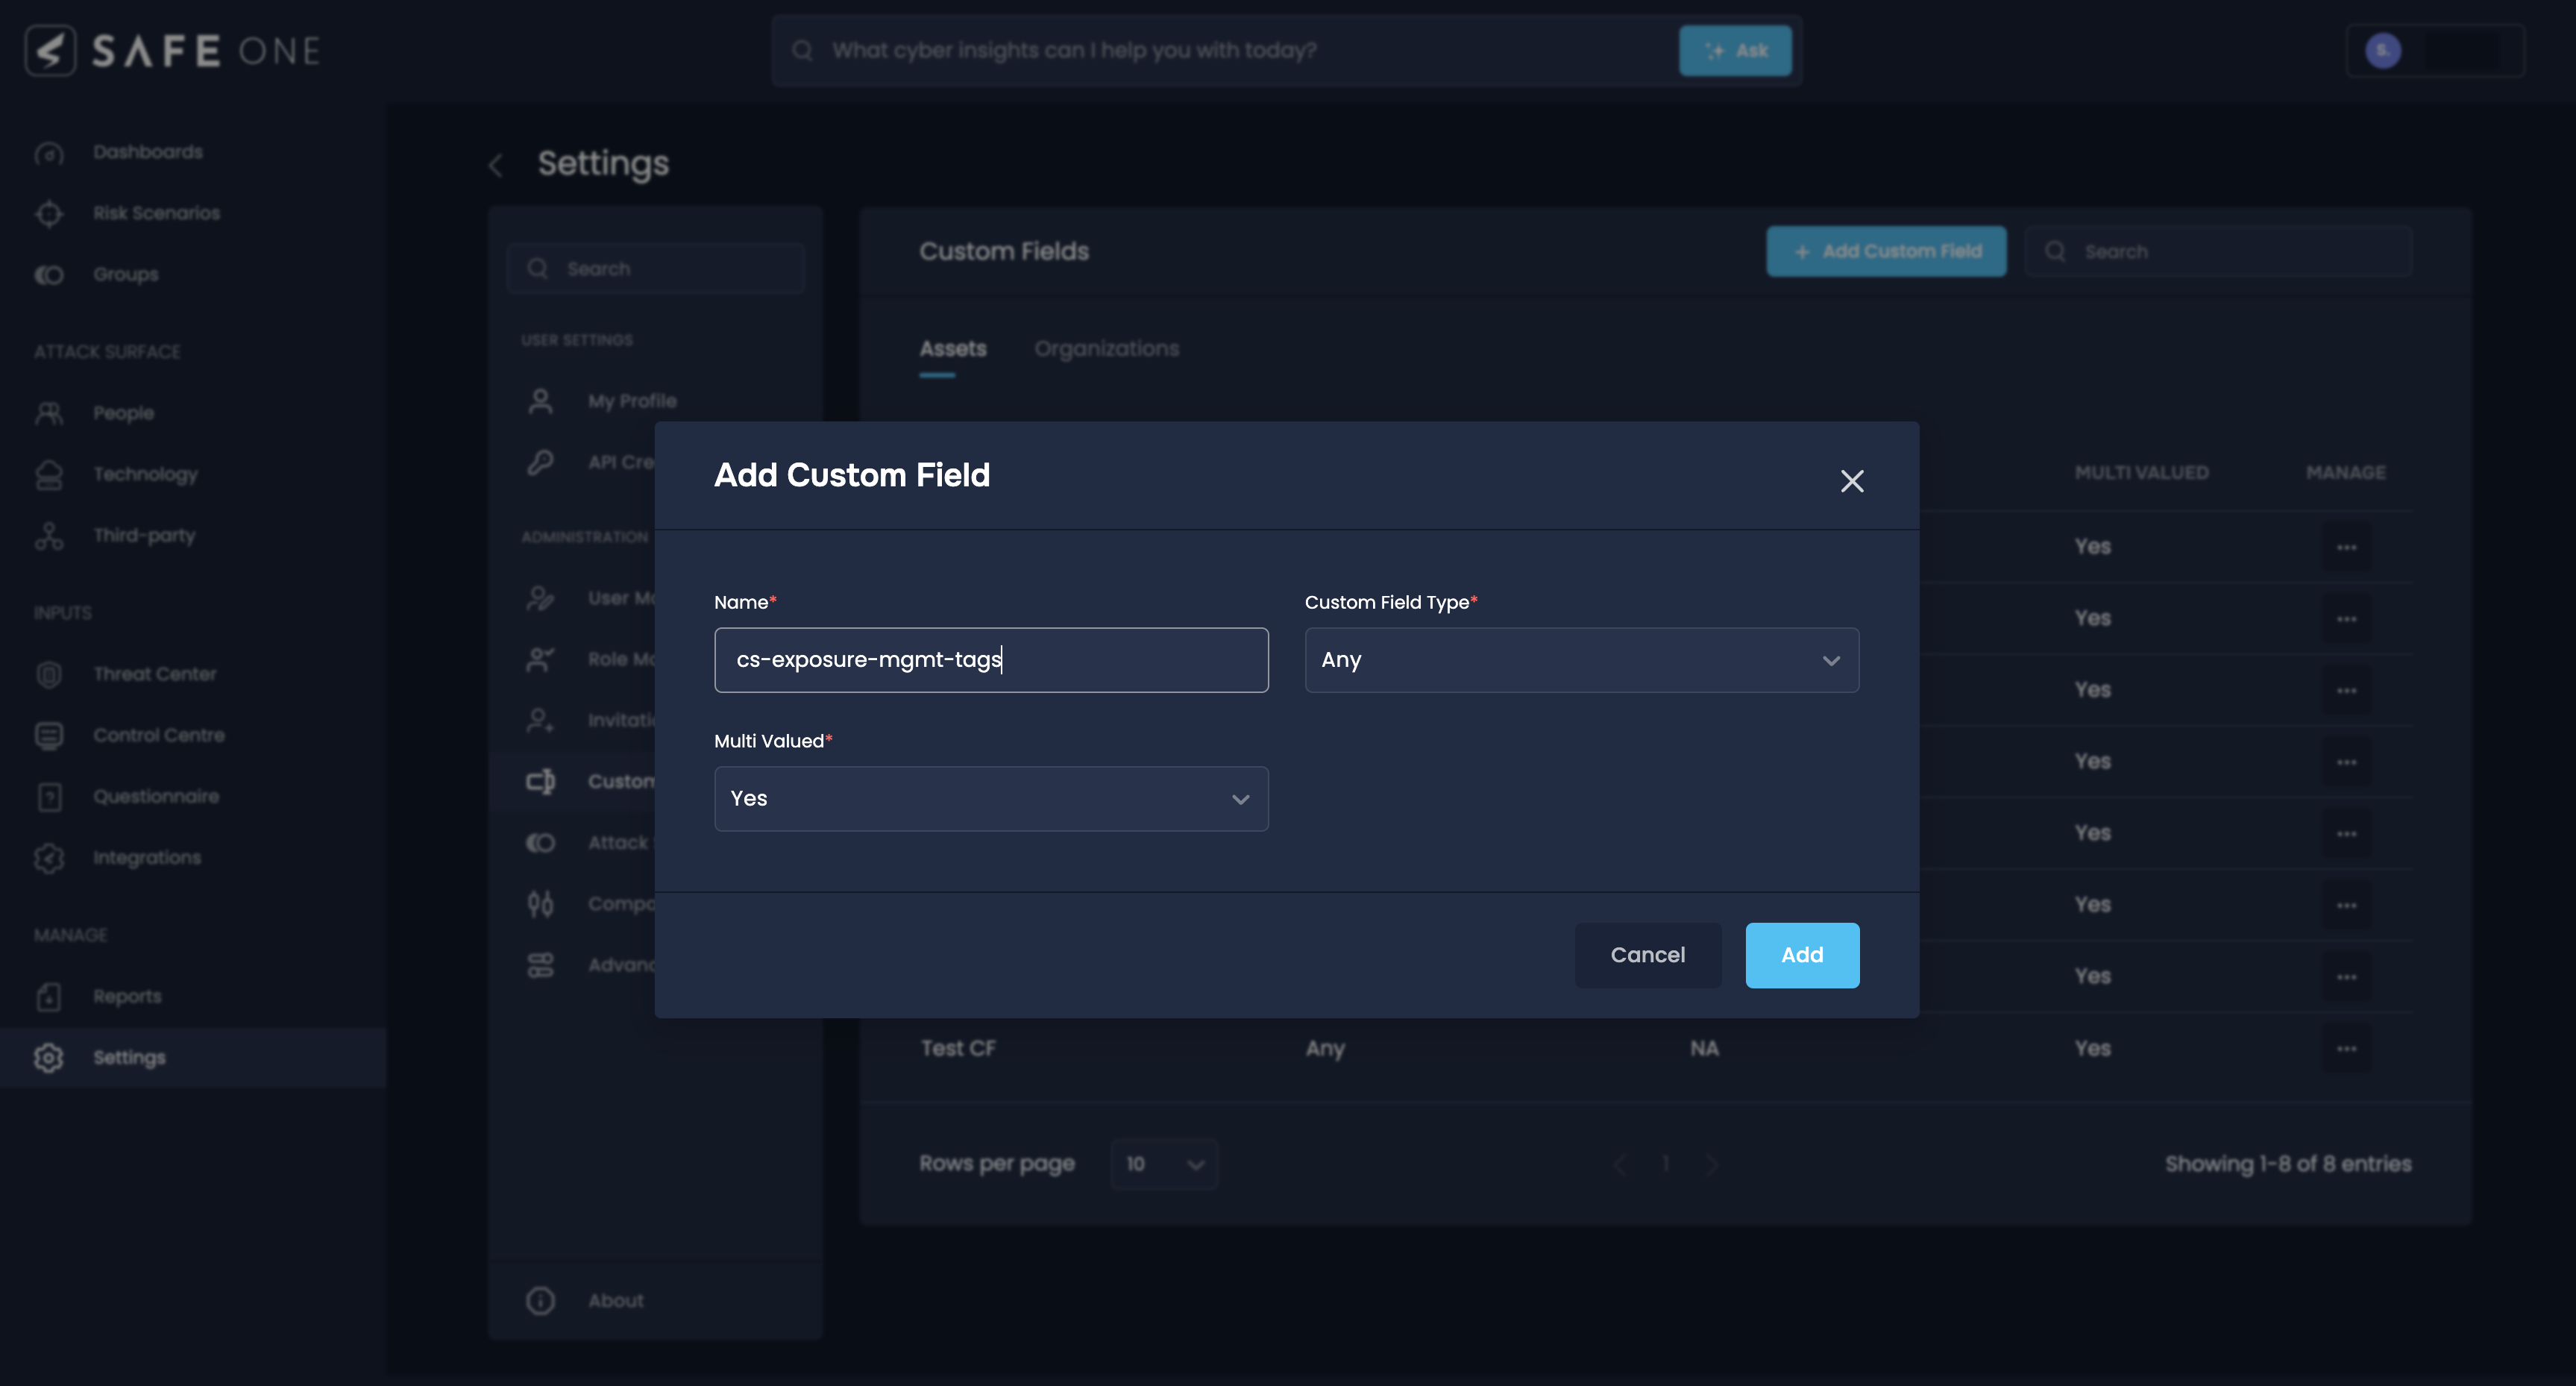
To view/filter the pulled tags, follow the steps below:
Log in to SAFE.
Navigate to Technology
Add column Custom Field: cs-exposure-mgmt-tags to view the pulled tags against the asset.
Filtering on the pulled tags is also supported.
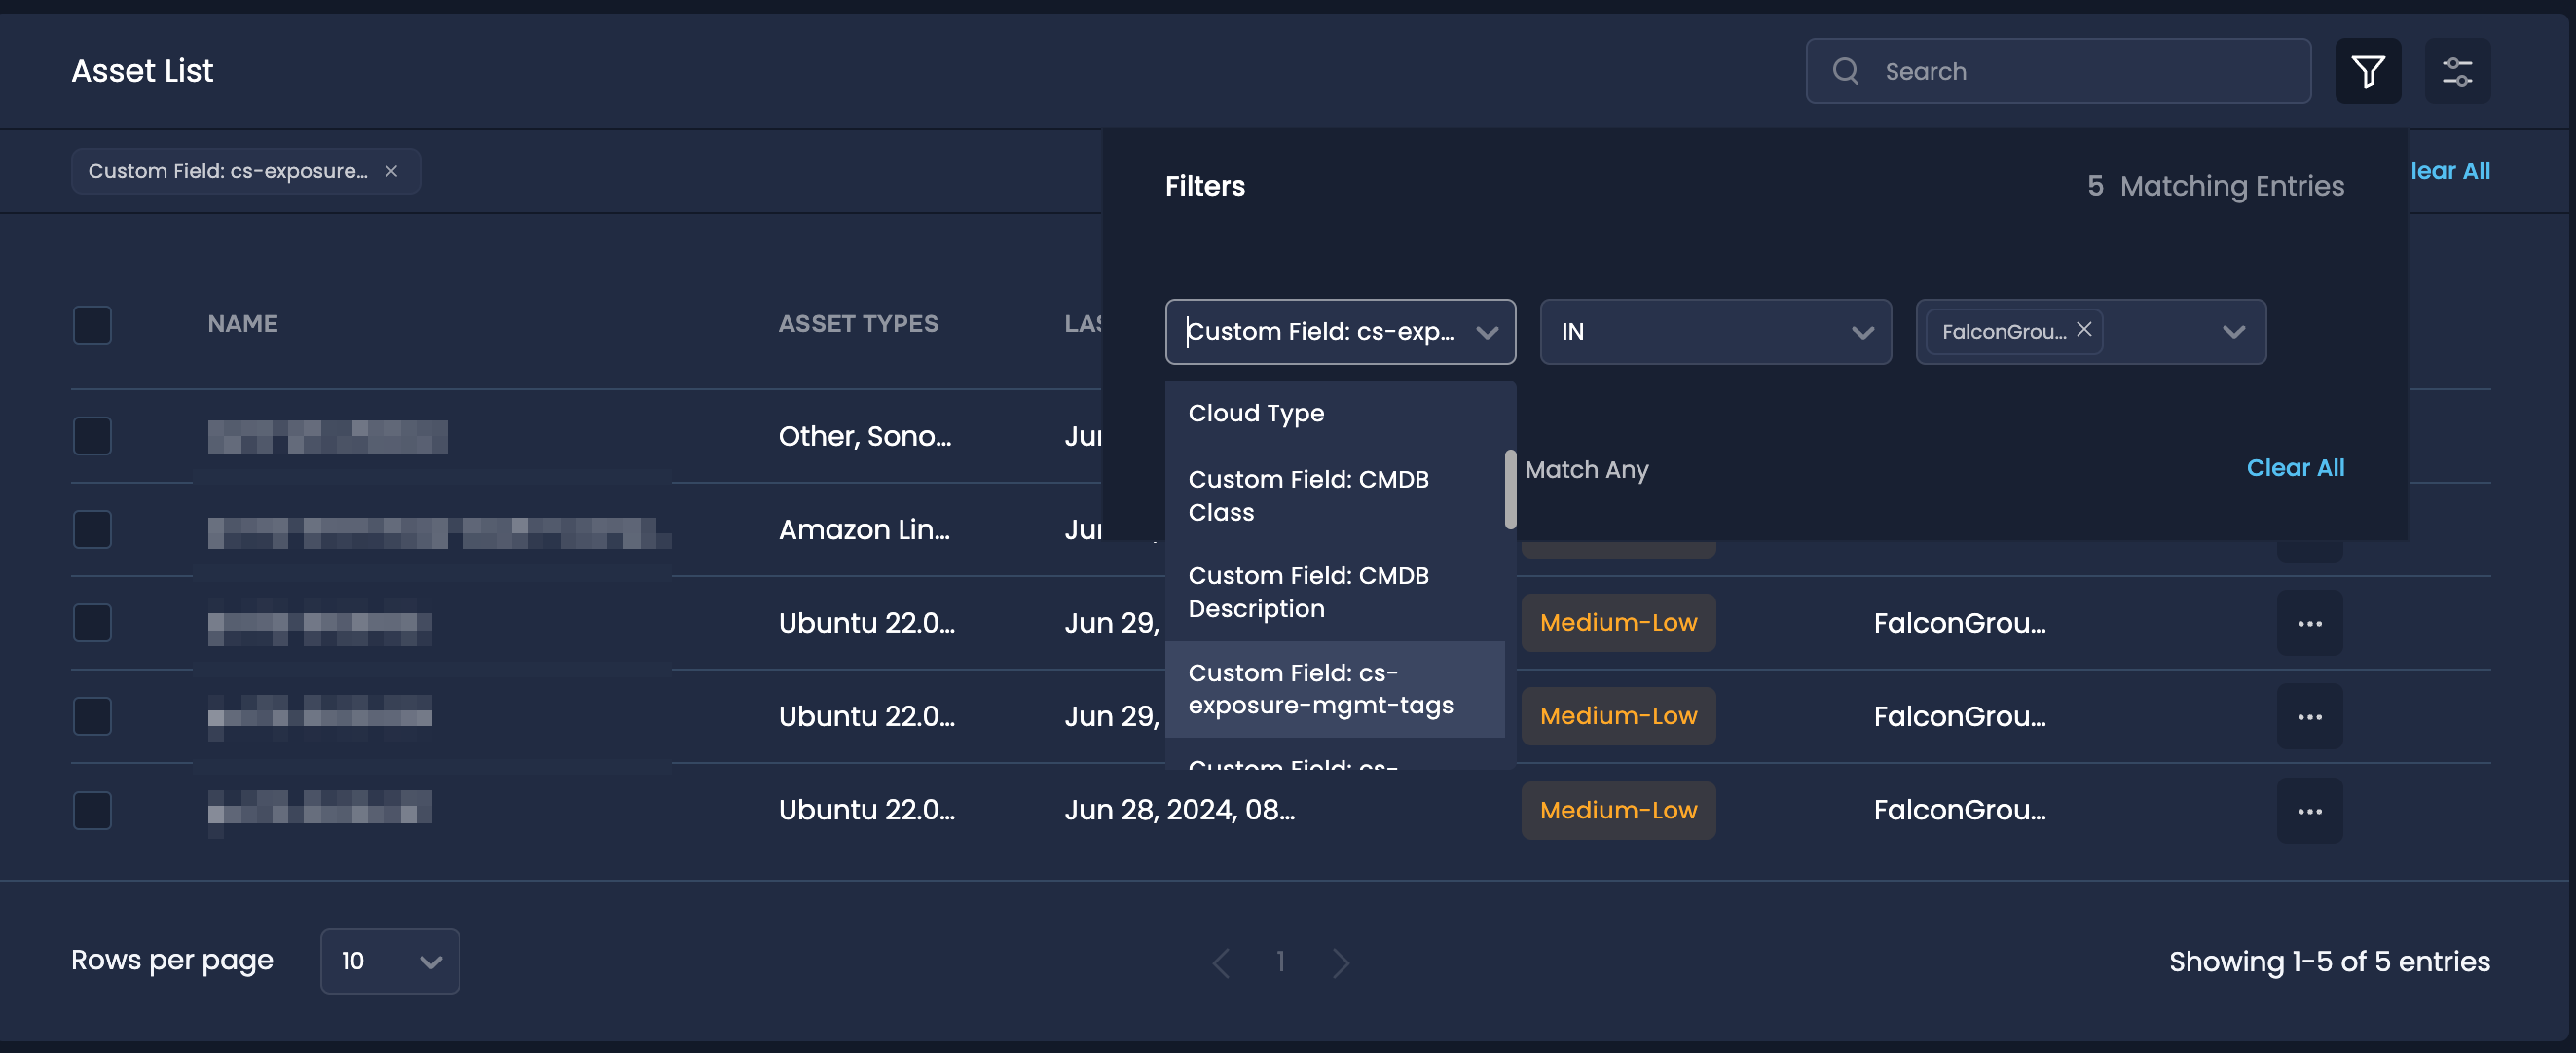
The custom field is case-sensitive. The custom field's name must be exactly this
cs-exposure-mgmt-tagsfor the tags to be pulled in. The CrowdStrike tags will be populated in the created custom field.
Import Tags from Tenable Vulnerability Management into SAFE
Ensure that Tenable Vulnerability Management is configured under Safe Hooks.
Create Custom Fields in SAFE that correspond to the tag keys (category) in Tenable Vulnerability Management that you wish to import. To set up these custom fields, go to Settings > Custom Fields.
The system will automatically update the custom field values during the next sync with Tenable Vulnerability Management. If you prefer, you can manually trigger a sync by going to SAFE Hooks > Tenable Vulnerability Management.
Info
The system will only import tags from Tenable Vulnerability Management if the corresponding custom fields are already set up in SAFE.
After each subsequent scan, the custom field values will be automatically updated.
Import Tags from SentinelOne via Custom field
SAFE can bring in tags from SentinelOne. Since SentinelOne uses key-value tags, you can import these tags into SAFE using a Custom Field.
To do this, go to Settings > Custom Field and create a new custom field. Make sure the name of this custom field matches exactly with the key of the tag in SentinelOne.
.png)
When the next sync with SentinelOne happens, the values for your custom field will be updated. You can also start a manual sync by going to Integrations > SentinelOne > Configure.
Import Tags from Claroty xDome into SAFE
Make sure that Claroty xDome is configured under integrations
Create custom fields matching the Claroty xDome tag keys (claroty-site-name, claroty-device-type, claroty-subcategory, claroty-category in Claroty xDome) in SAFE. You can create the custom fields from the Settings > Custom Fields. Refer to Custom Fields.
In the next Claroty xDome sync, the system will automatically update the custom field values. Alternatively, you can manually trigger a sync by navigating to Integrations > Claroty xDome.
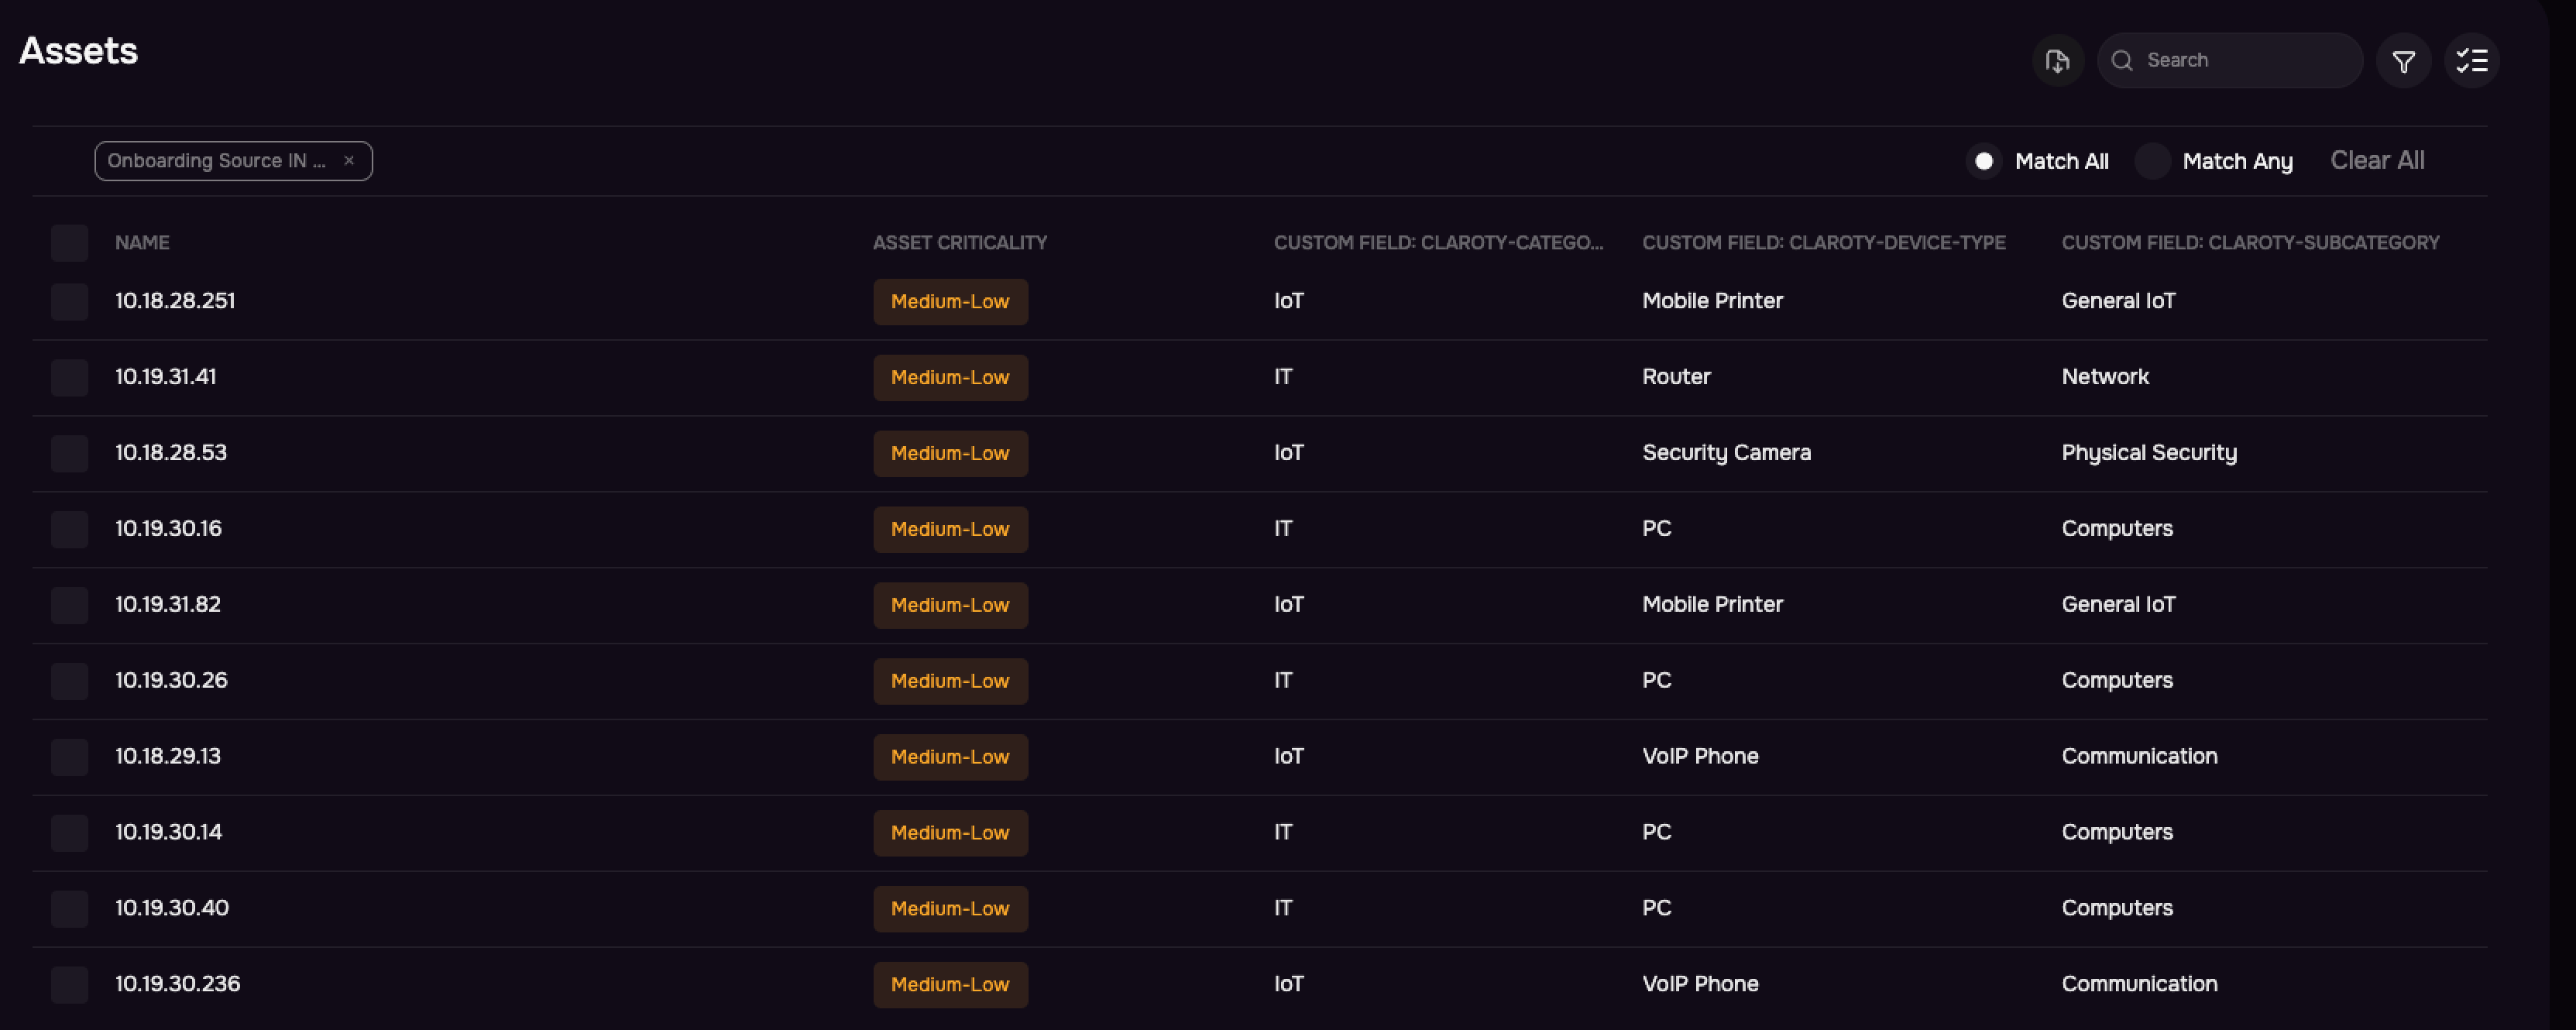
Notes
The system imports only those tags from Claroty xDome for which the corresponding custom fields are present in SAFE.
On every subsequent scan, the system automatically updates the custom field values.