1. Introduction
SAFE allows users to onboard and assess AWS accounts. SAFE admins can configure the AWS integration from SAFE Hooks.
SAFE scans the configured and confirmed AWS accounts and automatically onboard discovered assets under the "Cloud-AWS" vertical.
SAFE admins can trigger an on-demand assessment of the onboarded accounts. They can also set Global Auto Scan Frequency for AWS accounts.
2. Add AWS Accounts
SAFE allows users to add "Individual Account" and "Member Account."

2.1. Add Individual Account
You can onboard an Individual AWS Account in SAFE via the Role method.
SAFE Admin can add an AWS account by following the below step-by-step instructions:
- Navigate to SAFE Hooks.
- Click the Configure button available on the AWS card.
- Click the Add Account button.
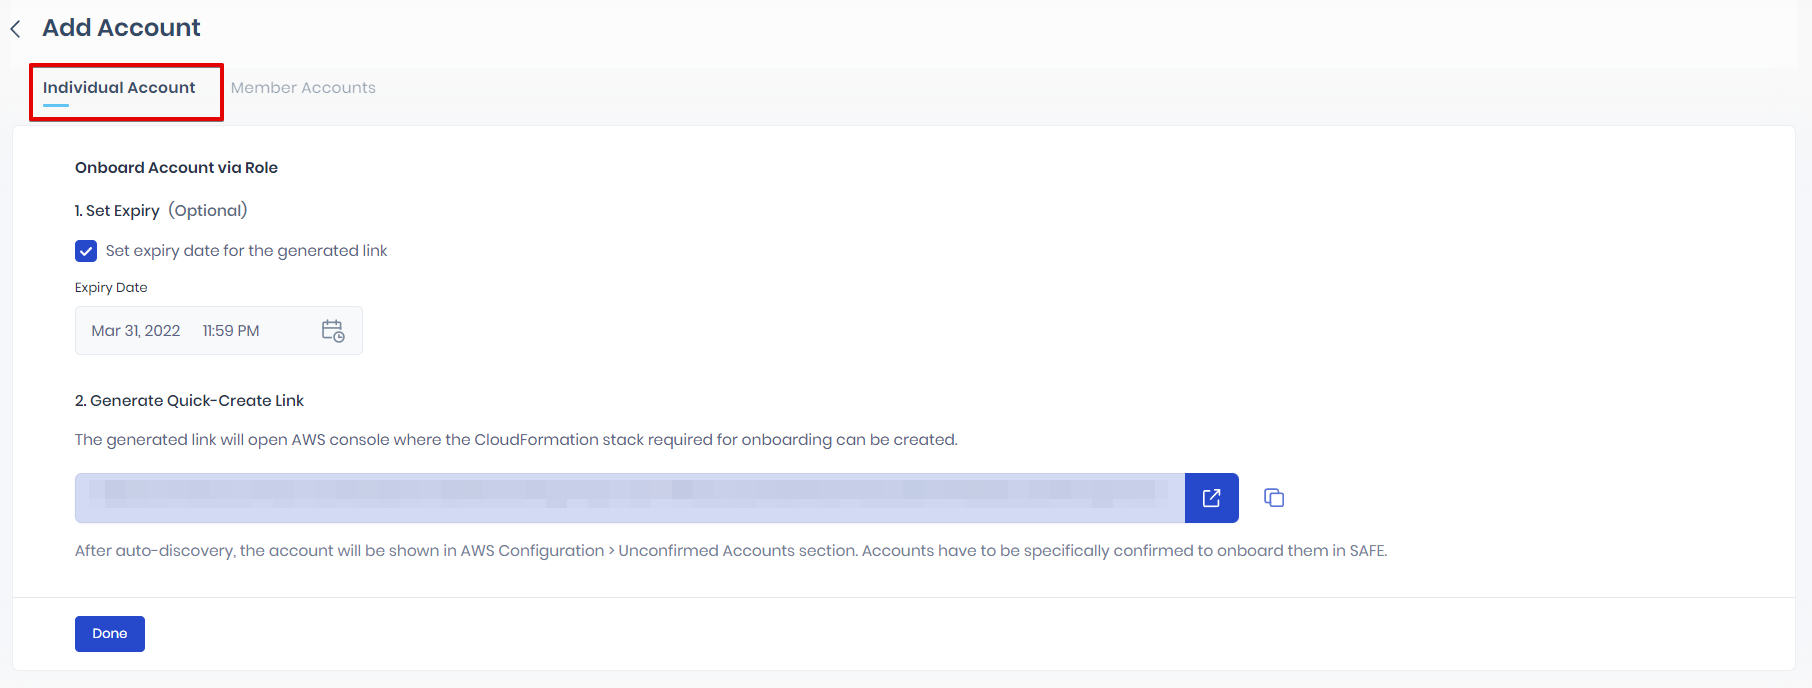
- (Optional) If required, set the expiry date for the link as follows:
- Mark the checkbox to Set the expiry date for the generated link.
- Enter or select the expiry date from the calendar.
- Click the Generate button.
- The system generates a CloudFormation stack link. Clicking the redirect icon available for the link will open the AWS console. You can also copy and paste the link into a browser. The link redirects you to the AWS console page.
You can view the Cloudformation template here. - If asked by the system, please log in to your AWS account.
- The system displays a pre-filled Quick create stack page.
- (Optional) If necessary, add the Permission Boundary ARN. SAFE supports adding the Permission Boundary ARN to allow attaching the permission boundary to the IAM role (that is created as part of the stack).
- Mark the checkbox to acknowledge that AWS CloudFormation might create IAM resources with custom names.NoteThe CloudFormation template creates an IAM role and assigns read-only privileges to it. This access privilege is then used by SAFE during the automated/on-demand assessment of all supported services available under that cloud account.
- Click the Create stack button. The system might take a few minutes to create the stack, usually between 3 to 5 minutes.
.png)
- SAFE auto-discovers your AWS account and displays it under AWS Configuration > Unconfirmed Accounts.Important
- If your organization has set up multiple AWS accounts which are managed centrally under an AWS organization, then you can use the option to add Member accounts setup in SAFE. Refer to Add AWS member account.
- You need to confirm the added unconfirmed accounts to complete the onboarding process
2.2. Add AWS Member Accounts
To add AWS Member accounts:
Section 1: Steps to be performed on SAFE UI
- Navigate to SAFE Hooks.
- Click the Configure button available on the AWS card.
- Click the Add Account button.
.png)
- Click the Member Account tab.
- (Optional) If necessary, set the expiry by marking the checkbox and selecting a date of expiry.
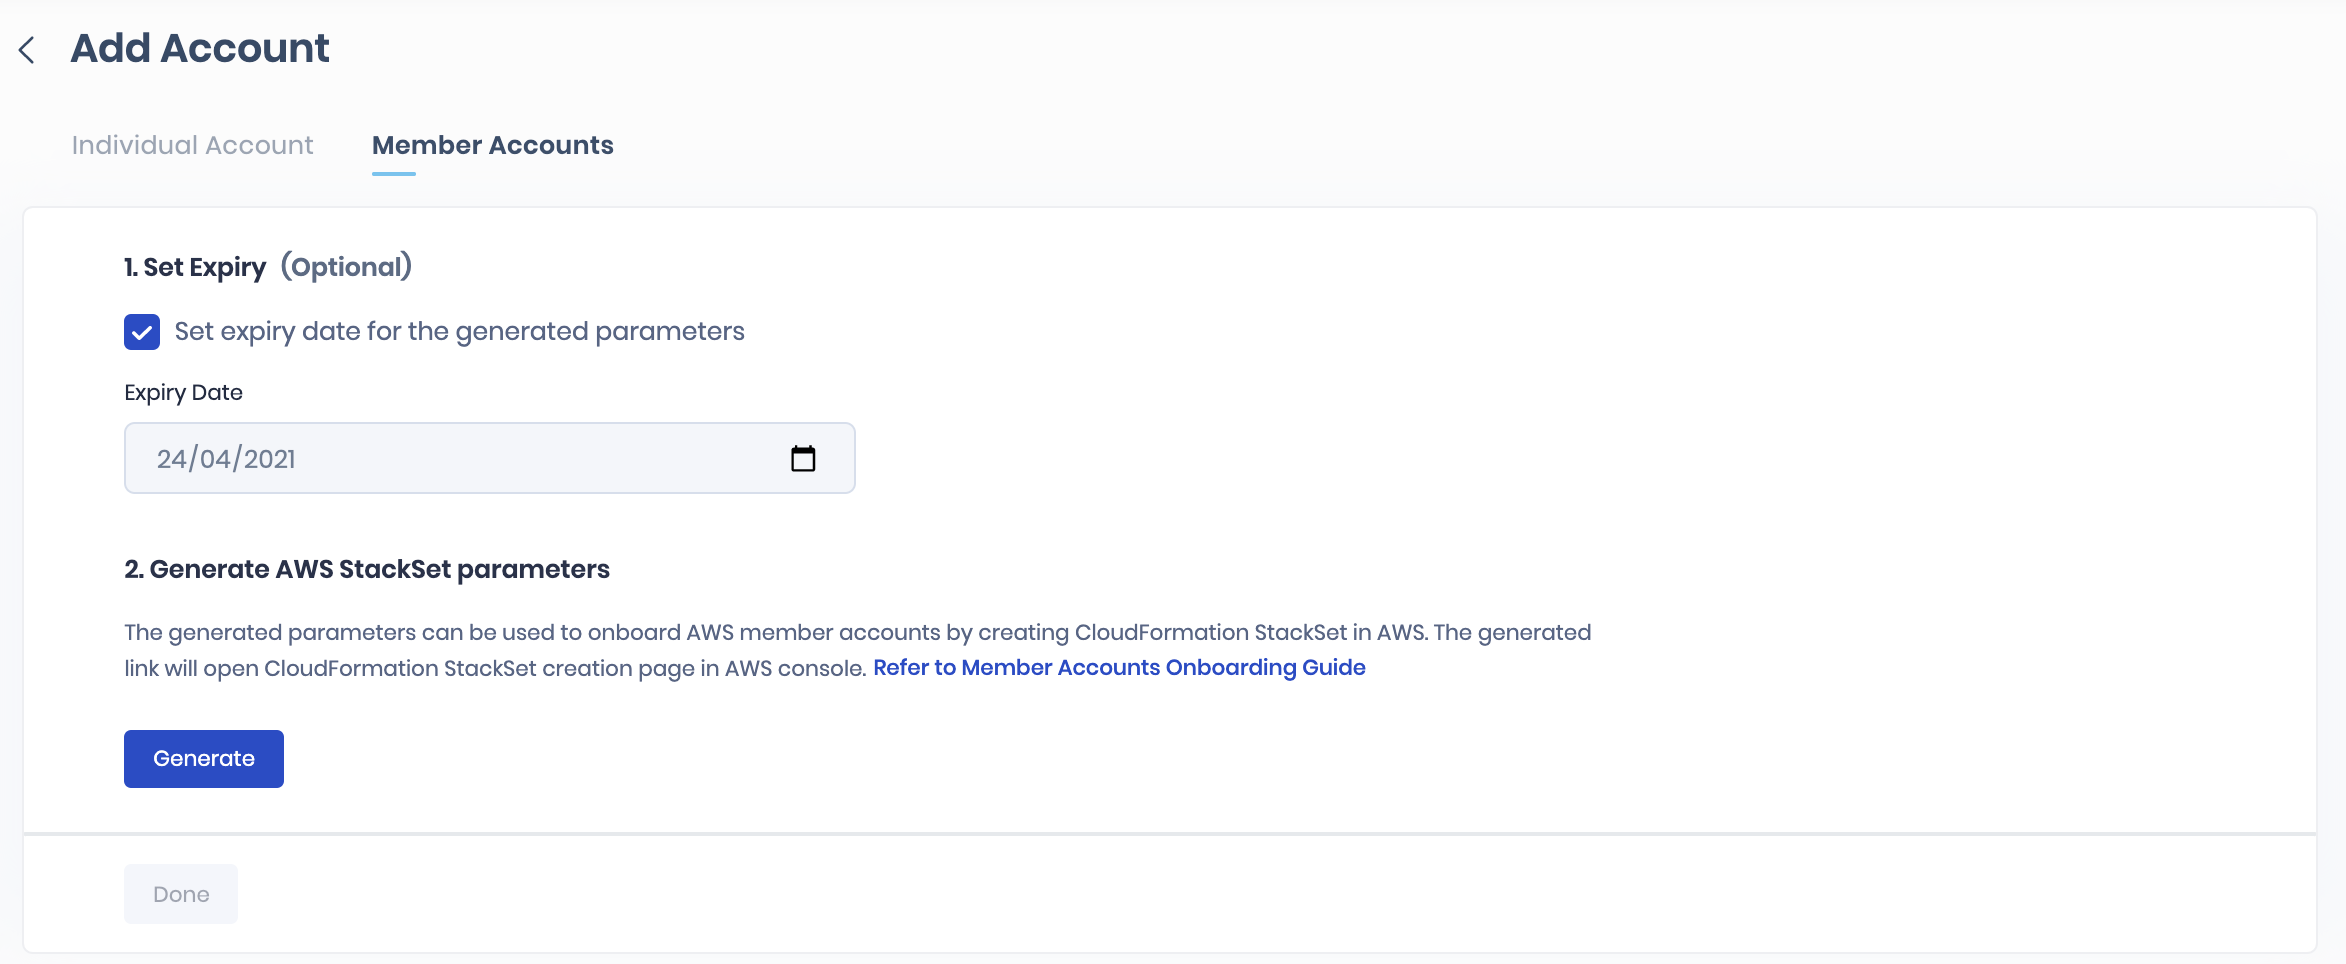
- Click the Generate button to generate the Generate AWS StackSet parameters. The system automatically generates the AWS onboarding link.
- Click the redirect icon available for the generated link. The system will redirect you to the AWS console. You can also copy and paste the link into a browser.
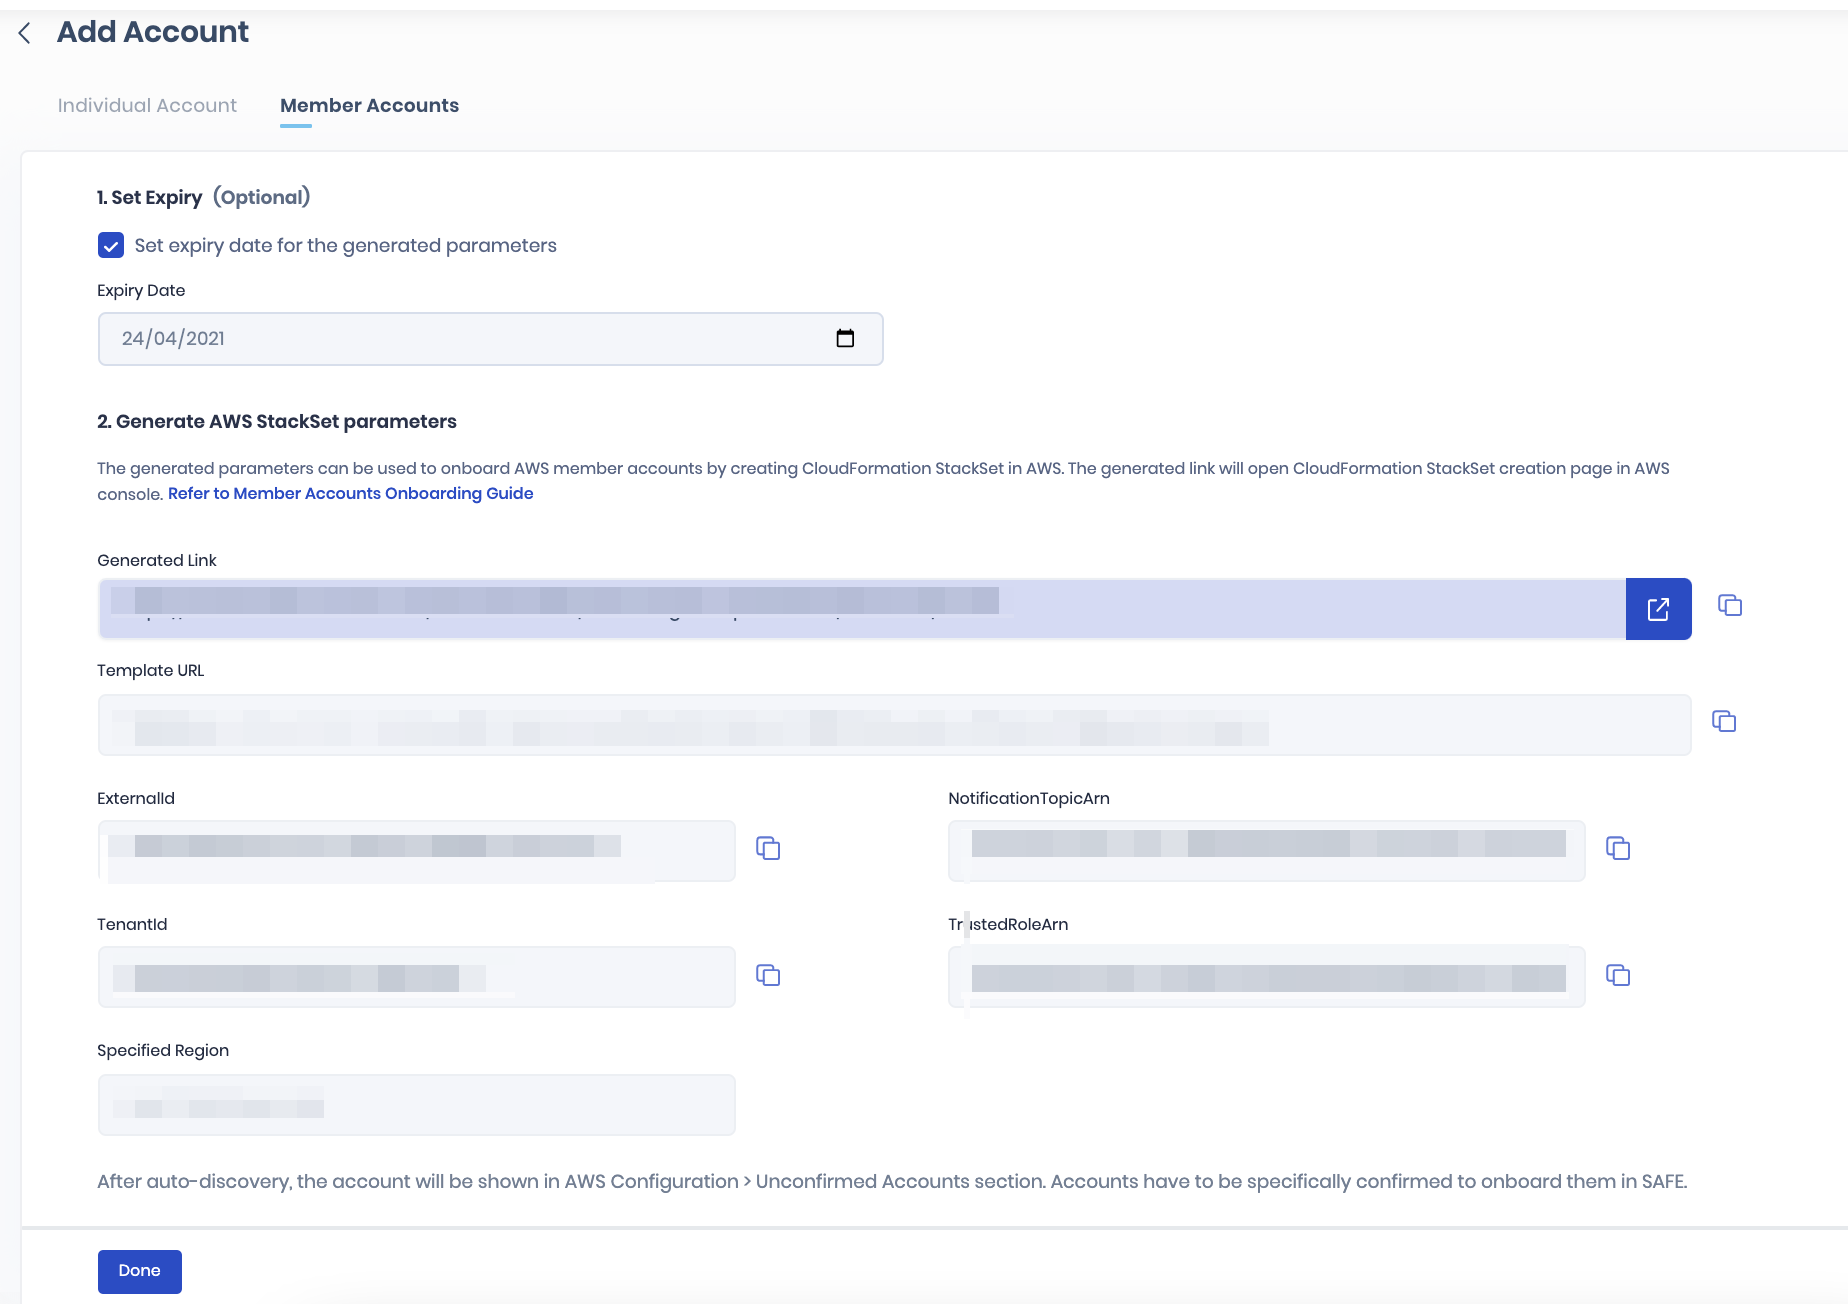
Section 2: Steps to be performed on AWS Console
- On the AWS console, a page with the title "Choose a template" will open up.
- On the Choose a template page.
- In the Prerequisite - Prepare template section, select the option Template is Ready.
- In the Specify template section, under the Template source, select the Amazon S3 URL.
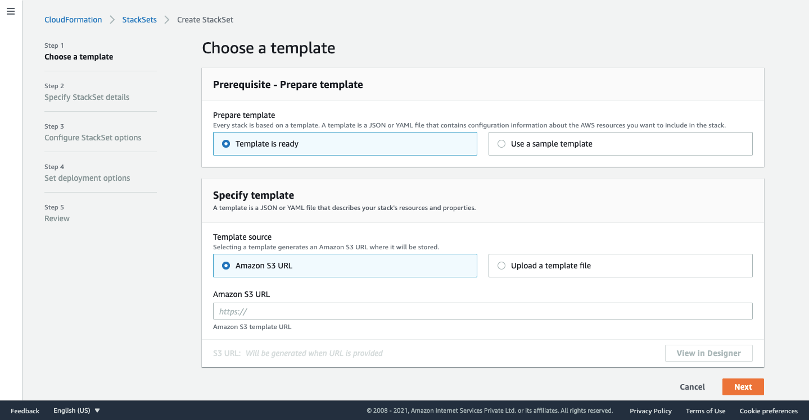
- Copy the Template URL from SAFE and paste it into the Amazon S3 URL field.
- Click Next.
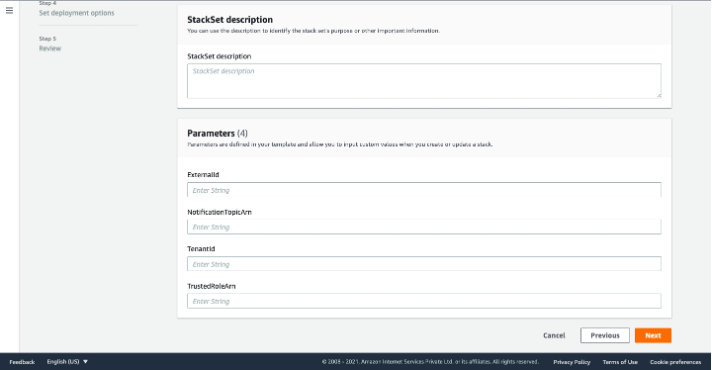
- In Specify StackSet details:
- Specify an appropriate StackSet name and relevant StackSet description in the respective fields.
- In Parameters:
- Copy the ExternalID from SAFE and paste it into the respective field.
- Copy the NotificationTopicArn from SAFE and paste it into the respective field.
- Copy the TenantID from SAFE and paste it into the respective field.
- Copy the TrustedRoleArn from SAFE and paste it into the respective field.
- Click Next.
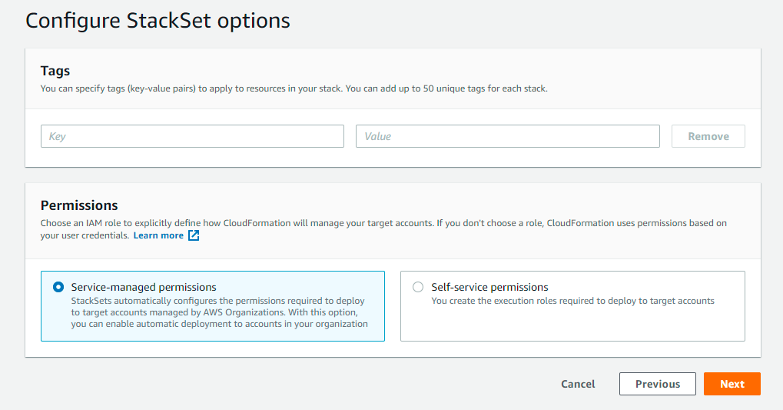
- In Configure StackSet section:
- Configure tags, if needed, in Tags.
- In Permissions - Choose any one of the 2 types of permissions shown -
- (RECOMMENDED) Service-managed permissions - With these permissions, you can deploy stack instances to accounts managed by AWS Organizations in specific Regions. You don't need to create the necessary IAM roles; StackSets will create the IAM roles on your behalf. If any new account is added to the Management account in the future, it will get auto-discovered on SAFE, provided Automatic deployment is Enabled in the Set Deployment Target Section.
- Self-Managed Permissions - You can deploy stack instances to specific AWS accounts in specific Regions with these permissions. You must first create the necessary IAM roles to establish a trusted relationship between the account you are administering the StackSet from and the account you are deploying stack instances too.Note: If the customer wants "per-account" control (e.g., delete the stack in a single account after deployment) on the stack set, they should choose Self-Managed Permissions. Users can only perform actions (e.g., delete) at an OU level with the Service-managed permissions. Hence, Self-managed permissions offer more granular control, even though they will require higher maintenance effort than Service managed permissions.
- Click Next.
- In the Set deployment section:
- In Deployment Targets:
- Choose one of the 2 options shown:
- If you want to deploy stack to all accounts under the Management Account, choose to Deploy to the organization.
- If you want to onboard only a subset of your OUs, choose to Deploy to organizational units (OUs).
- Choose the appropriate options for Automatic deployment and Account removal behavior.
- Choose one of the 2 options shown:
- In Specify regions, select the region as shown in Specified Regions in SAFE.
- In Deployment options, specify values for Maximum concurrent accounts and Failure tolerance, if needed. Note: If Failure tolerance is a small value, stack creation failure in that many accounts will cause the entire StackSets deployment to stop.
- Click Next.
- In Deployment Targets:
- Review the options and deploy the stack sets by clicking Submit.

- Once deployed, StackSets can be viewed from AWS Console > CloudFormation > StackSets.
- To view individual stacks, click on the StackSet Name > Stack Instances.
3. Manage AWS Accounts
All the onboarded AWS accounts will be available on the AWS Account Management Page.
- Unconfirmed Accounts: Upon successful configuration of the AWS account, the system auto-discovers the AWS account and displays it under Unconfirmed accounts.
- Confirmed Accounts: Users need to confirm all the added AWS accounts available under Unconfirmed Accounts to scan it. Once the user confirms the account, it will be displayed under the Confirmed tab.
3.1. View AWS Account
To view the onboarded AWS account:
- Navigate to Integrations > AWS.
- Click the configuration button available on the AWS card.
- The system displays a list of all the Confirmed accounts on the page.
- Click the Unconfirmed tab to view the list of Unconfirmed Accounts.
.png)
3.2. Confirm AWS Account
Upon onboarding, SAFE auto-discovers your AWS account and displays it under AWS Configuration > Unconfirmed Accounts. Users need to confirm the added Unconfirmed accounts to complete the onboarding process.
To confirm:
- Go to the Unconfirmed Accounts tab available on the AWS Account Management page.
- Click the Confirm button available in the Manage column.
.png)
3.3. Scan AWS Account
Users can scan the onboarded AWS account from the AWS configuration page.
To start the Scan:
- Navigate to Safe Hooks > AWS.
- Click the configuration button available on the AWS card.
- The system displays a list of all the Confirmed accounts on the page.
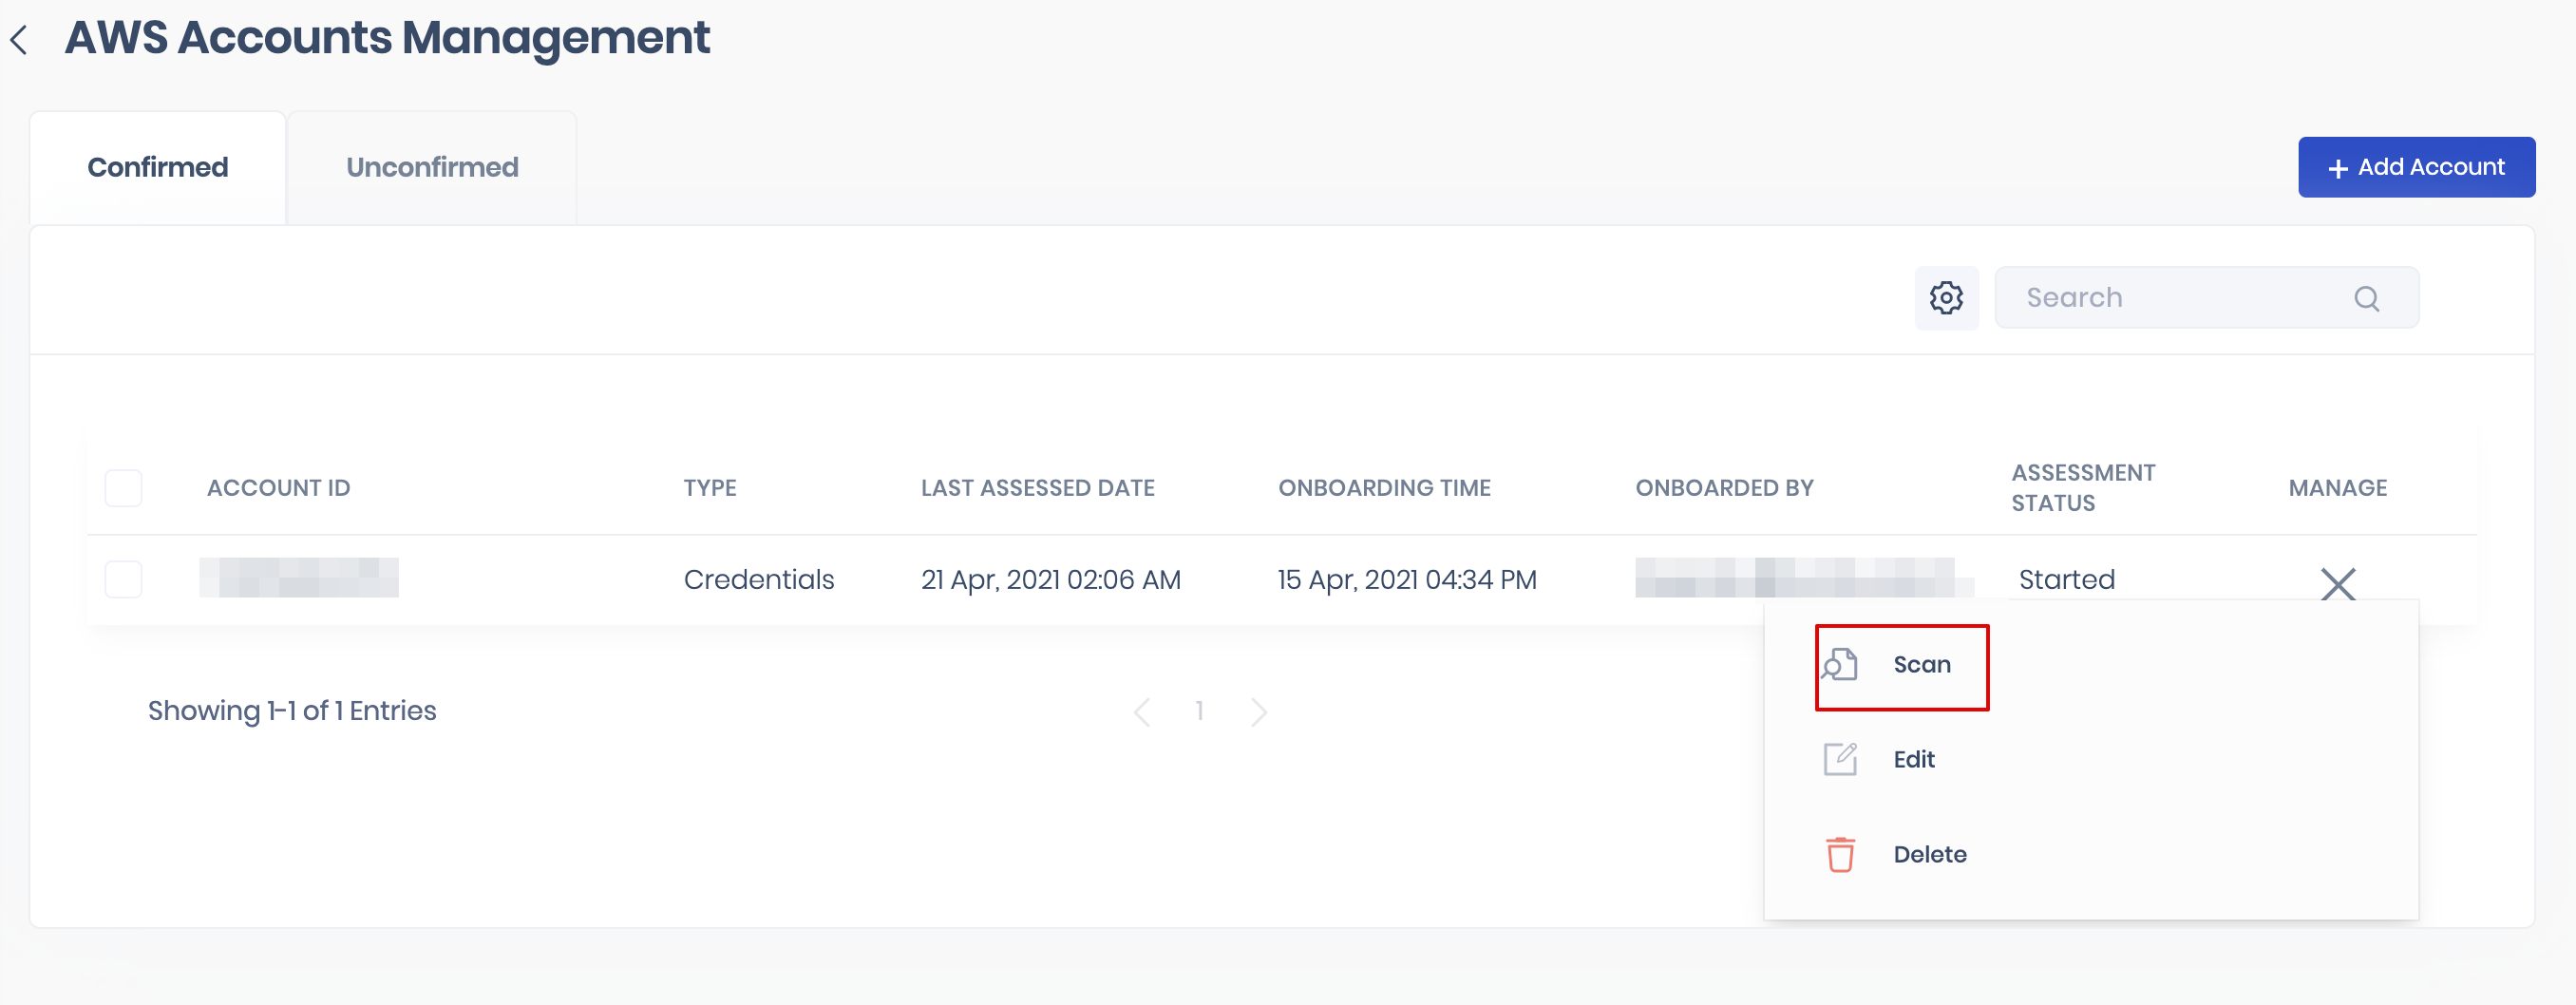
- Click the options menu available in the Manage column.
- Click the Scan button. The system notifies you that a scan has been started. The status of the scan will be displayed under the Assessment Status column.
3.4. Scan AWS Account in bulk
Users can start the scan of multiple AWS accounts from the AWS configuration page.
To start the Scan in bulk:
- Navigate to Safe Hooks > AWS.
- Click the configuration button available on the AWS card.
- The system displays a list of all the Confirmed accounts on the page.
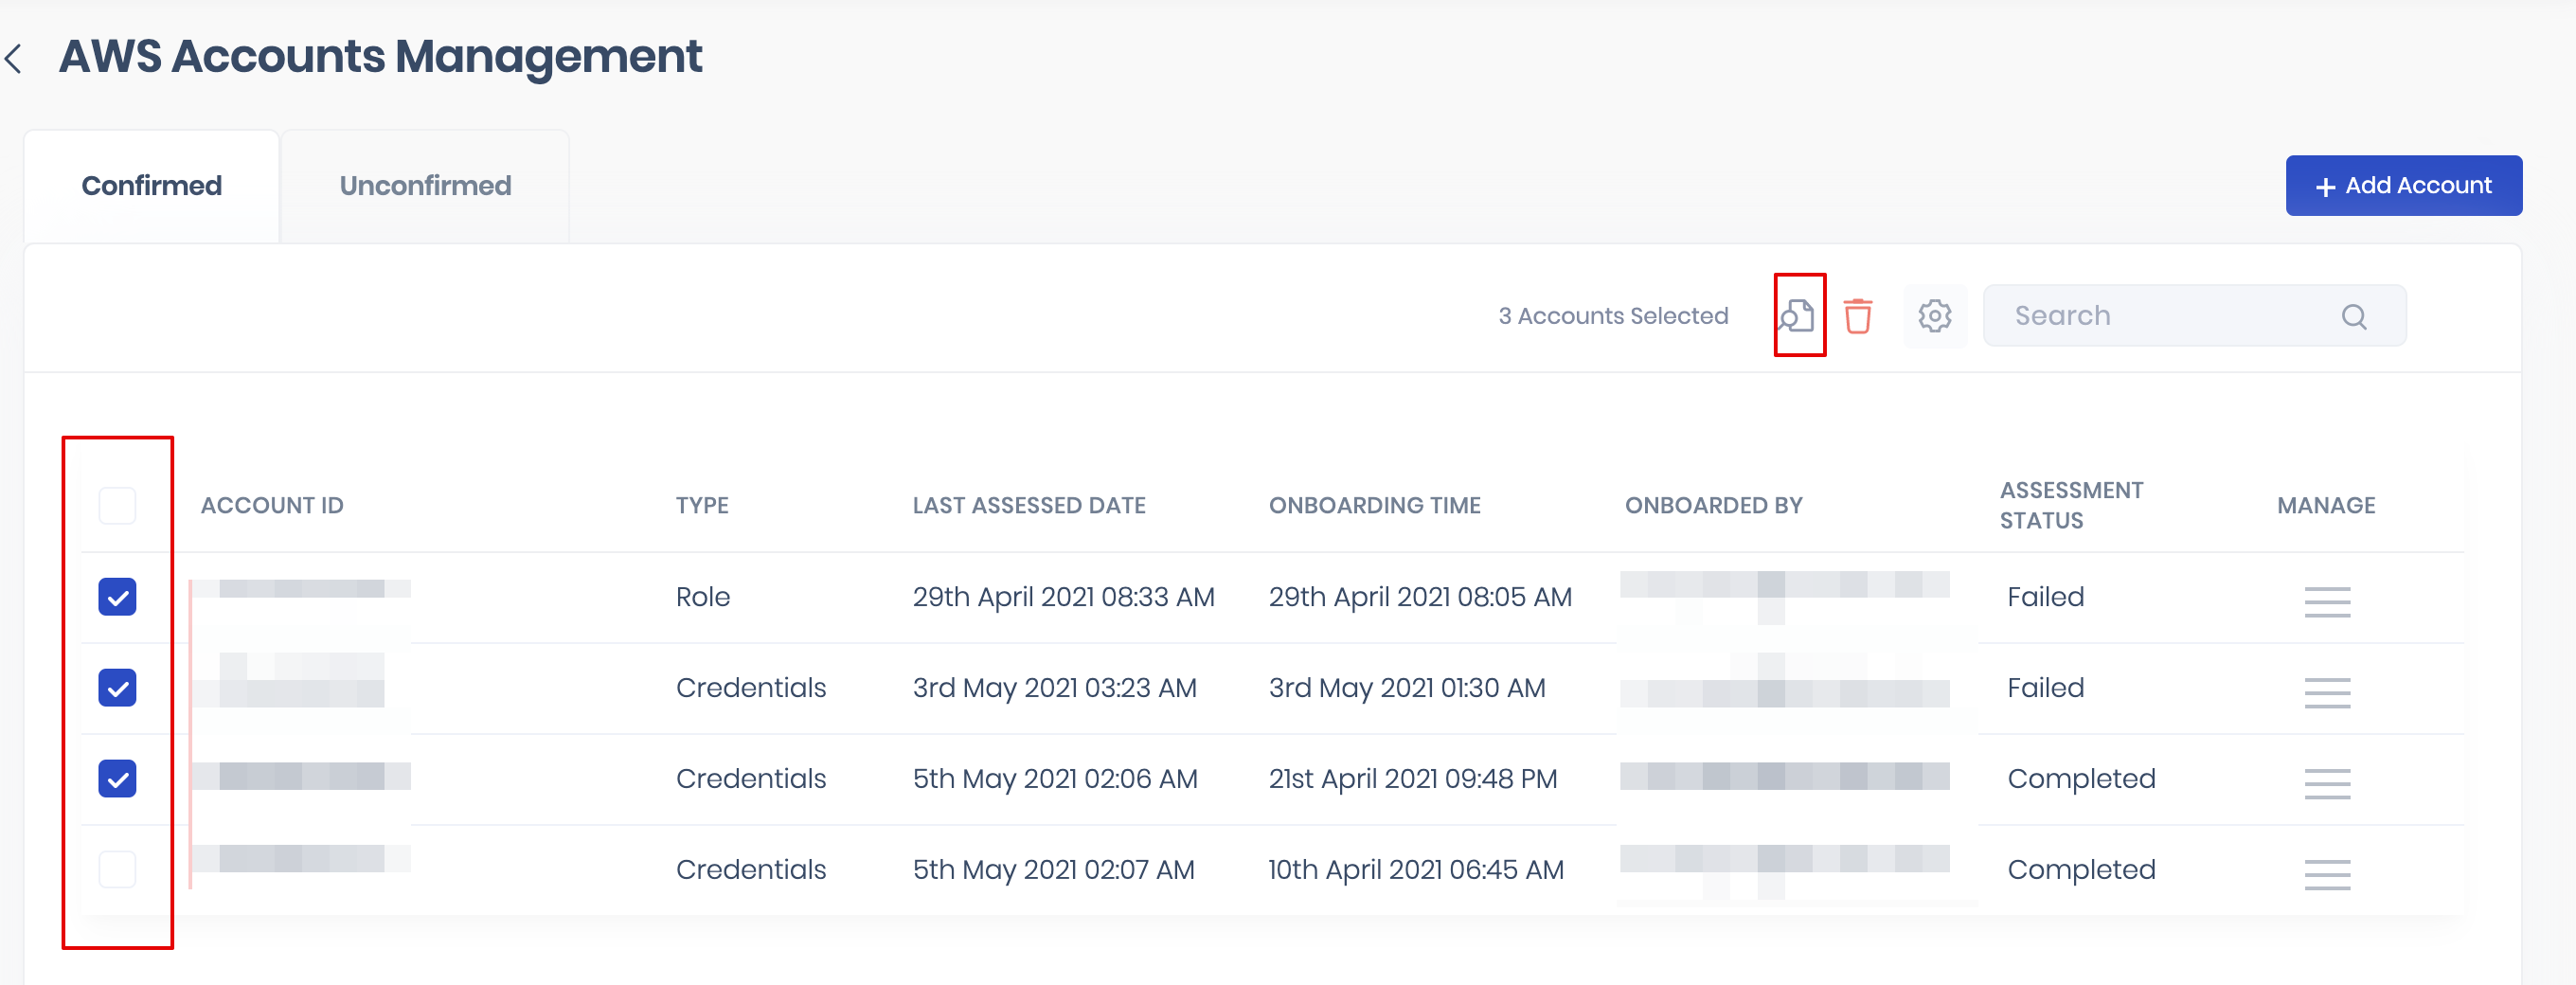
- Select the AWS accounts by marking the checkboxes available against them.
- Click the Scan icon available at the top to start the scan.
3.5. View Assessment Status
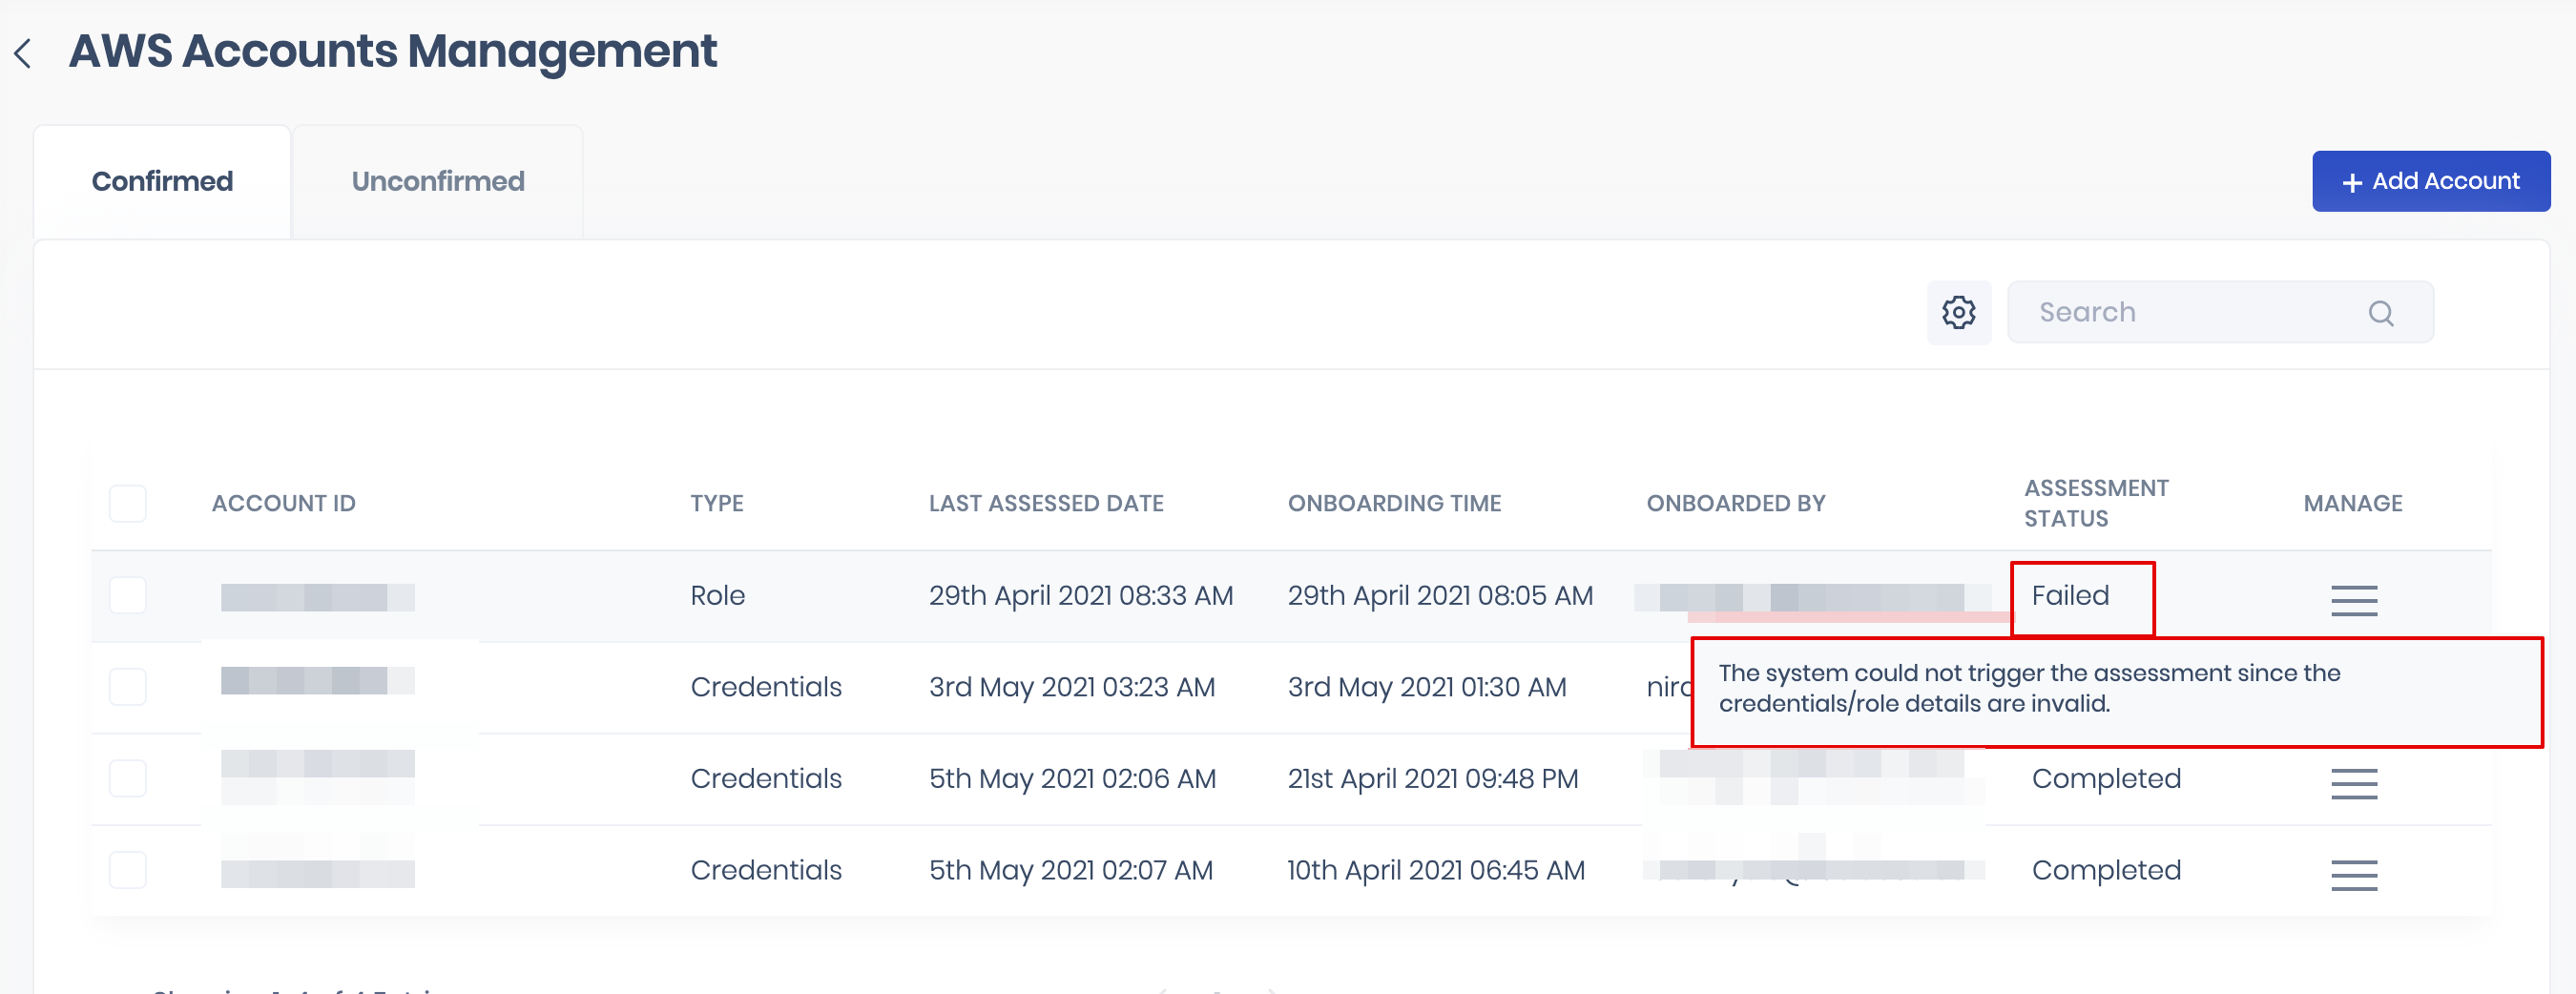
On hovering over the Assessment Status, the system displays more details about the assessment status. For example: If the Assessment Status is Failed, the system displays the reason for failure.
3.6. Delete AWS Account
To delete an AWS account:
- Navigate to Safe Hooks > AWS.
- Click the configuration button available on the AWS card.
- The system displays a list of all the Confirmed accounts on the page.
- Click the options menu available in the Manage column.
- Click the Delete button.
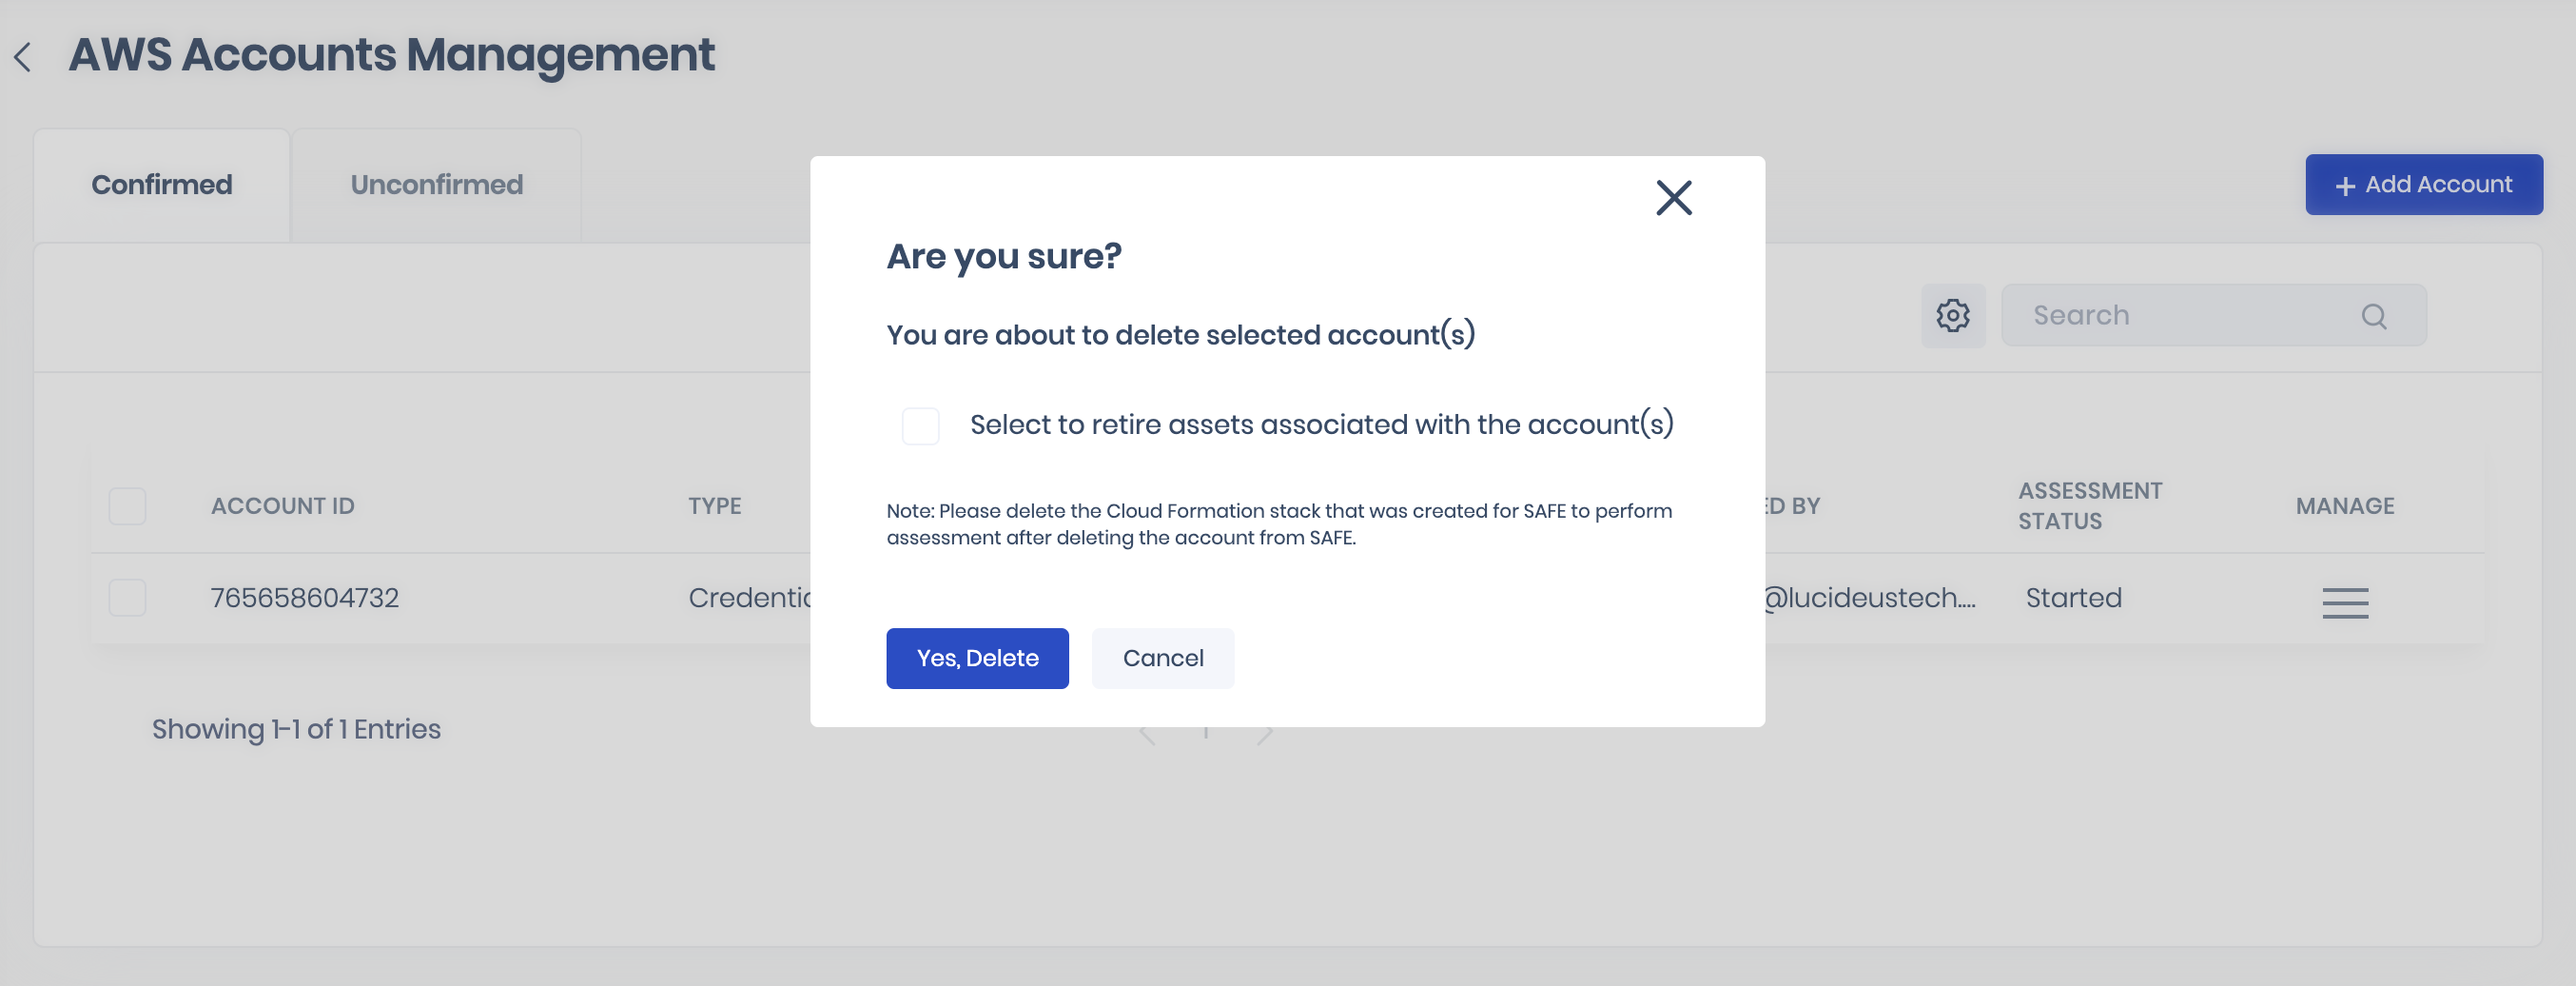
- On the confirmation screen, click the “Yes, Delete” button.
3.7. Delete AWS Accounts in bulk
To delete an AWS account in bulk:
- Navigate to Safe Hooks > AWS.
- Click the configuration button available on the AWS card.
- The system displays a list of all the Confirmed accounts on the page.
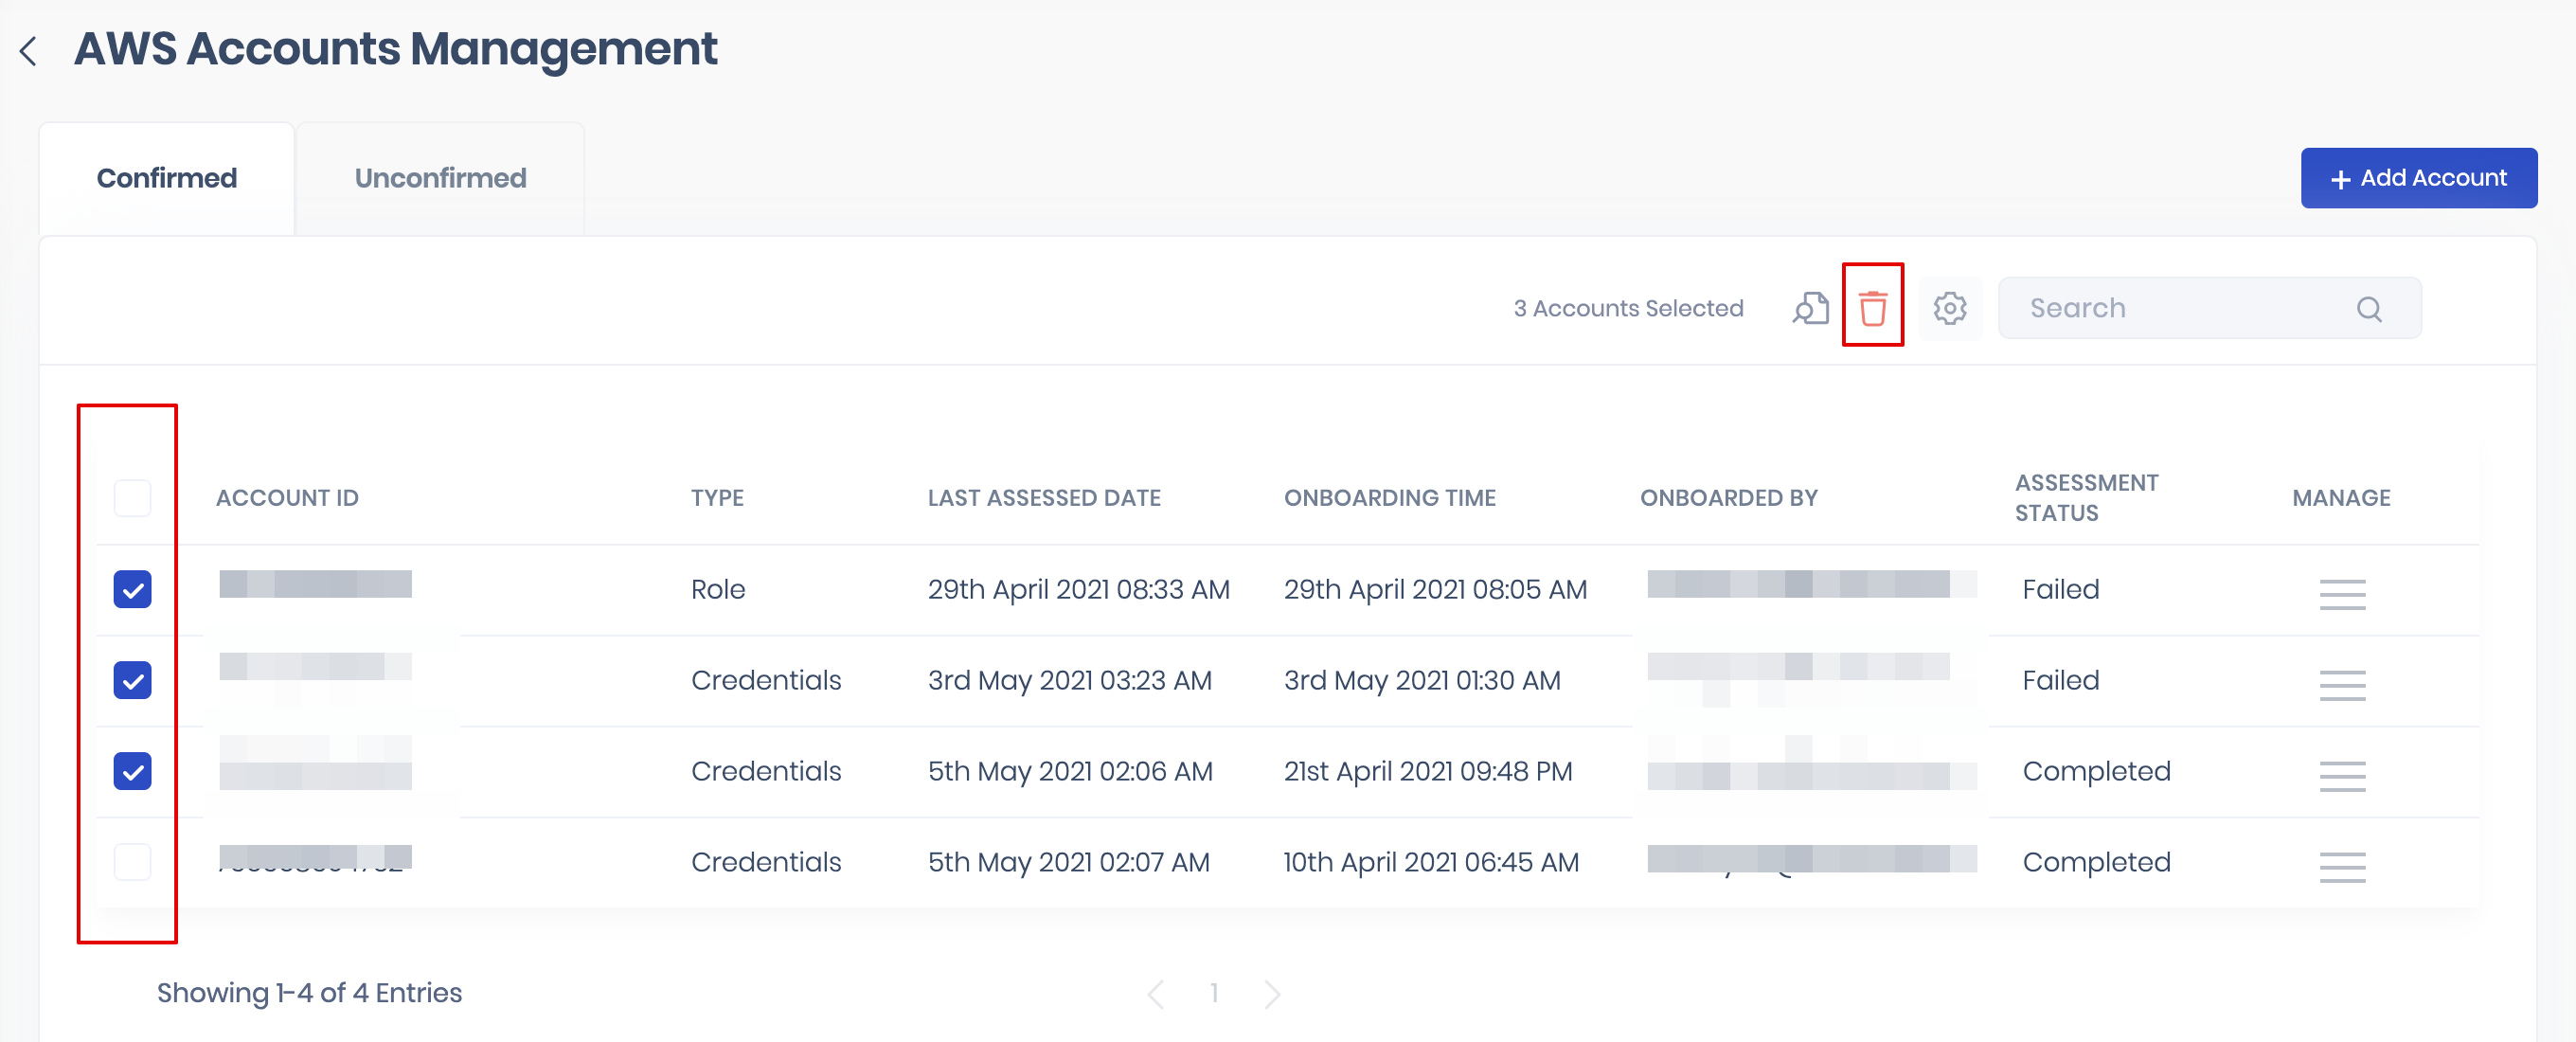
- Select the AWS accounts by marking the checkboxes available against them.
- Click the Delete icon available at the top.
- On the confirmation screen, click the “Yes, Delete” button.
4. Set Global Scan Frequency for onboarded AWS accounts
Users can set Global Scan Frequency (frequency for scanning the onboarded AWS account as a number of days).
To set the auto-sync frequency for onboarded AWS accounts:
- Navigate to Safe Hooks > AWS.
- Click the Configuration button available on the AWS card.
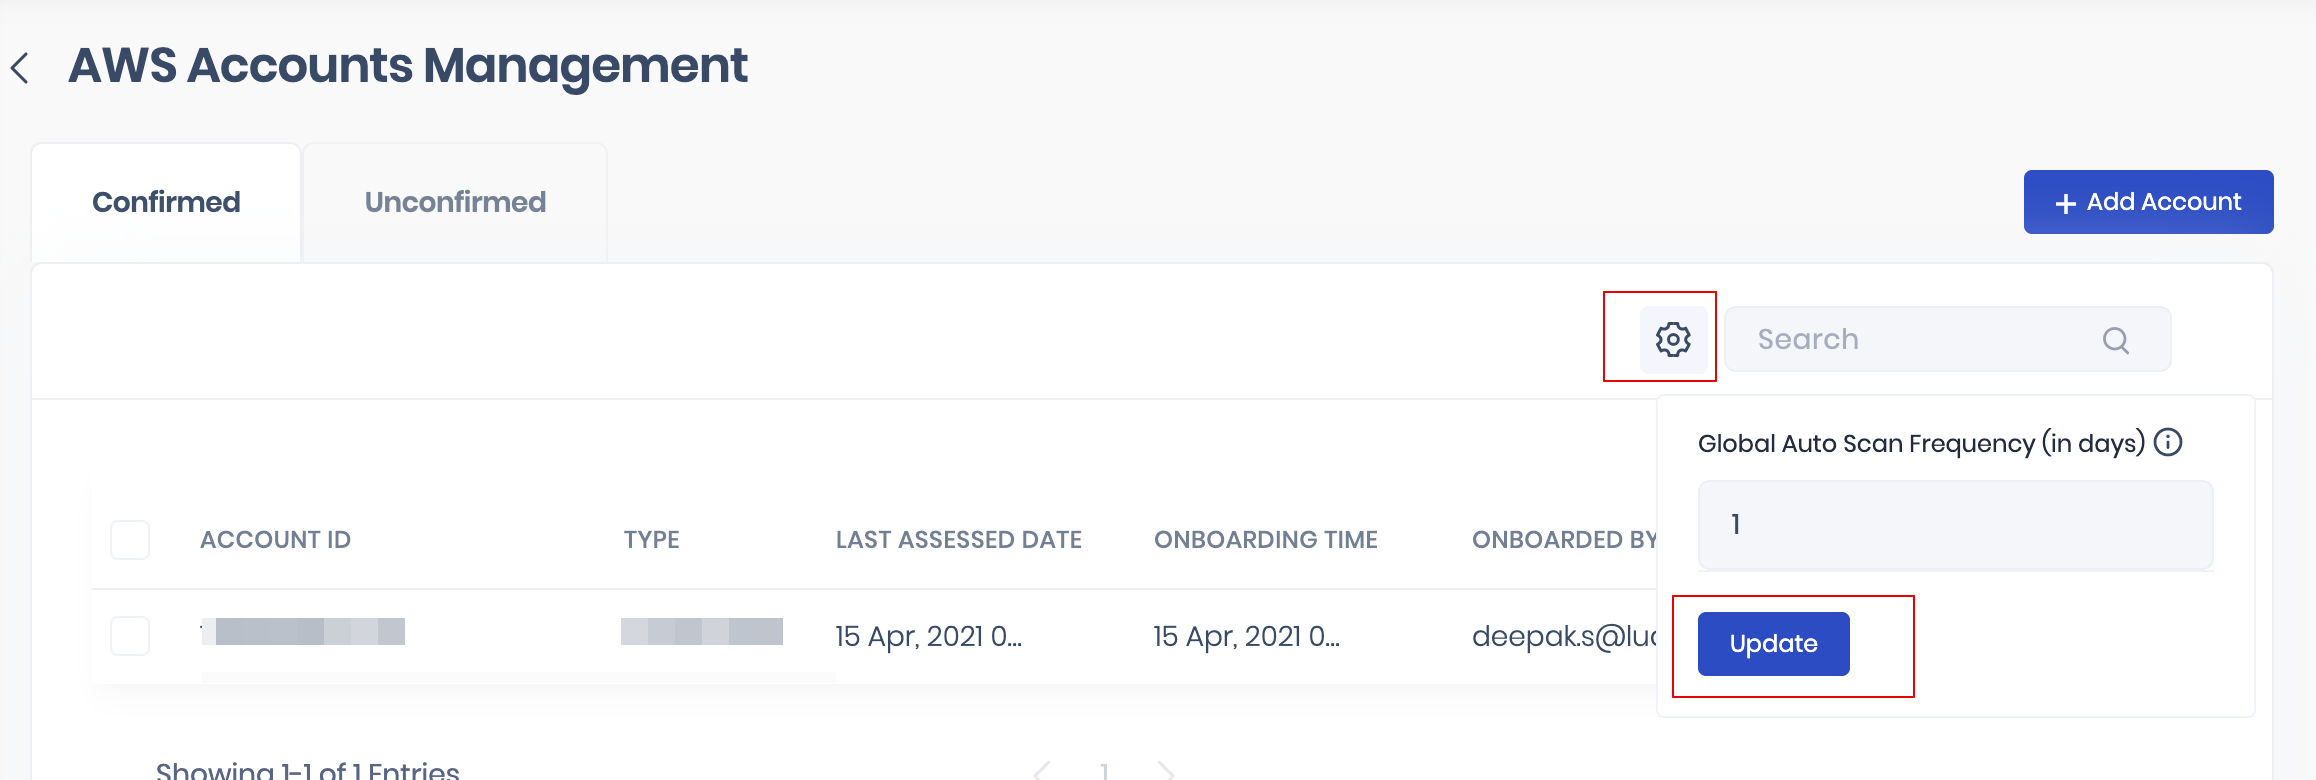
- On the AWS account management page, click the Settings icon.
- Enter the number of days in the Global Scan Frequency field.
- Click the Update button.
5. View assessment results of the onboarded AWS Accounts
SAFE scans the added AWS accounts and automatically onboards the assets under the "Cloud-AWS" vertical.
To view the assessment result of the onboarded AWS Accounts:
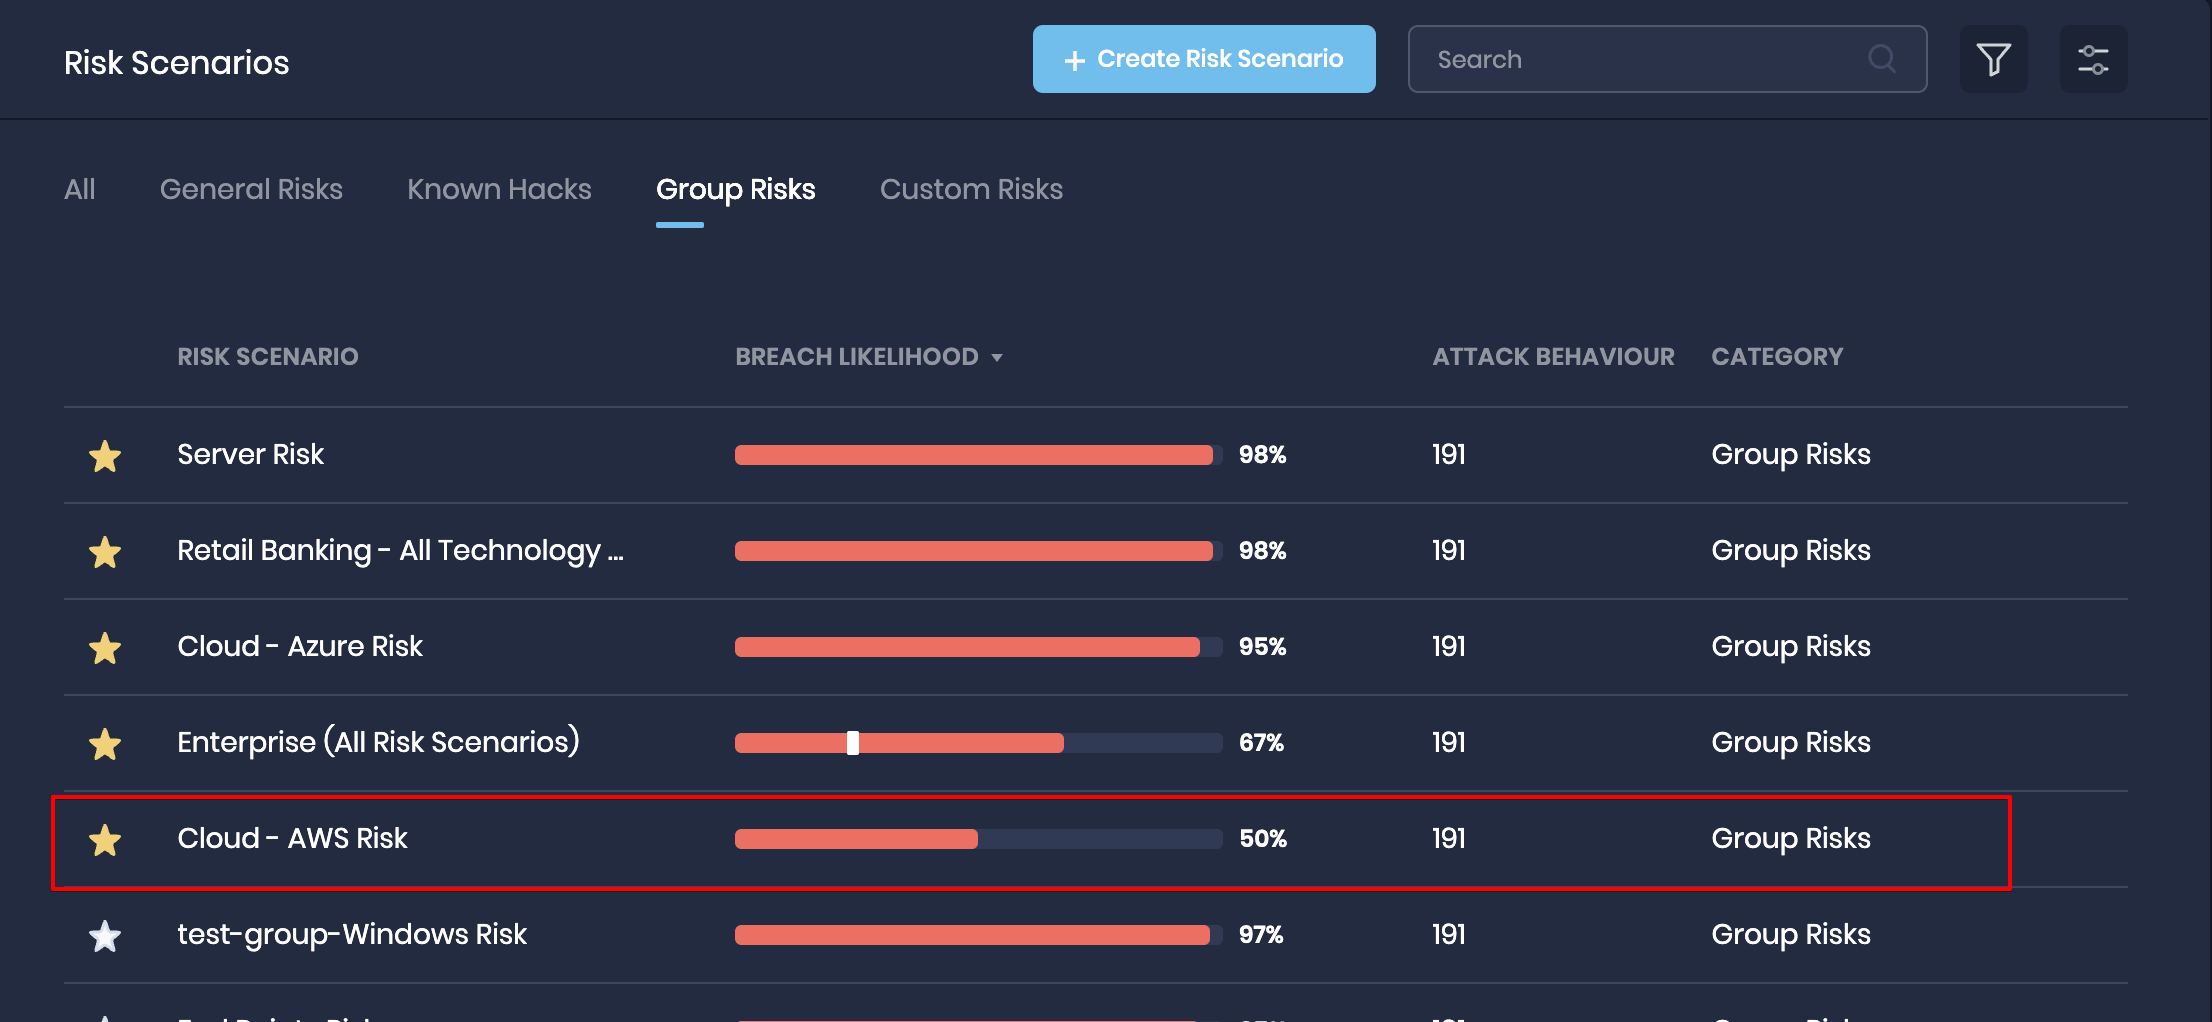
- Navigate to the Risk Scenario page and click the Group Risk tab.
- Click the Cloud AWS Risk from the list.
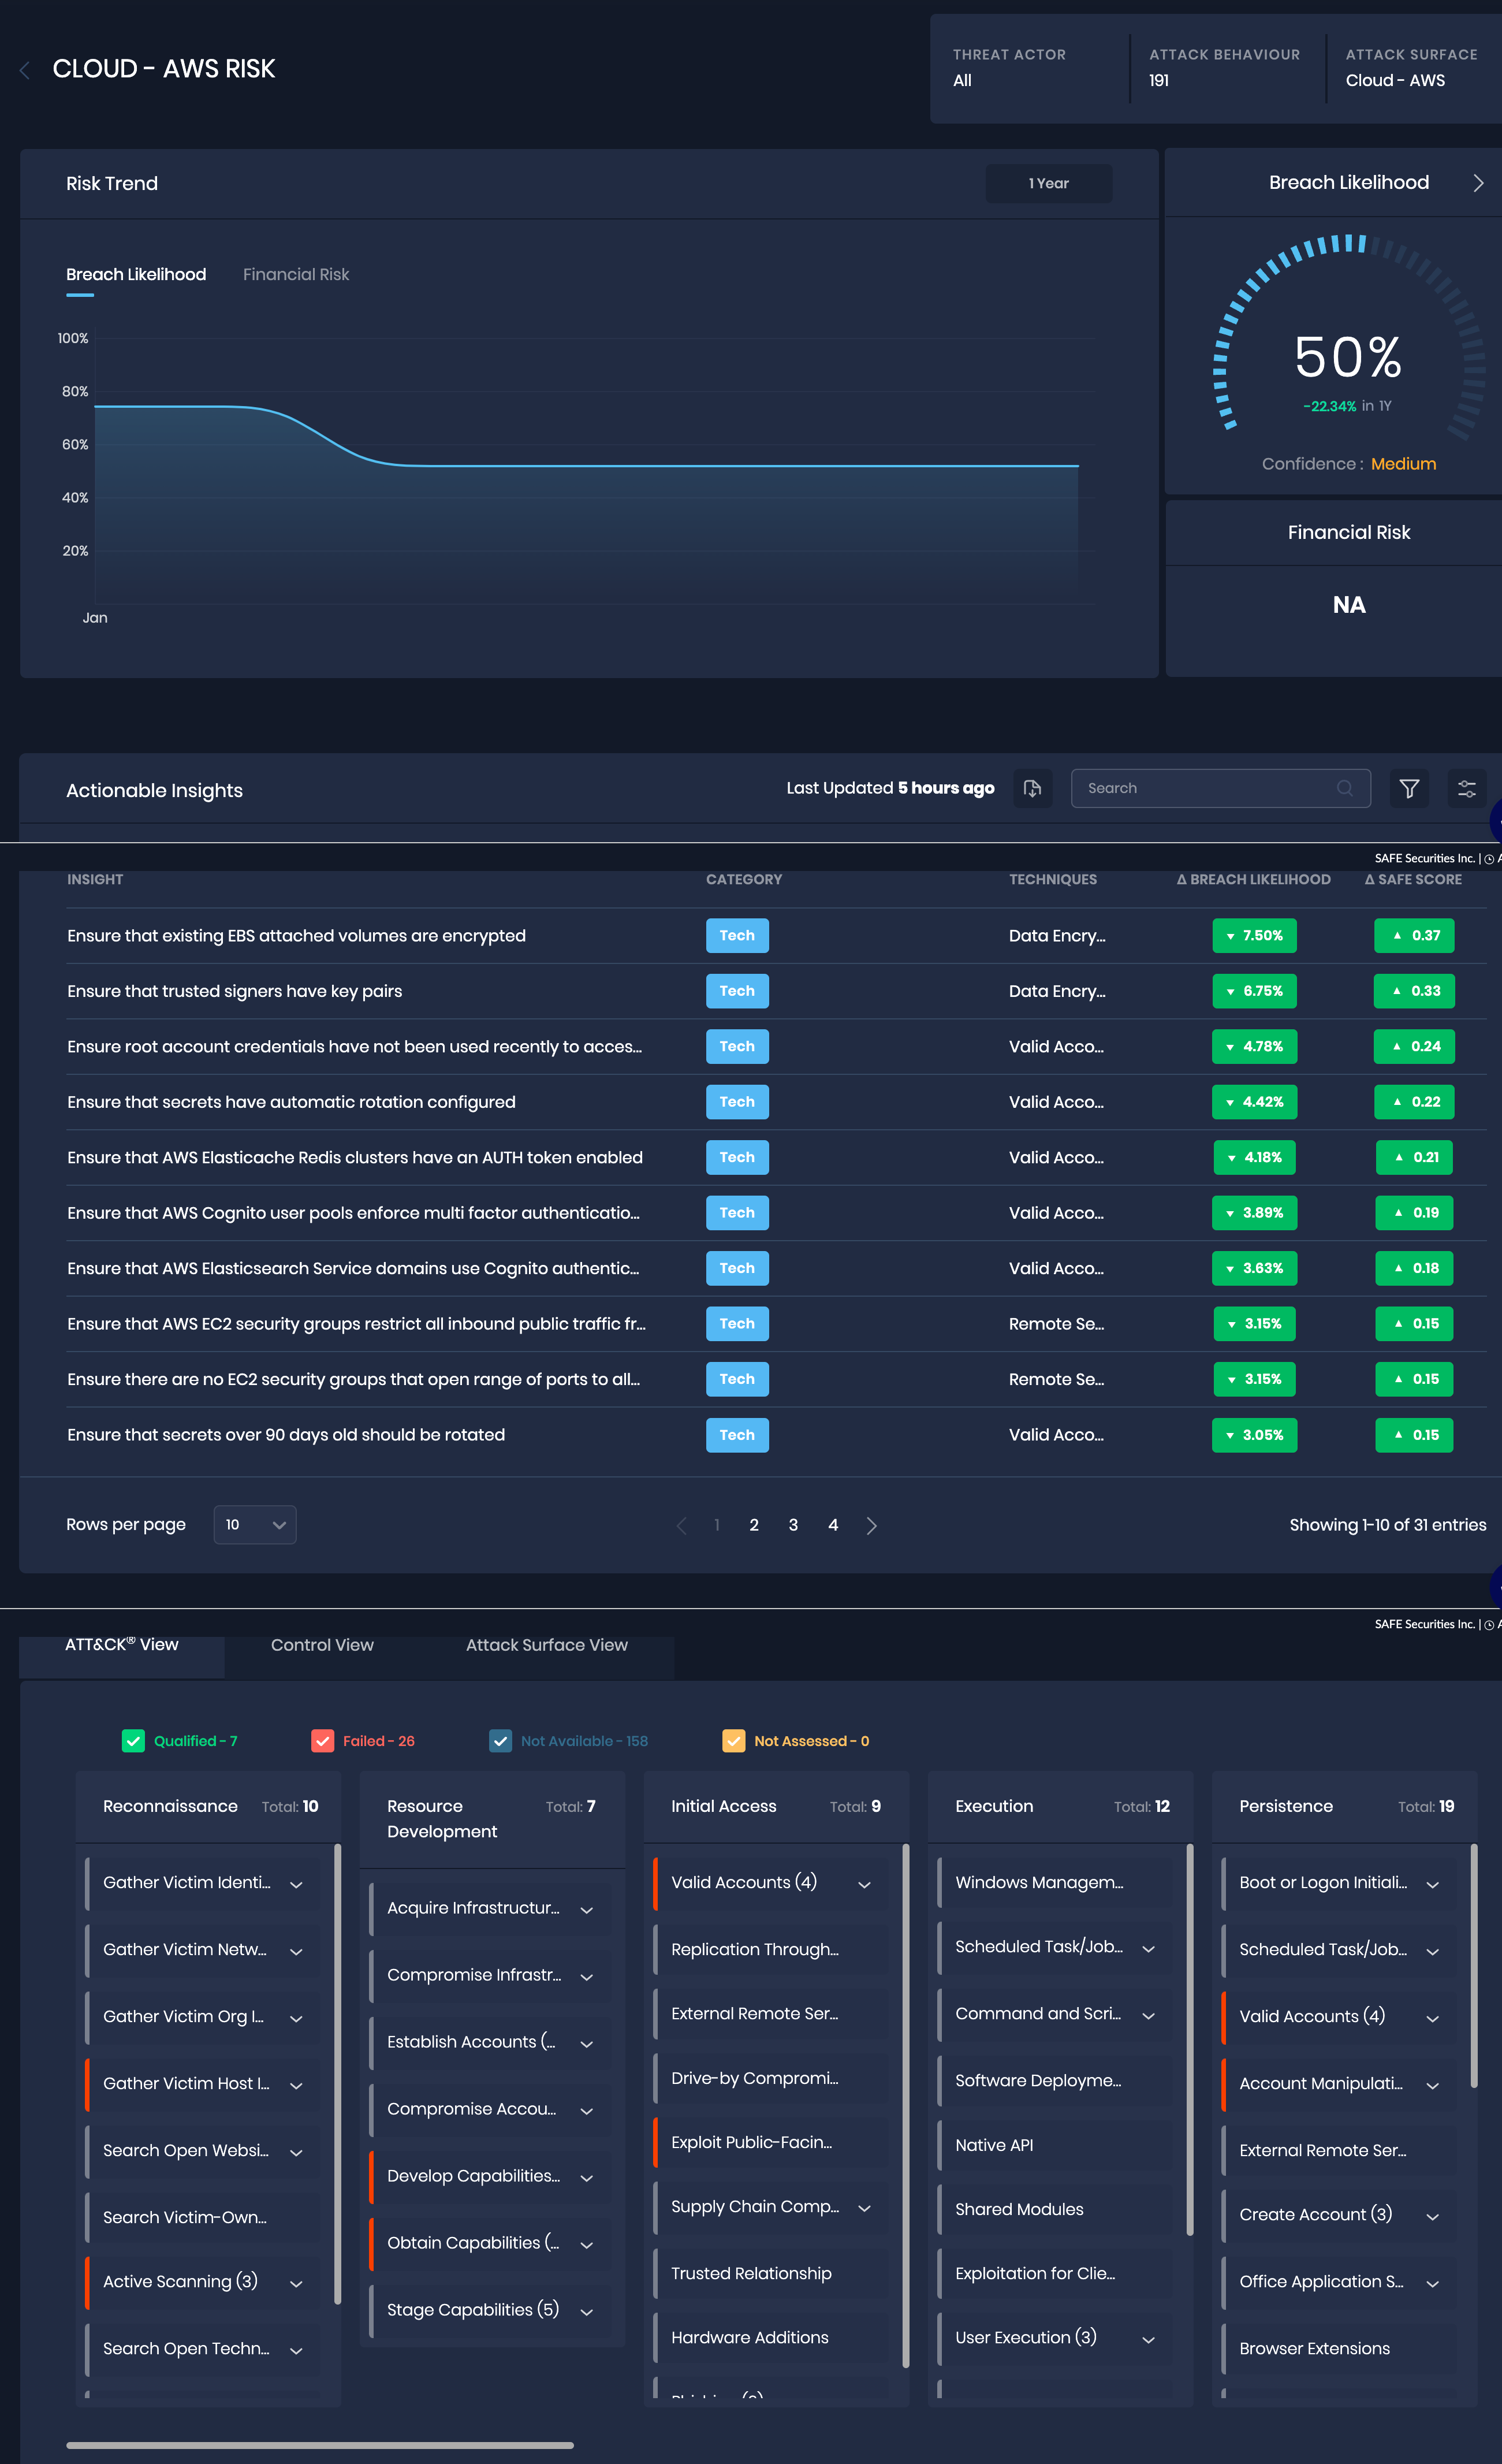
- The system opens the Cloud AWS Risk details page that includes the Risk Trend, Actionable Insights, and MITRE ATT&CK mapping.
6. FAQs
6.1. What happens when I delete an AWS account from UI, retire the linked assets, and then re-onboard that AWS account and assess it?
The assets that got retired will get unretired and start getting assessed, provided they exist in the account.
If an asset is deleted from SAFE and is found in the AWS account, it will get added as a new asset in SAFE.
6.2. If I have paused/stopped an EC2 instance, will SAFE still be able to assess it (given it's already onboarded on SAFE and the related account gets assessed regularly)?
Yes.
6.3. If I set the expiry for a stack-creation link as, say, 7th Apr 2021 in SAFE, from what time onward will the link become inactive?
It will become inactive from 8th Apr 2021 from 12:00 AM onward.
6.4. What will happen if I use the stack-creation link beyond its expiry date?
Stack creation will get initiated and completed using that link. But that particular account will not show up in SAFE.
6.5. What if I try to create another stack in an account that already has one stack created?
You can deploy multiple stacks in the same account as long as they correspond to different SAFE instances. If one stack already corresponds to one SAFE instance and you try to create another stack for that instance, the stack creation will fail. To resolve this, you need first to delete the previous stack. Please note that on deleting the previous stack, the account will not be able to get assessed using that stack (since it has been deleted), and hence the assessment status of that account in SAFE will become Failed unless you deploy the second stack before the next Scan.
6.6. If a scan of an AWS account is in progress and I click on Scan again for that account, what will happen?
The Scan in progress will continue without interruption, and a new Scan (to scan the account after the first Scan ends) will not be queued.
6.7. If the scan of an AWS account is in progress and I delete the account from SAFE, what will happen?
The ongoing Scan will continue in the background, but the scan results will not be updated in SAFE. Furthermore, if the assets linked to the account were retired while deleting the AWS account, those assets will not get unretired.
6.8. Why do I see the Add Account button as disabled even though I am logged in as an Admin?
Please get in touch with the SAFE Support team to enable the Add Account button.
6.9. What happens if I delete the stack from my AWS account when the Scan is ongoing?
The status of the Scan gets updated to "Failed" on SAFE UI for that account.
