About this document
This guide outlines the end-to-end process of configuring the ServiceNow Asset Connector within SAFE. The connector helps you pull asset metadata from ServiceNow's CMDB and sync it with SAFE to enrich your asset context.
Introduction
SAFE integrates with ServiceNow by ingesting metadata for matching scoped assets from the cmdb_ci table and related CMDB tables.
Supported ServiceNow Release Version - Australia
Notes
The number of signals created may differ from the assets synced, as this connector only updates metadata and does not onboard them — hence, some signals may not appear as asset in SAFE.
Prerequisites
SAFE Admin Access
ServiceNow Admin Access
Required User Inputs:
Encoded Query
Fields to Sync
SAFE API URL, API Username, and Password (Refer to Accessing SAFE APIs)
Required Scope:
Organization - Read
Member - Read
Get the SAFE Asset Connector application Store
Open your ServiceNow instance and log in with an account that has admin privileges.
In the application navigator, type "Store" and click on ServiceNow Store to open the store page.
In the search bar of the ServiceNow Store, type "SAFE Asset Connector" and press Enter.
Find the SAFE Asset Connector in the search results, then click it to view the application details.
.png "image(269).png")
Click "Get" or "Request":
If you have access to install the app directly, click the "Get" button.
If you need approval from your ServiceNow admin, click "Request" to submit a request.
Check for any prerequisites listed on the application page, including required roles or dependencies.
Follow the prompts to install the application into your instance.
After installation, go to the Application section in the ServiceNow instance and search for SAFE Asset Connector to ensure it's installed.
Choose Asset Matching Criteria
You can define custom criteria to match assets between ServiceNow and SAFE. This configuration ensures that metadata is associated with the correct assets in SAFE.
On the SAFE Asset Connector configuration page, the Asset Matching Criteria field allows you to define this logic.
You must provide an array of ServiceNow field names (strings). The connector will attempt to match assets using the fields in the order provided, from highest to lowest priority (left to right).
In this example, SAFE will first attempt to match using fqdn. If no match is found, it will try the name. Ensure the fields you provide exist in both SAFE and ServiceNow to ensure proper matching.
Create Encoded Query
The Encoded Query lets you control which ServiceNow CMDB assets are synced to SAFE. This is important to avoid syncing unnecessary records and to focus only on assets relevant to your security posture.
What is an Encoded Query?
An encoded query is a compact string generated by ServiceNow that represents your filter criteria (e.g., only servers in a specific location).
Create and Copy an Encoded Query
You will generate this query by applying filters in the ServiceNow UI, which will automatically build the encoded query string behind the scenes.
To configure the encoded query, follow the given steps:
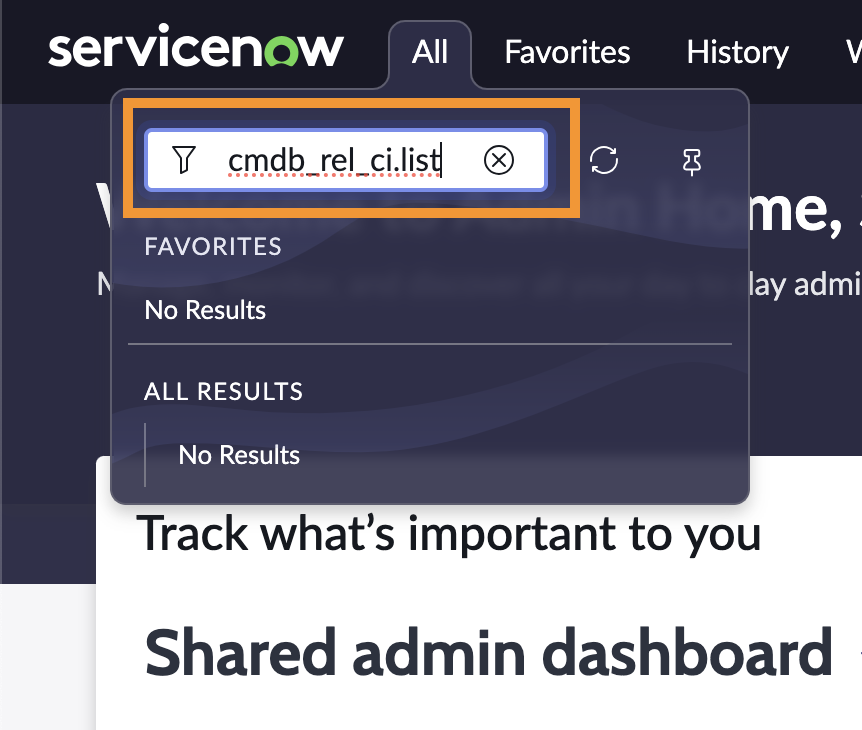
Click All, search for cmdb_ci.list, and then press Enter.
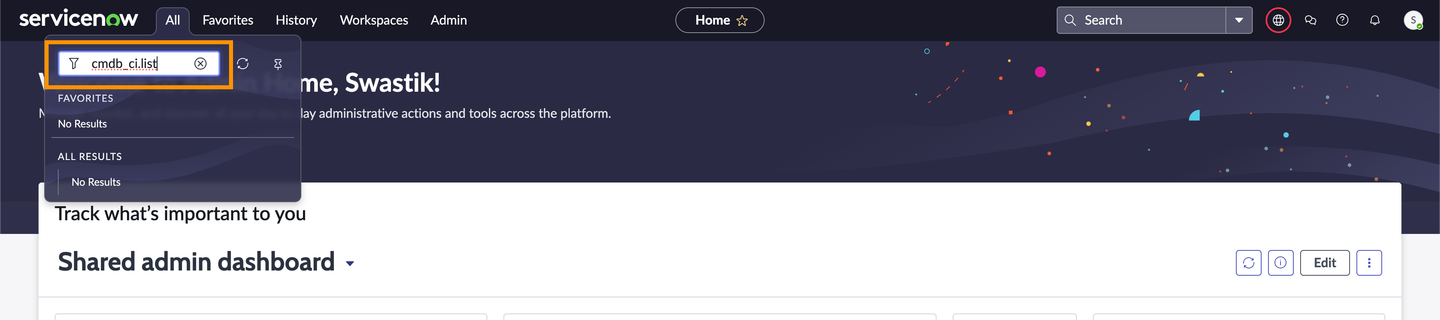
The system displays the cmdb_ci table view in ServiceNow.
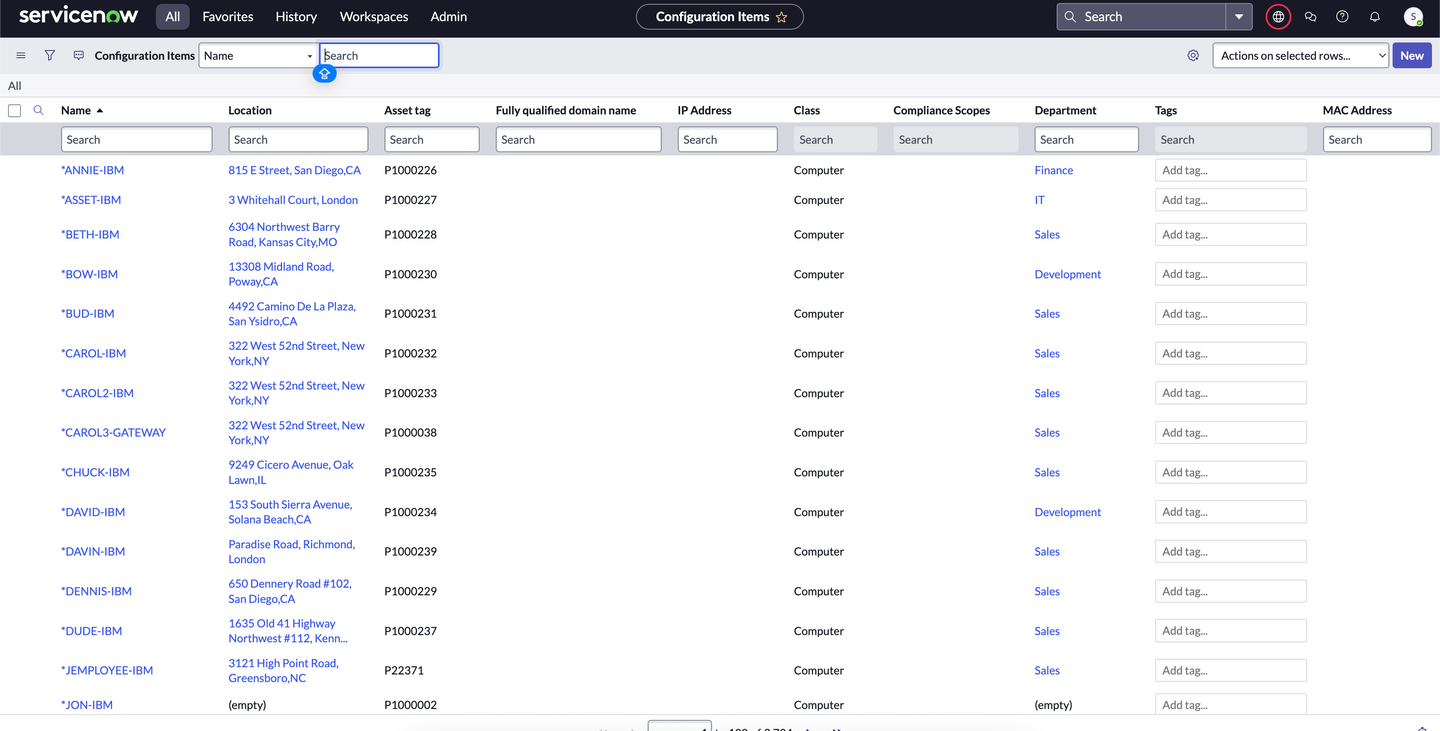
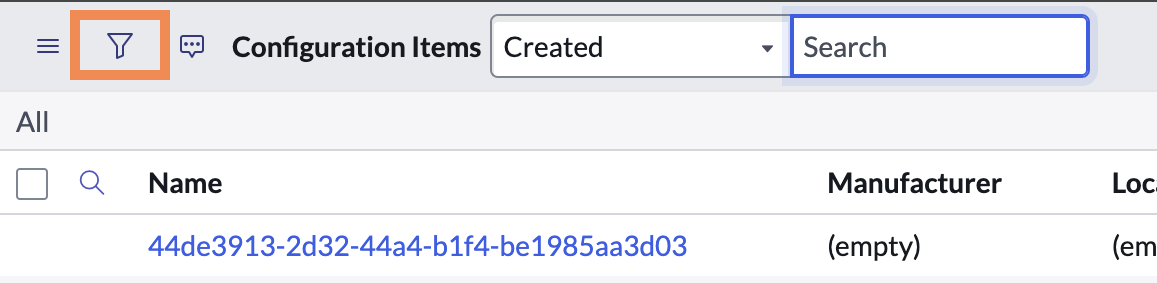
Click the Filter icon at the top of the table to open the filter editor.
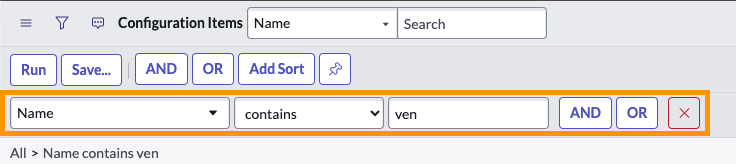
Apply your desired filters (e.g., Class = Server, Manufacturer = Dell, etc.).
Click Run to apply the filter. The table now shows only records that match your filter criteria.
Once the filters are applied and the results are displayed, inspect the current page's URL. Look for the query parameter sysparm_query in the URL. The value assigned to this parameter is the encodedQuery.
.png)
Some ServiceNow versions allow you to right-click the filter and select Copy query or Copy encoded query.
Copy and save this value, as it encodes the filter logic you applied in the UI.
On the SAFE Asset Connector Configuration page, enter the value for Encoded Query (typically the second field on the form).
Note
The SAFE Asset Connector processes a maximum of 500,000 assets per sync. If your encoded query matches more than 500,000 assets, only the first 500,000 will be processed; any additional assets will be ignored in that sync. To ensure all relevant assets are processed, consider refining your encoded query to reduce the number of assets, or run multiple syncs with different filters.
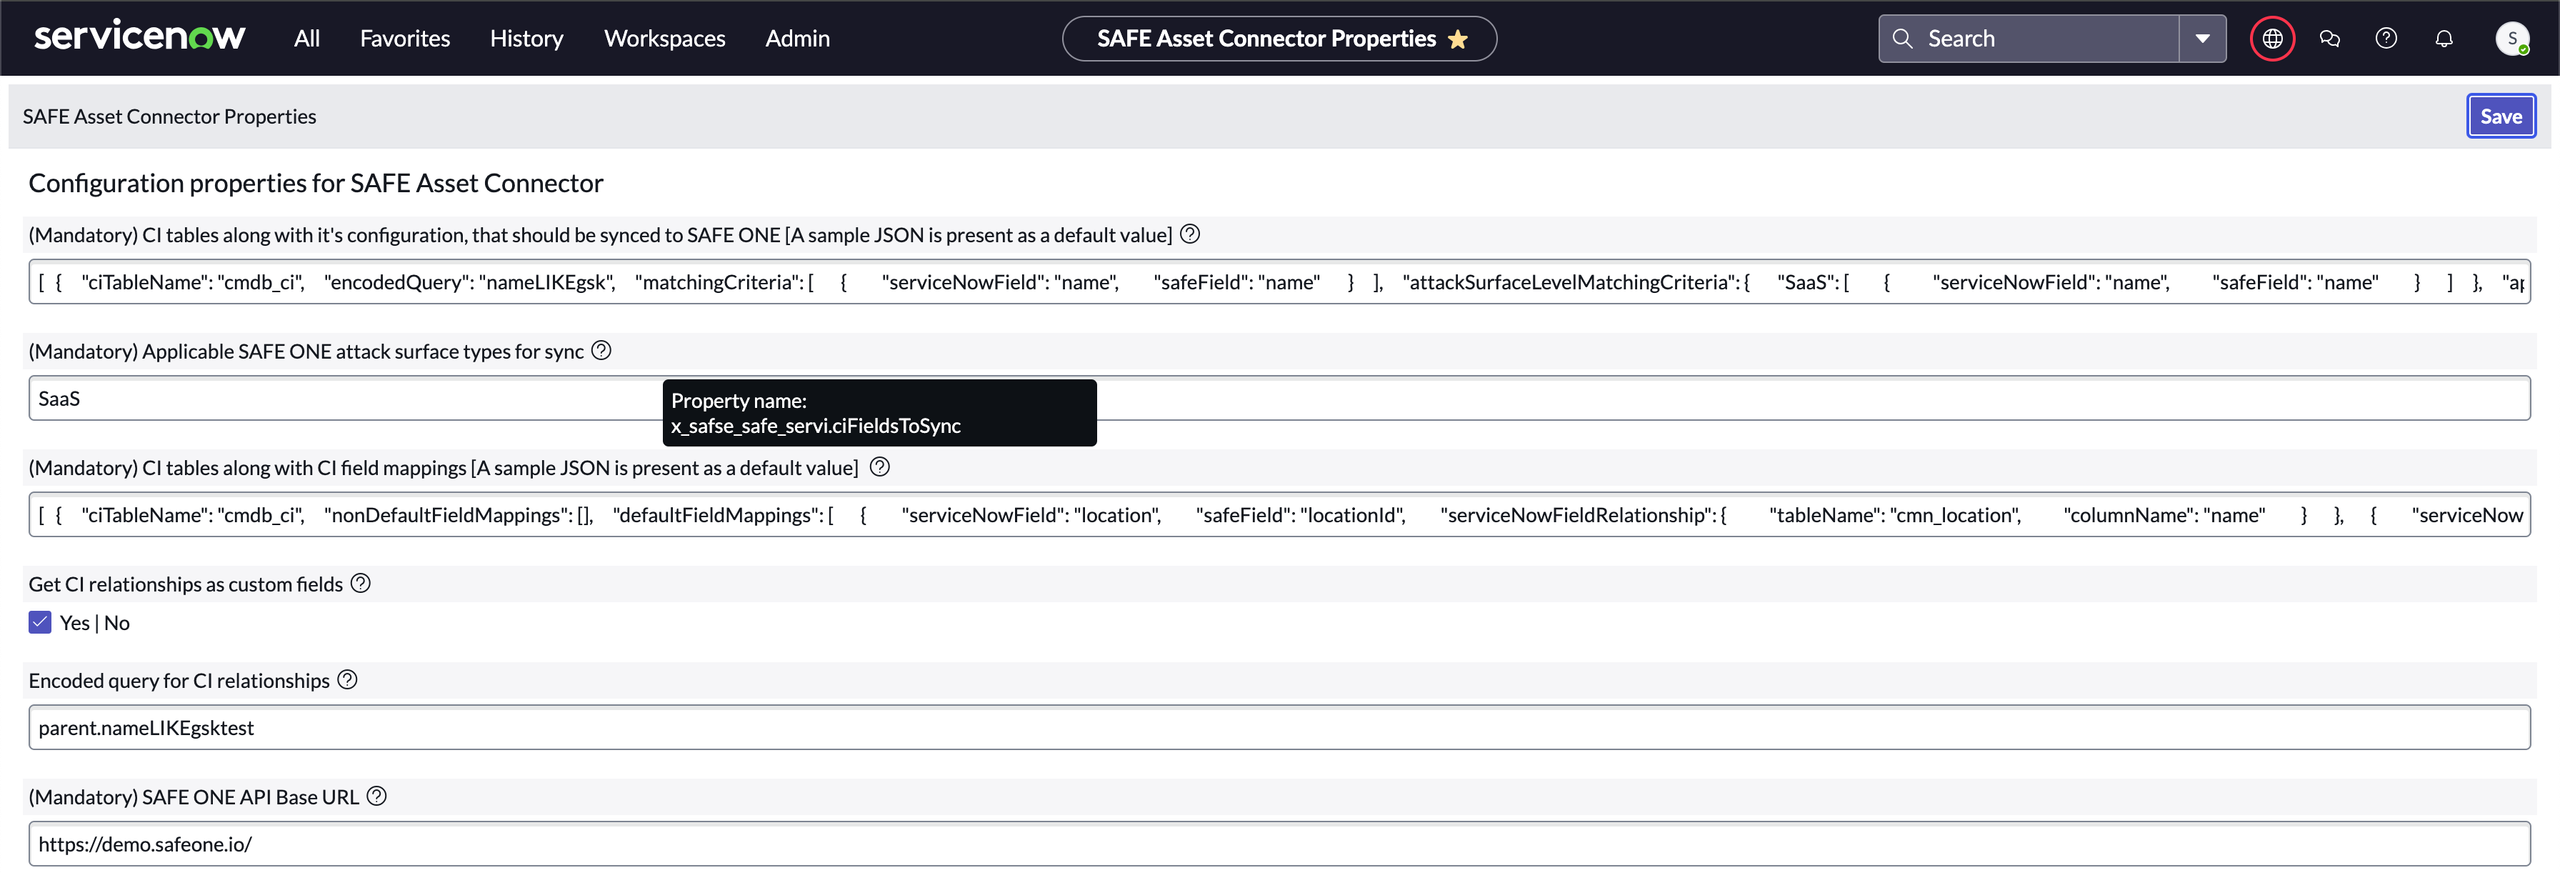
Generate Configuration for Fields to Sync
If you're migrating from an earlier version of the connector and have a configuration backup, you can paste it directly into the Fields to Sync field.
Use a JSON beautifier to avoid confusion when creating the configuration. (Example: Json Beautifier - Json Formatter)
SAFE Field Mapping Overview
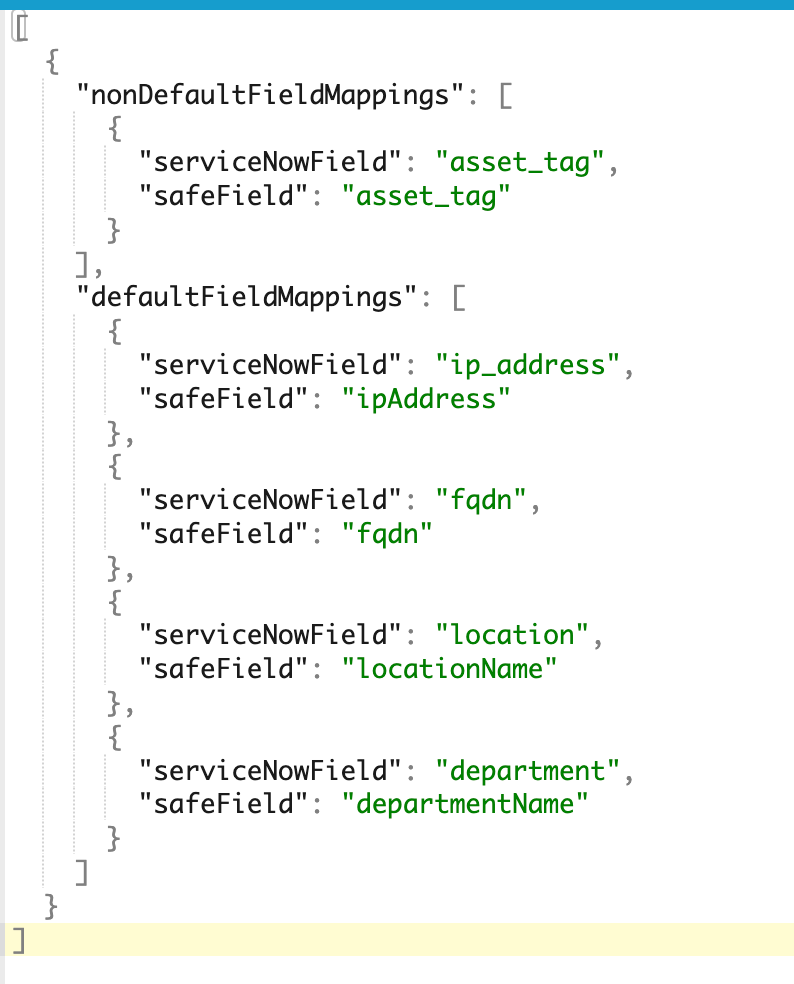
The configuration JSON includes two keys:
defaultFieldMappings – for predefined fields in SAFE.
nonDefaultFieldMappings – for custom fields you've added to SAFE.
List of predefined fields in SAFE
ipAddress
region
internetFacing
sourceName
criticalityId
departmentName
designationName
locationName
fqdn
cmdbId
platform
By default, the connector ships with the following configuration:
[
  {
    "defaultFieldMappings": [
      { "serviceNowField": "ip_address", "safeField": "ipAddress" },
      { "serviceNowField": "fqdn", "safeField": "fqdn" },
      { "serviceNowField": "location", "safeField": "locationName" }
    ],
    "nonDefaultFieldMappings": []
  }
]
Default Fields Mapping
Let’s take an example with the departmentName field, which is a predefined field in SAFE, to have more clarity.
To map the ServiceNow department field to SAFE’s departmentName:
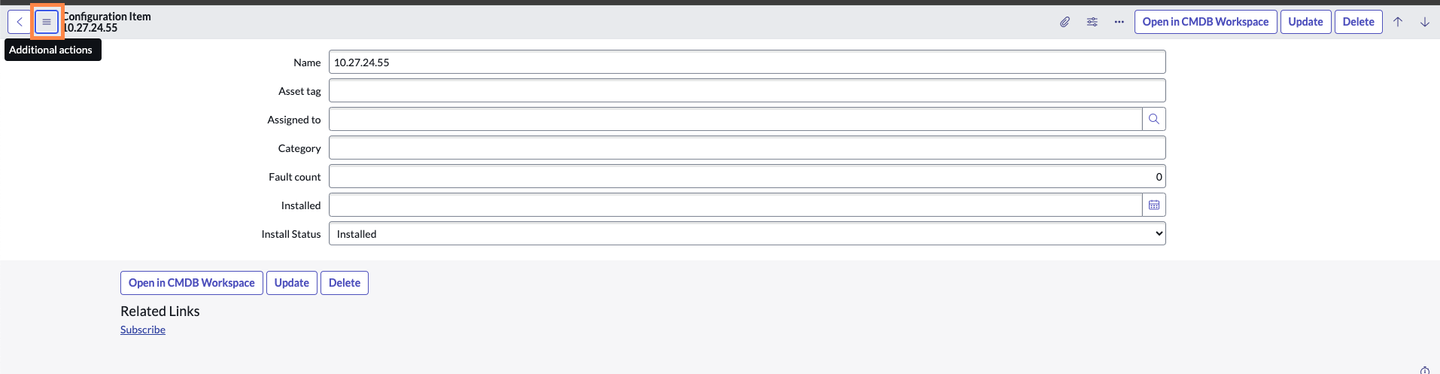
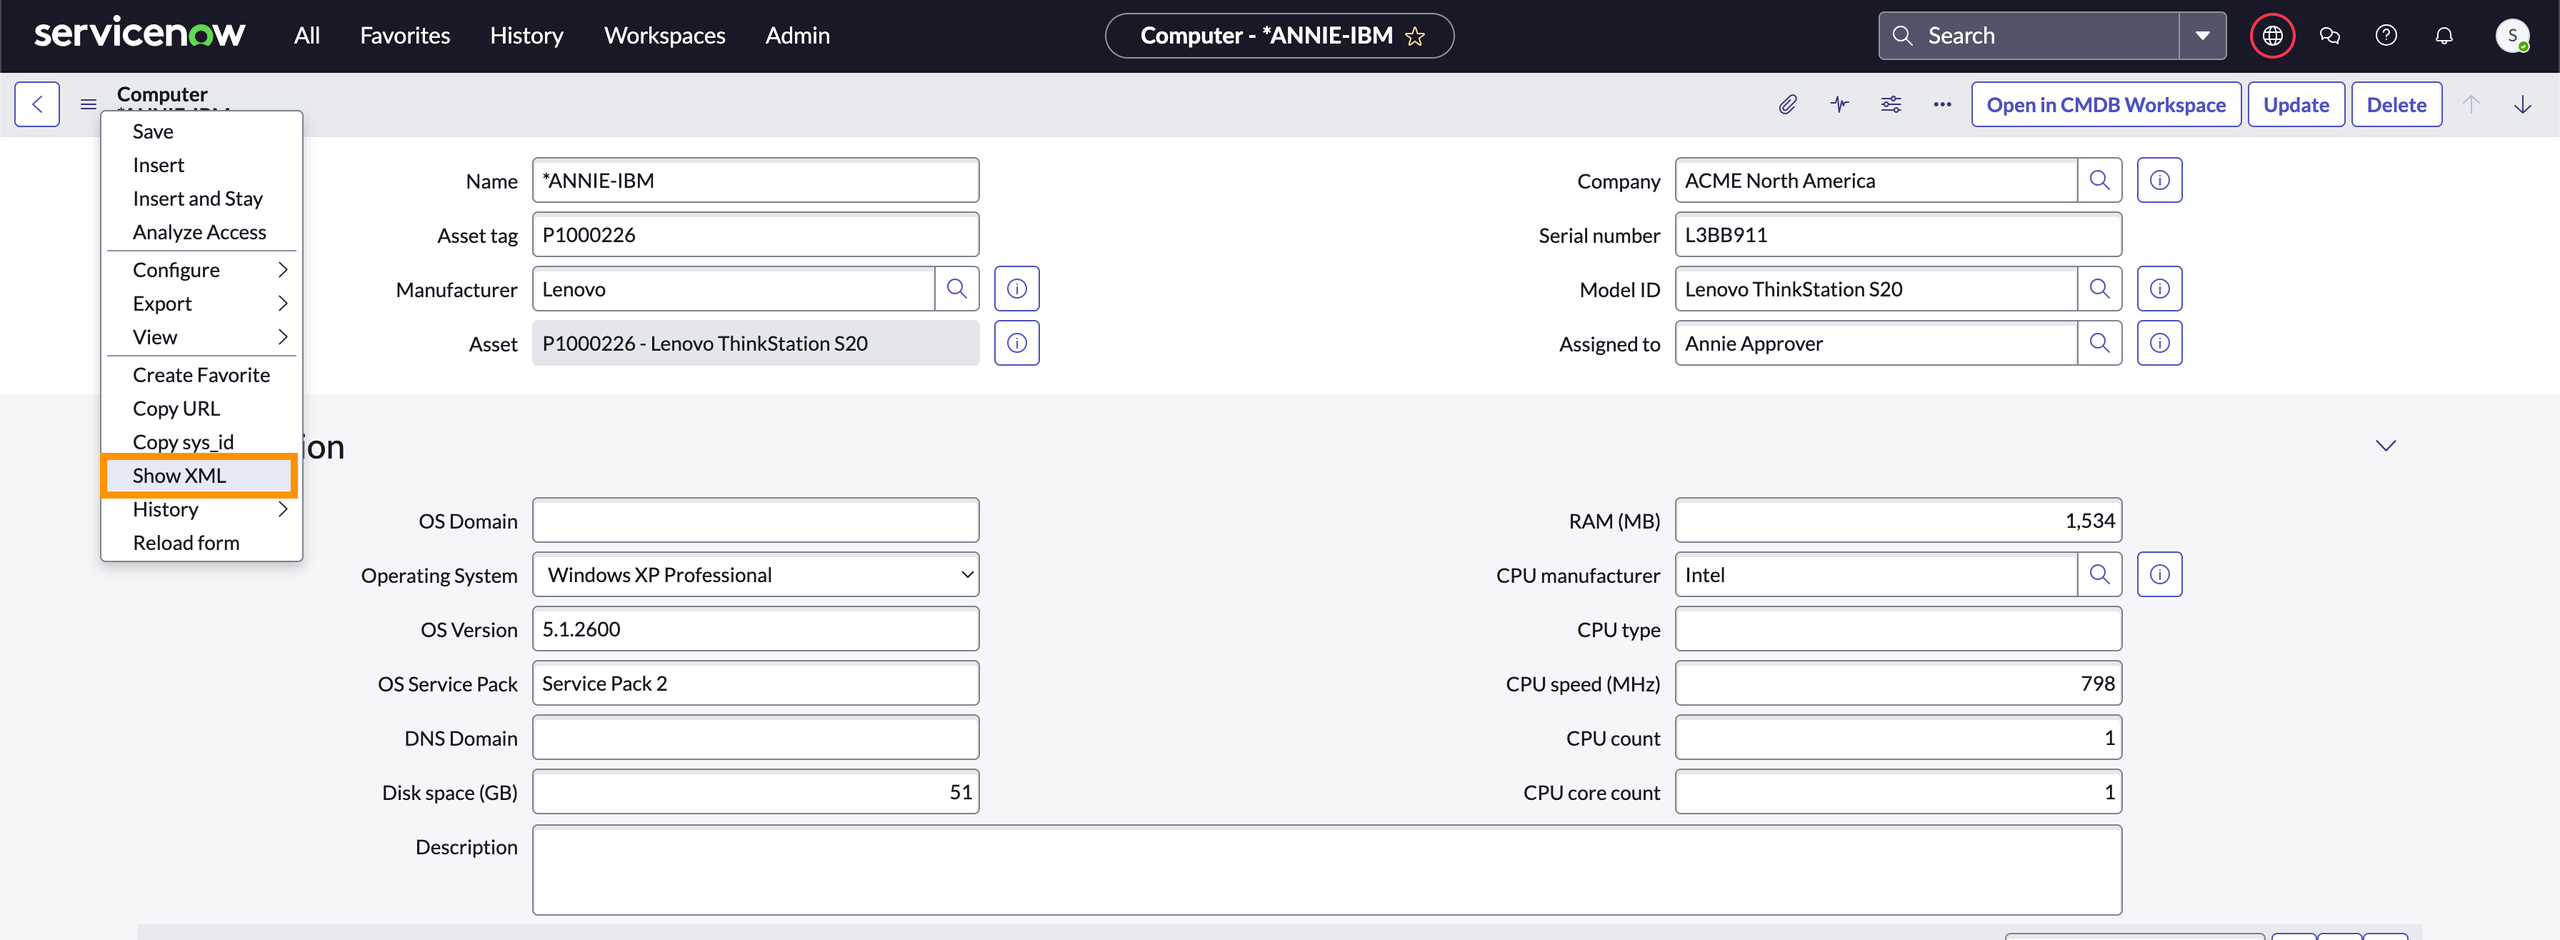
Go to cmdb_ci (or any table where this column resides) and click on any record. You might see a window like this.
Right-click the highlighted button, then click Show XML. You will find a new window opened. Search for the field that you want to sync into SAFE. (Example: departmentName)
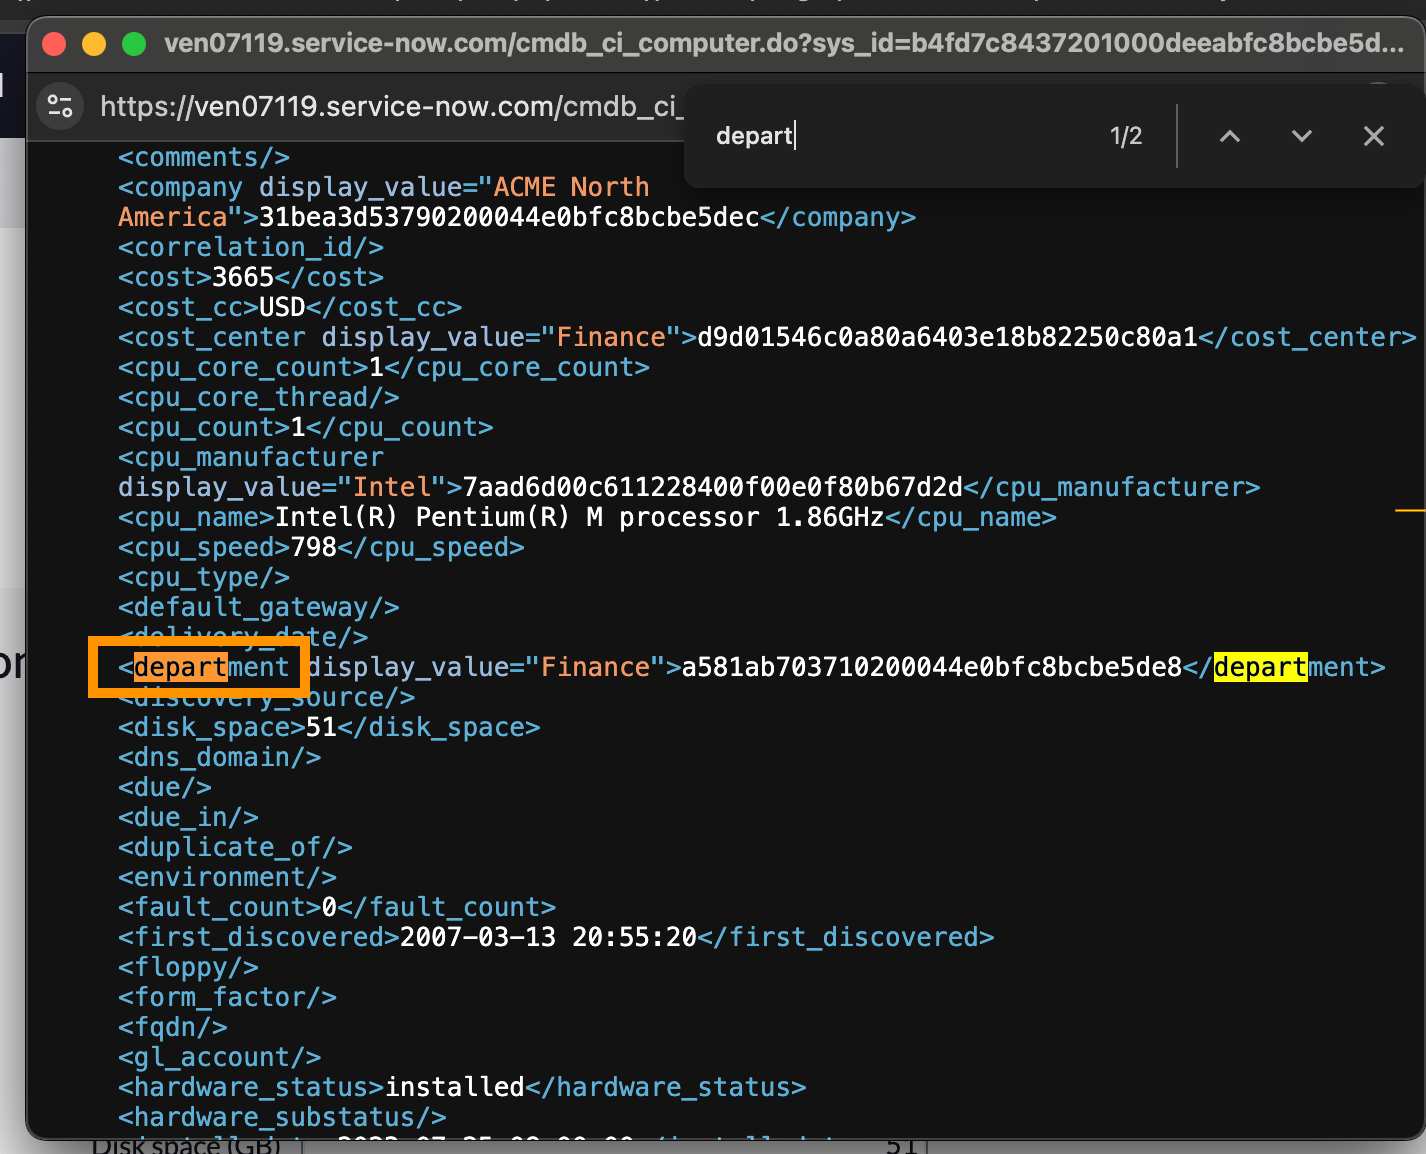
The tag is basically your ServiceNow field.
Now, in your configuration JSON, we can write the mapping as given below:
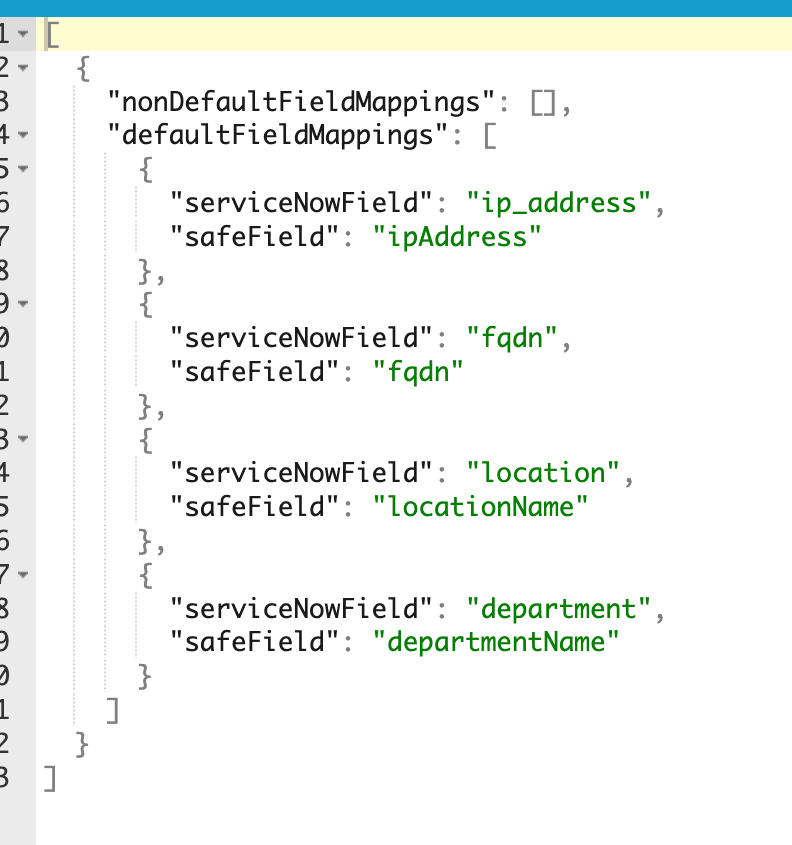
Now the asset connector will pick the department column from the cmdb_ci table and link it with the default field departmentName in SAFE.
Non-Default (Custom) Field Mappings
Use nonDefaultFieldMappings when you want to bring in additional data that isn't part of SAFE's predefined fields. These custom fields must first be created in SAFE, then mapped to corresponding fields in ServiceNow. Refer to Custom Fields.
In the ServiceNow CMDB, identify the corresponding column in ServiceNow that should be mapped to this custom field.
In this case, we need to pick the asset_tag column, which is already present in CMDB (you can create the column and extract the actual column name, too).
Go to the ci_record for which you want to extract the asset_tag and click on Show XML.
Get the column name from the XML. asset_tag in this case.
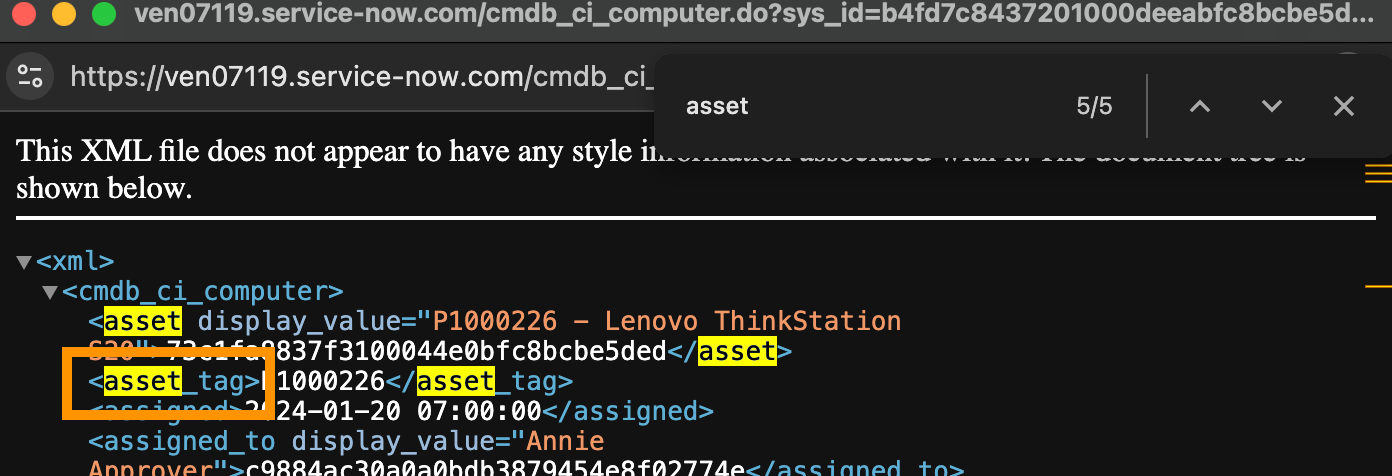
Map both the things in the configuration under the nonDefaultFieldMappings section. The final configuration will look like this.
Configuring Parent Child Relationship in CMDB
In ServiceNow’s CMDB, parent-child relationships represent how assets (Configuration Items, or CIs) depend on or relate to each other, such as a server hosting an application. Syncing these relationships into SAFE provides valuable context for asset dependencies and risk assessment.
How does it work in SAFE?
When you enable the “Get CI Relationships as Custom Fields” option in the SAFE Asset Connector:
The connector will sync one direct parent and one direct child for each CI, based on your ServiceNow relationship query.
These relationships are stored as custom fields in SAFE, enriching each asset’s metadata.
Note
Only assets included in your main cmdb_ci encoded query will have relationships synced. If either the parent or child is not included in your asset sync, the relationship will not be captured in SAFE.
Configure the parent-child relationship
Before you sync parent/child relationships, you must manually create the following Custom Fields in SAFE if not present:
ci-parent: Stores the identifier (e.g., name or sys_id) of the direct parent CI.
ci-child: Stores the identifier of the direct child CI.
To learn more about how to create custom fields in SAFE, refer to Custom Fields.
Once the custom fields are created:
Navigate to cmdb_rel_ci.list to open the CMDB Relationship [cmdb_rel_ci] table.
Click the Filter icon at the top of the table.
Click the Filter icon, then apply filters to select the relationships you want to sync (e.g., Connection strength is always).
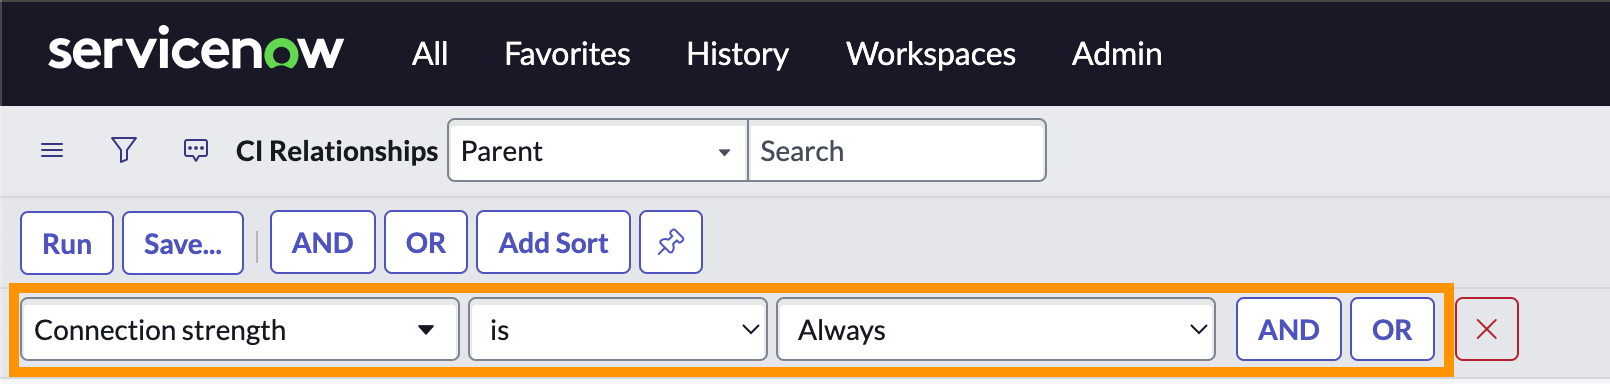
Click Run to execute the filter.
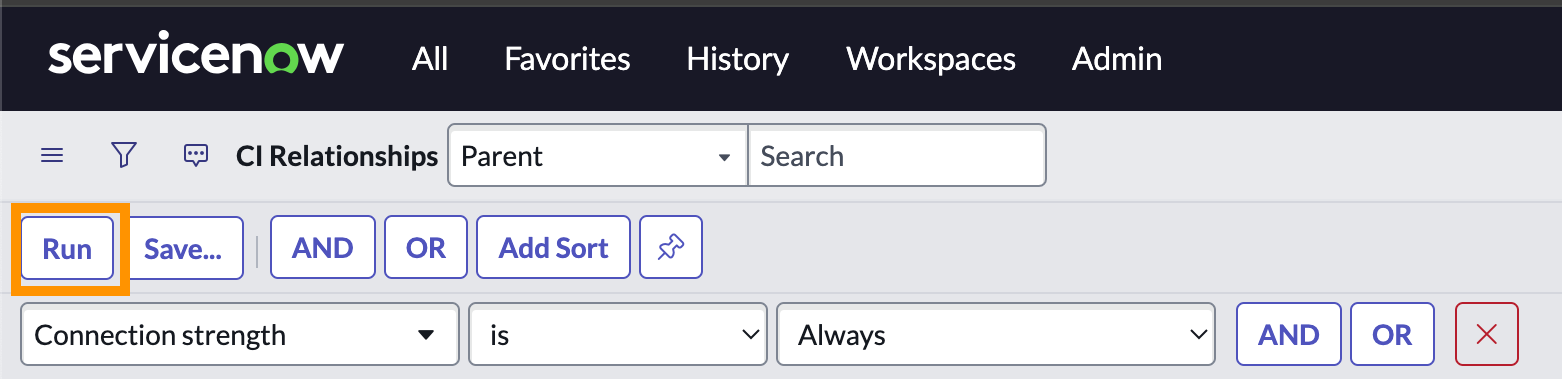
After the filtered results are shown, inspect the browser URL. Find the sysparm_query parameter.
Copy the value of sysparm_query. This is the encoded query representing your filter logic.
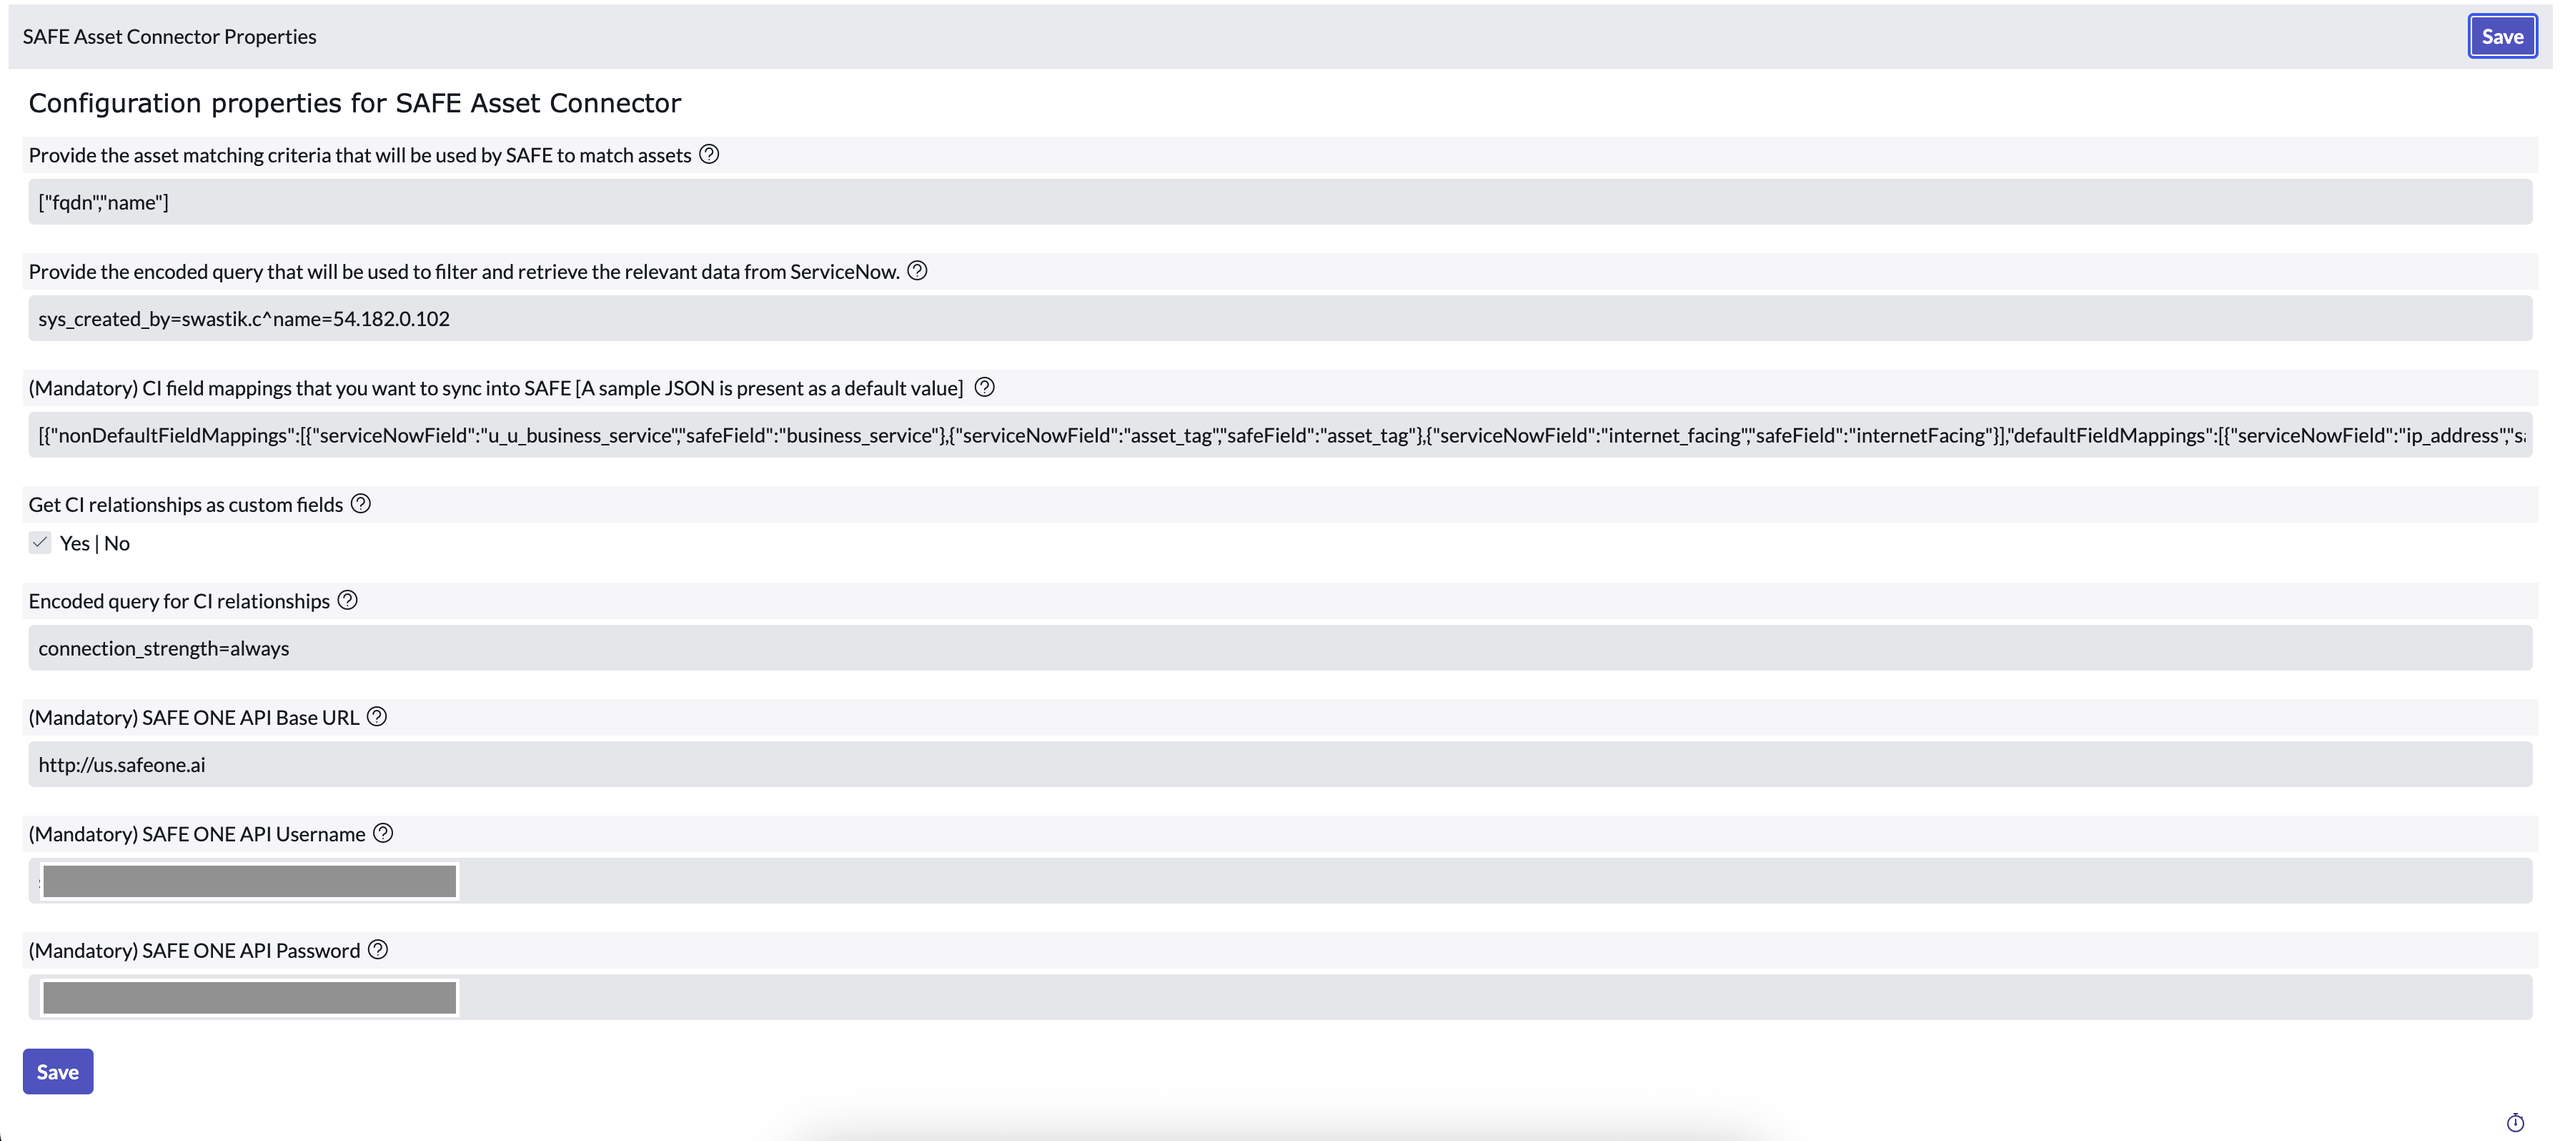
Go to the SAFE Asset Connector configuration page.
Enable the option titled Get CI relationships as custom field.
Paste the copied encoded query into the CI-Parent Encoded Query field. This allows the connector to sync CI relationships using the logic you defined in ServiceNow.
Note
Make sure your relationship filter only includes assets that are also included in your earlier cmdb_ci encoded query, otherwise, SAFE may not resolve the relationship if one side of the pair wasn't synced.
Configuring Root Parent Relationship in CMDB
To fetch and map root business applications (across multi-level hierarchies) for all assets (Configuration Items or CIs) from the ServiceNow CMDB:
When the “Get Root Parent as Custom Field” option is enabled in the SAFE Asset Connector, the connector syncs all root parent business applications for each CI. These relationships are then stored in SAFE as a custom field (ci-root-parent), enriching the asset metadata.

Configure ServiceNow Asset Connector with SAFE Credentials
Generate API Credentials from SAFE
To enable the connector to push data from ServiceNow to SAFE, you must provide valid SAFE API credentials with the appropriate access. You’ll create these credentials in SAFE and input them in the connector configuration. Refer to Accessing SAFE APIs.
Configure Asset Connector
Go to the SAFE Asset Connector’s configure page in ServiceNow and add your credentials.
Click the Save button.
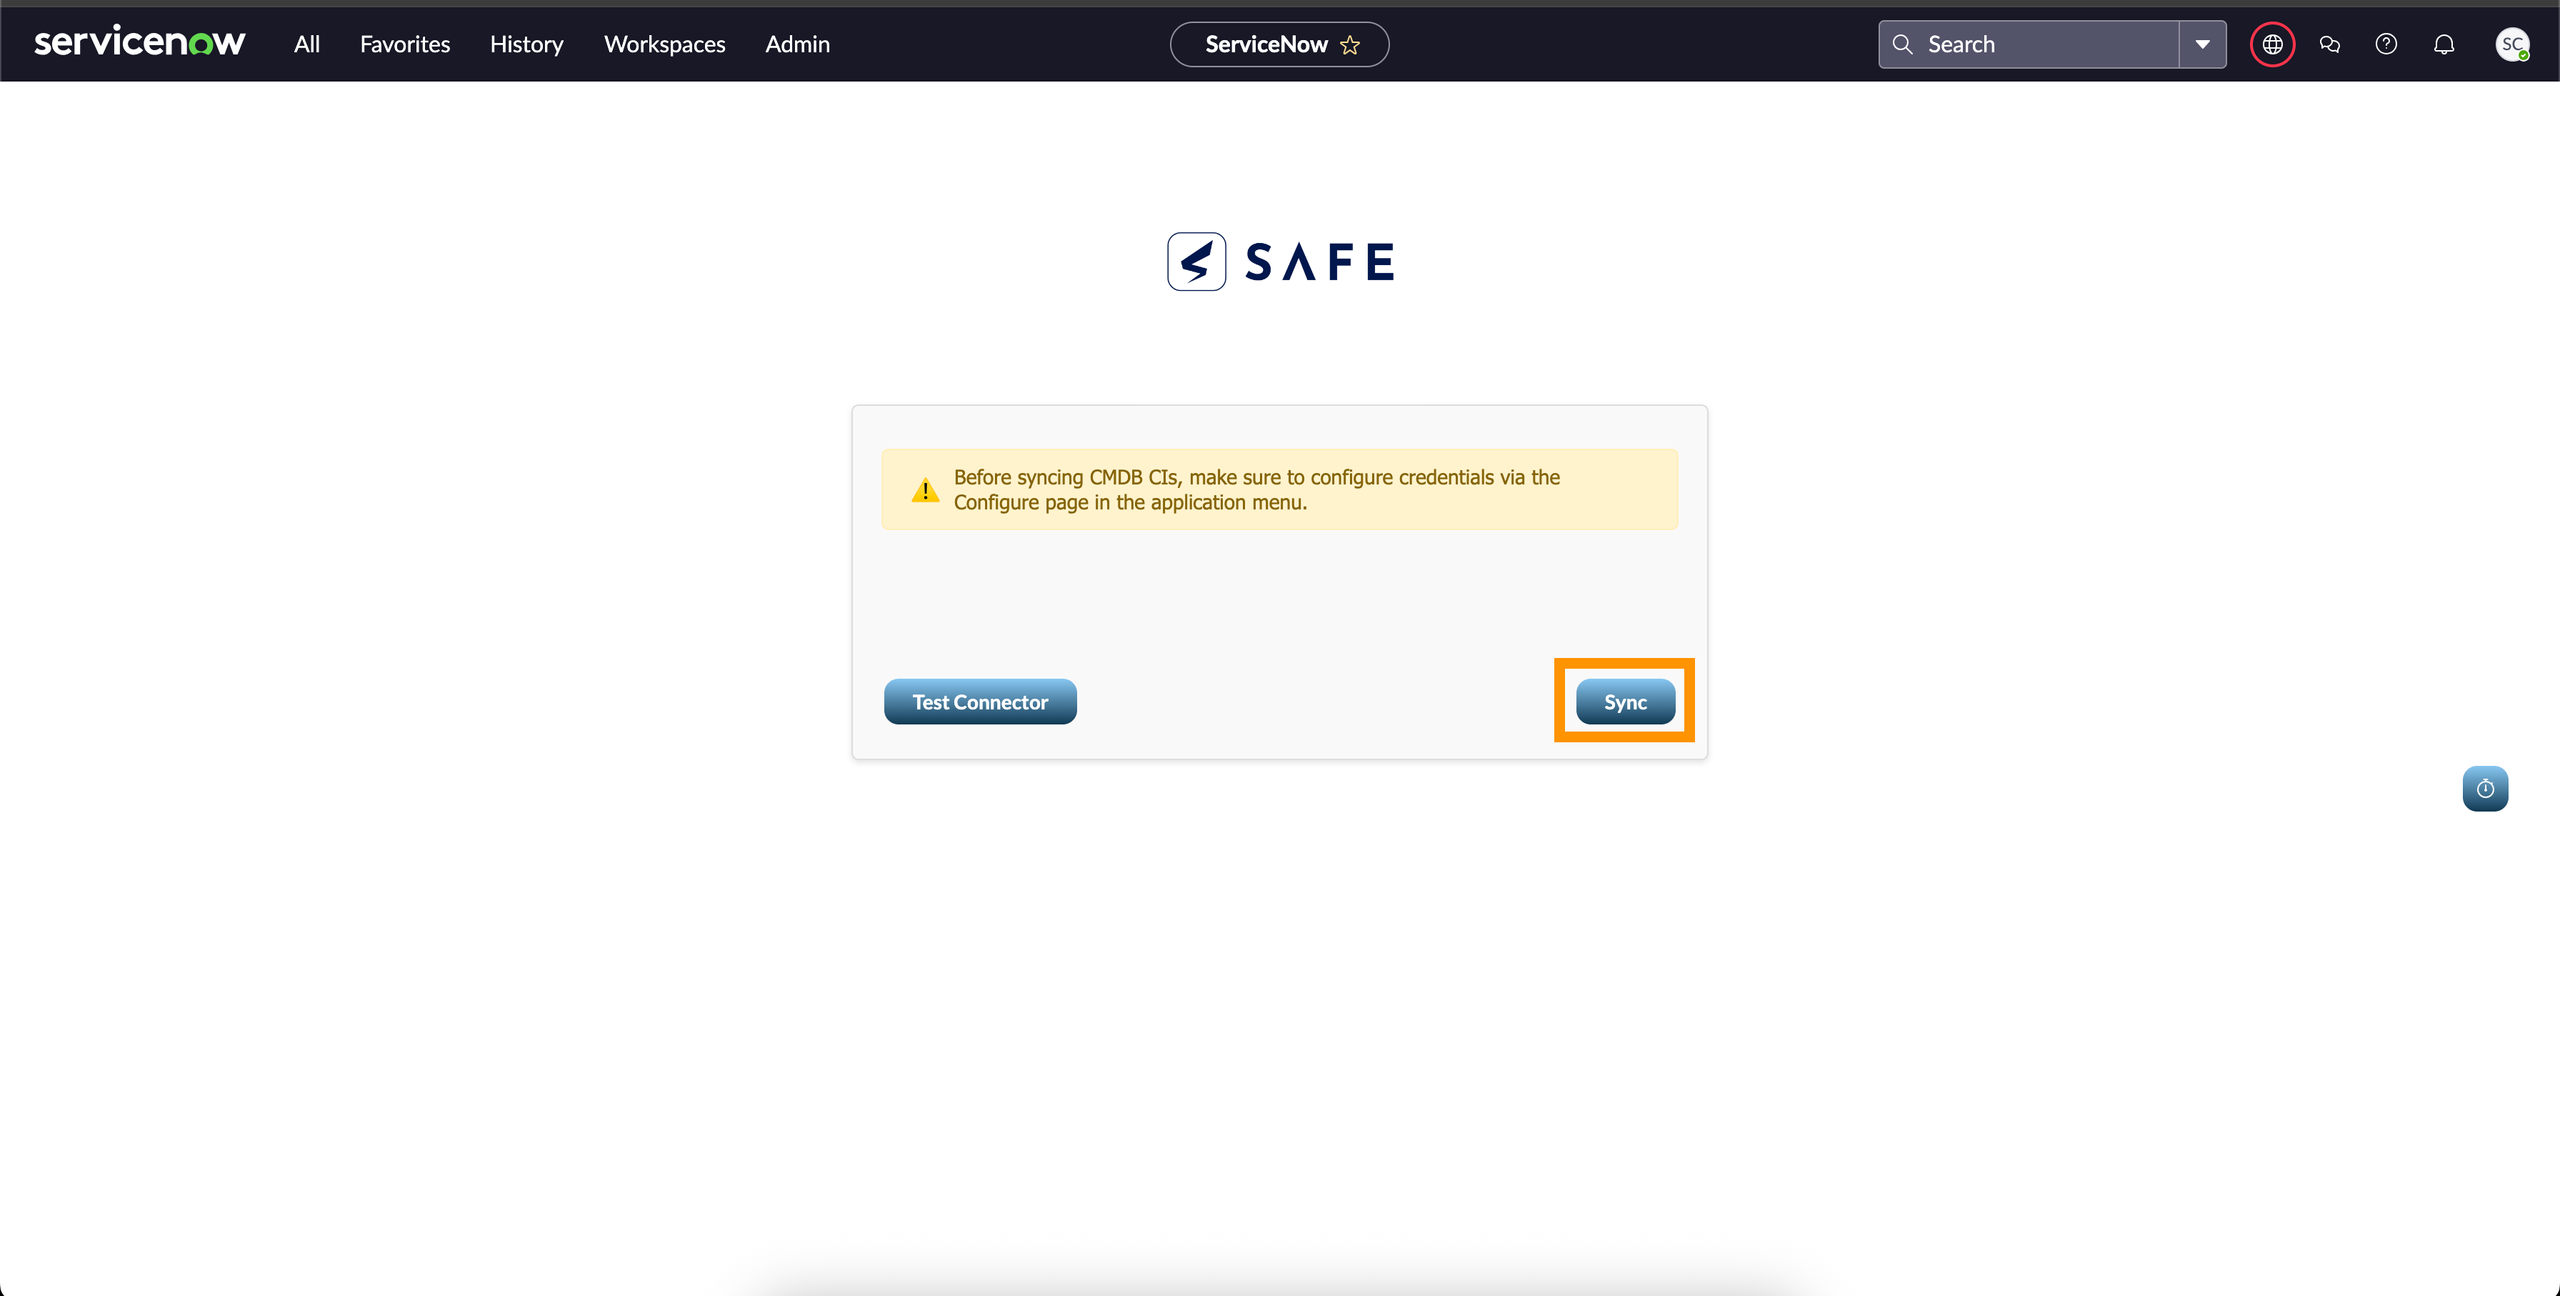
Test the Asset Connector
After completing all configuration steps, it's important to test the connector to ensure it can successfully connect to both ServiceNow and SAFE.
Go to the application menu and search for SAFE Asset Connector, and then click on Sync CMDB CIs.
Click on the Test Connector button.
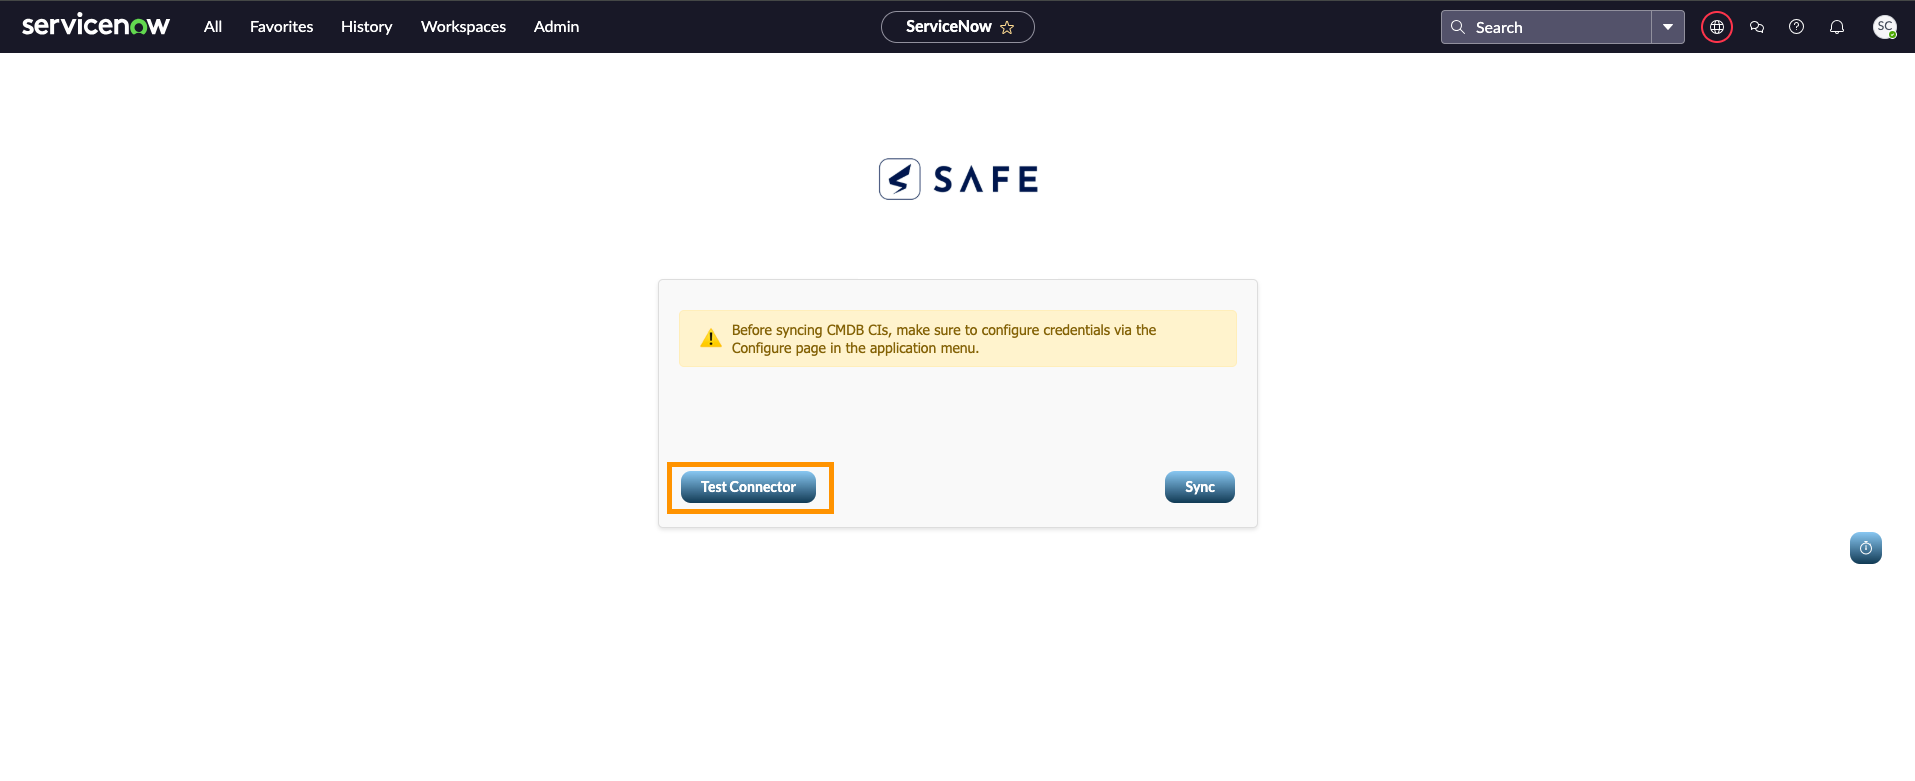
Success Message: Indicates that the connector is properly configured and ready to sync.
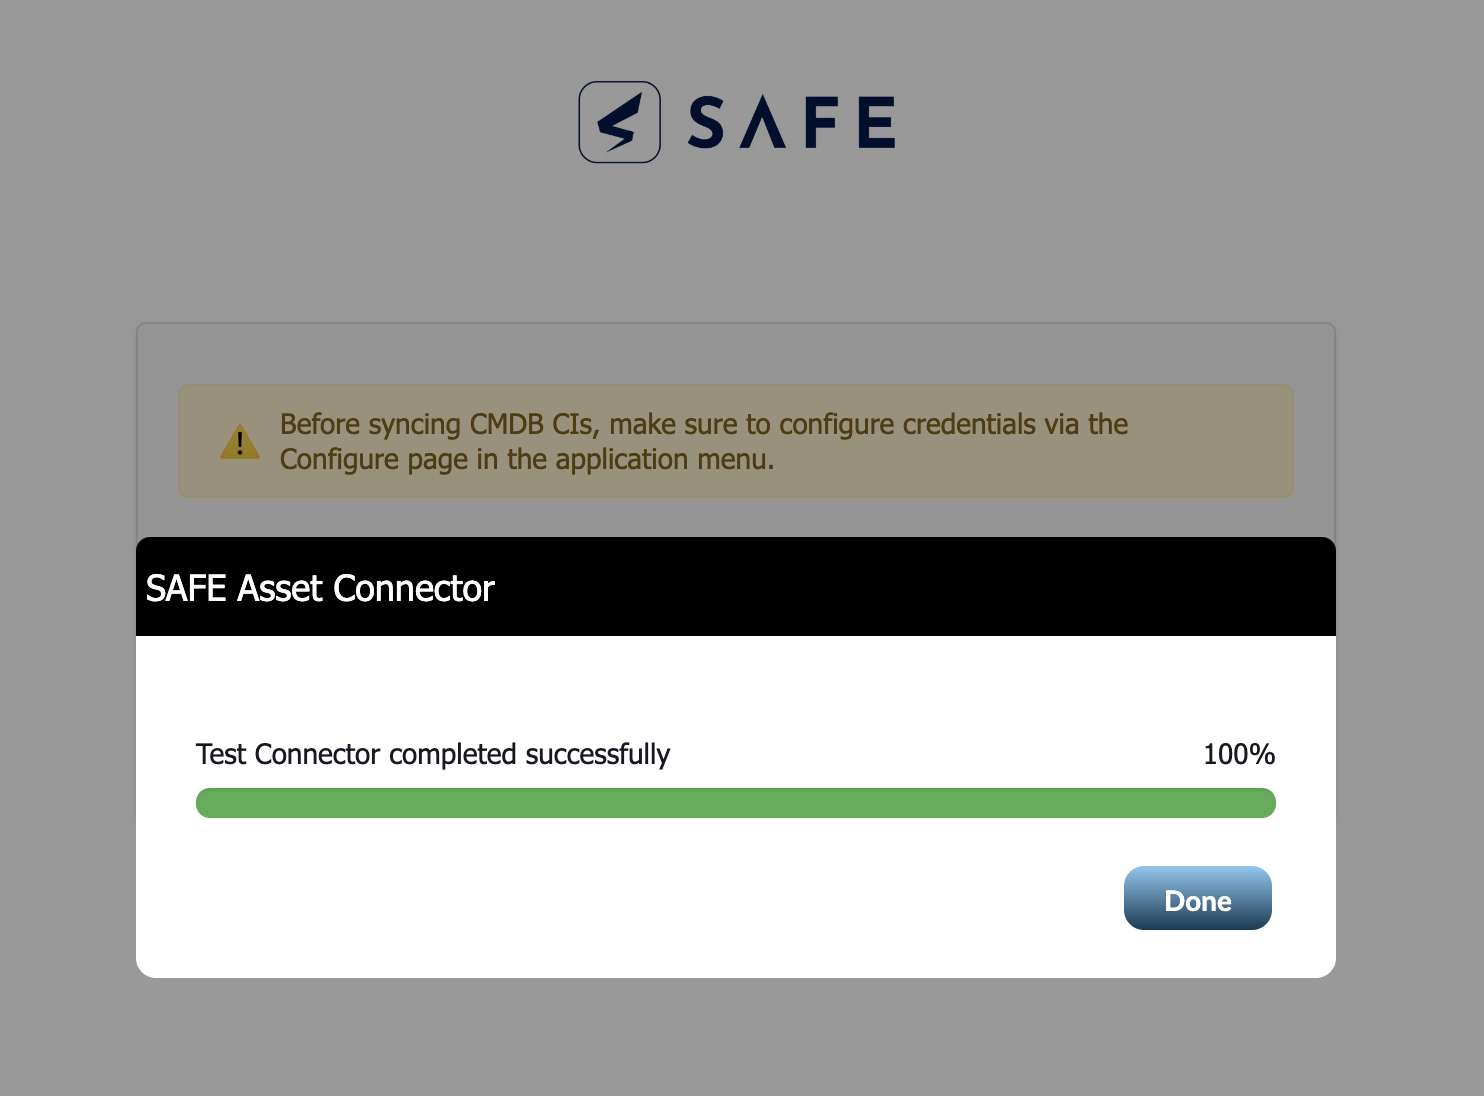
Once the test is successful, you’re ready to perform a full sync.
Sync
Once the connector test is successful, you’re ready to initiate a sync to pull asset metadata from ServiceNow into SAFE.
Click the Sync button.
The connector will start processing:
Filtering assets based on your encoded query
Mapping ServiceNow fields to SAFE fields
Pulling one direct parent and one direct child relationship per CI (if enabled)
Pushing the resulting metadata into your SAFE environment
What Happens After Sync
The mapped metadata appears in SAFE under the corresponding assets.
Relationships (if configured) are added as custom fields.
Any assets not matched to existing SAFE assets will not generate signals (metadata only).
This sync does not onboard new assets, it only enriches metadata for assets already present in SAFE.
View Result
After a successful sync, it’s important to verify that your asset metadata and relationships have been updated in SAFE as expected. This section guides you through what to expect, how to check your results, and what to do if you don’t see the updates immediately.
What to Expect After Sync
Stats: Immediately after a sync, you will see a stats dialog box indicating the number of signals sent and the time taken to perform the action. This confirms that the sync process was initiated and completed from the connector side.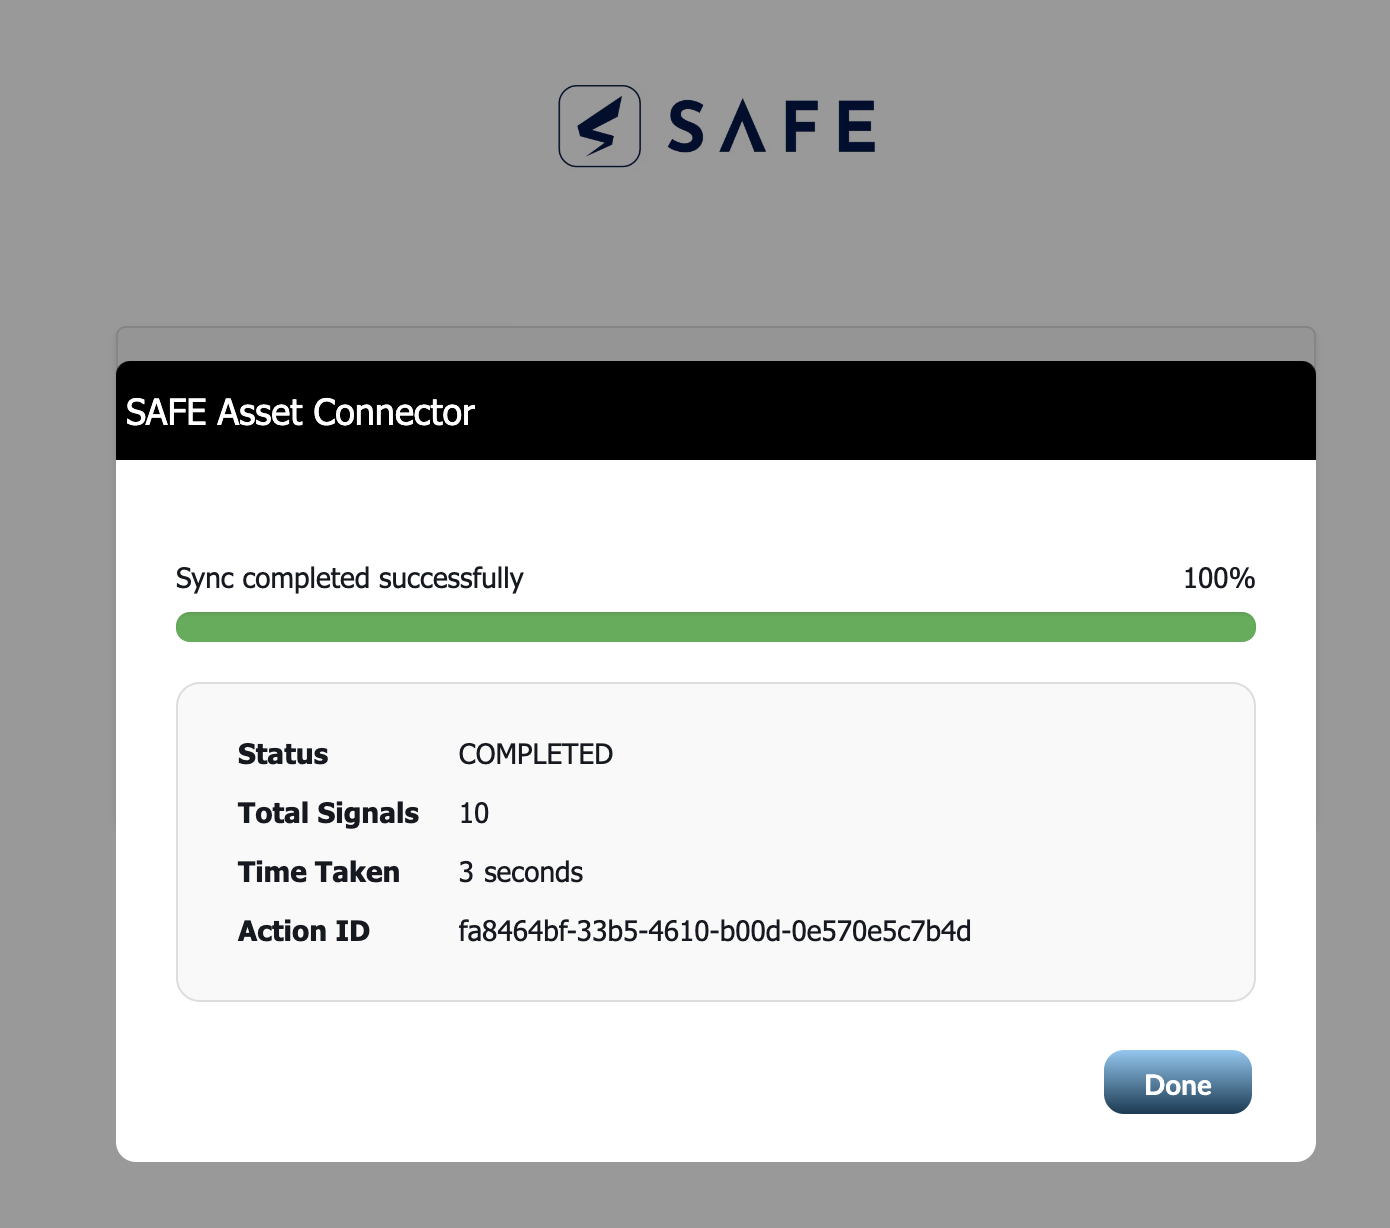
How to Verify Synced Data in SAFE
Navigate to the Assets in SAFE
Use filters or search for assets that were included in your ServiceNow encoded query.
Click on an asset to view its details. You should see updated metadata fields as per your field mapping configuration (e.g., ipAddress, fqdn, locationName, and any custom fields you mapped).
If you enabled parent-child relationship sync, look for the custom fields ci-parent, ci-child, and (if applicable) ci-root-parent in the asset details. These fields should be populated with the corresponding parent/child identifiers from ServiceNow.
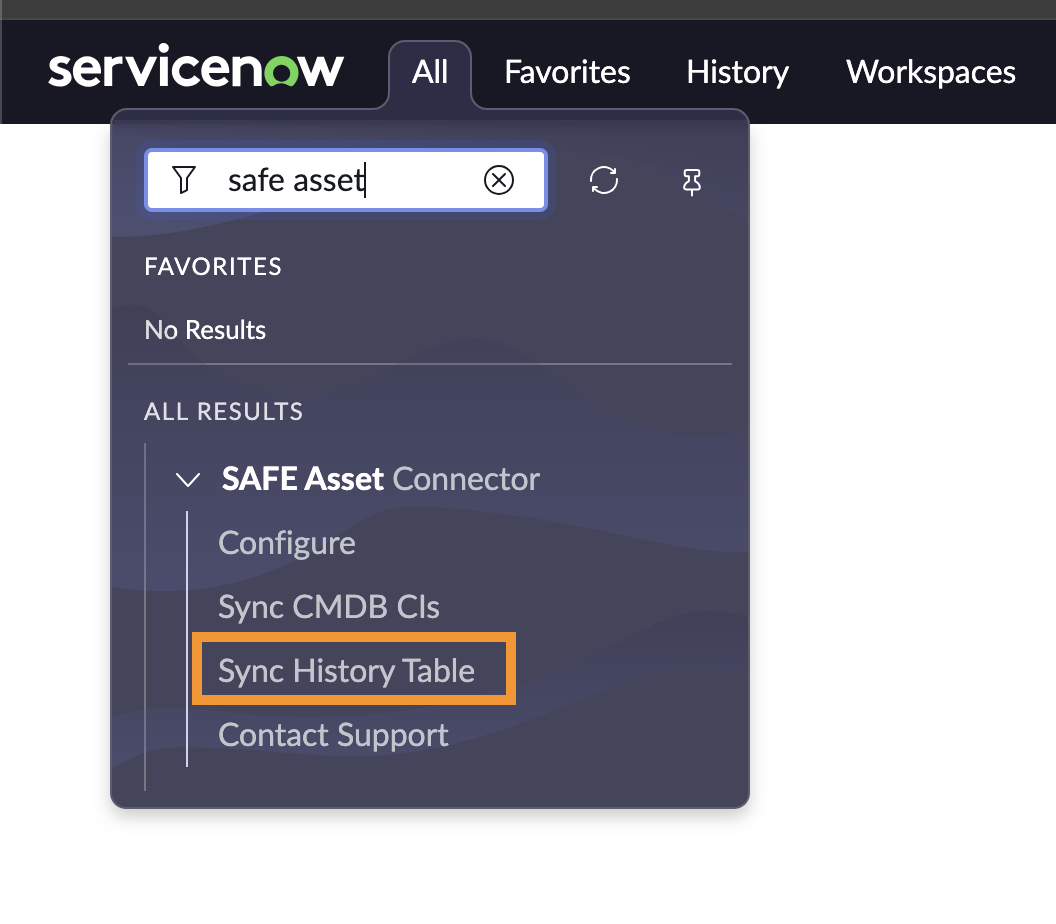
History
SAFE Asset Connector keeps a detailed record of all sync actions, whether triggered manually or via scheduled jobs.
In order to view the history table, under SAFE Asset Connector, click on the Sync History Table.

FAQs
Is there a limit to the number of assets that can be processed in a single sync?
Yes. The SAFE Asset Connector processes up to 500,000 assets per sync. If your encoded query covers more than 500,000 assets, only the first 500,000 will be processed, and the rest will be ignored. To ensure all relevant assets are processed, consider refining your encoded query or running multiple syncs with different filters.
Why aren’t assets onboarded into SAFE when using the ServiceNow CMDB Connector?
The ServiceNow CMDB Connector for SAFE does not onboard new assets into SAFE. It only updates the metadata of assets that already exist in SAFE with information pulled from ServiceNow. If an asset from ServiceNow does not already exist in SAFE, the connector will not create (onboard) it—only the metadata for matching assets is updated.
What is an encoded query, and why do I need it?
An encoded query is a filter string generated in ServiceNow that defines which assets are synced to SAFE. It ensures only relevant assets are included in the sync, reducing noise and improving performance.
How do I find the encoded query for filtering CIs in ServiceNow?
Open the desired CI table in ServiceNow (e.g., cmdb_ci).
Apply the required filters using the UI.
Once results are displayed, inspect the URL for the sysparm_query parameter—its value is the encoded query.
Copy this value for use in the SAFE Asset Connector configuration.
How do I sync parent-child relationships, and do I need to create custom fields in SAFE?
Yes, you must manually create the custom fields ci-parent and ci-child in SAFE before syncing relationships. The connector will populate these fields with the parent and child identifiers based on your ServiceNow relationship query. If these fields do not exist in SAFE, relationship data will not be stored.
What should I do if relationship data is missing in SAFE after sync?
Ensure that:
Both parent and child assets are included in your main asset encoded query.
The custom fields ci-parent and ci-child exist in SAFE.
The “Get CI relationships as custom fields” option is enabled in the connector configuration.
Can I import relationships without enabling "Get CI Relationships as Custom Field"?
No, this option must be enabled to pull and store CI relationships as custom fields in SAFE. Without it, the encoded query for CI relationships will not apply, and no relationships will be imported.
How do I use the "Encoded Query for CI Relationships" field?
This field allows you to specify a filter for which relationships are imported from the cmdb_rel_ci table.
Apply filters in the ServiceNow UI and copy the sysparm_query value from the URL.
Paste this value into the connector’s configuration to import only the desired relationships.
What happens if I don’t configure the custom fields ci-parent and ci-child in SAFE?
If these custom fields are not configured in SAFE, the connector will be unable to populate relationship data for CIs, and the parent-child relationships defined by the encoded query will not appear in SAFE.
How do I sync custom fields from ServiceNow to SAFE?
First, create the custom field in SAFE (via Settings → Custom Fields), then map it to the corresponding ServiceNow field in your configuration under “Fields to Sync.” The connector will then populate these custom fields during sync.
What should I do if my custom fields are not being populated?
Confirm that the field names match exactly in SAFE and your mapping configuration. The connector cannot create fields automatically; they must exist in SAFE before syncing.
Where can I view the results and sync history?
You can view updated asset metadata and relationship fields in SAFE under each asset’s details. To see sync history, go to the Sync History Table in the SAFE Asset Connector UI.
I synced my data, but I don’t see it reflected in SAFE. Why?
The sync is an asynchronous process and does not reflect immediately in SAFE. You may need to wait a short while before the updated metadata appears. Please check again after some time.
Does SAFE Asset Connector push data back to ServiceNow?
No, the SAFE Asset Connector only reads data from the ServiceNow cmdb_ci tables for which access is granted. There is no data pushed from SAFE back into ServiceNow; the synchronization process is read-only from the ServiceNow side.
What permissions are required to configure and run the SAFE Asset Connector?
You need admin-level privileges in both ServiceNow and SAFE to configure the integration, install the SAFE Asset Connector, generate API credentials, and run the sync. The ServiceNow user account used for sync must have read access to the CI tables.
How do I troubleshoot sync errors in the SAFE Asset Connector?
Check the ServiceNow logs and the SAFE Asset Connector’s Sync History Table for error messages or failed jobs.
Verify that all required fields are properly mapped, the API credentials are correct, and the integration is configured according to SAFE's prerequisites.
For permission errors, refer to SAFE Asset Connector ACL Issues.
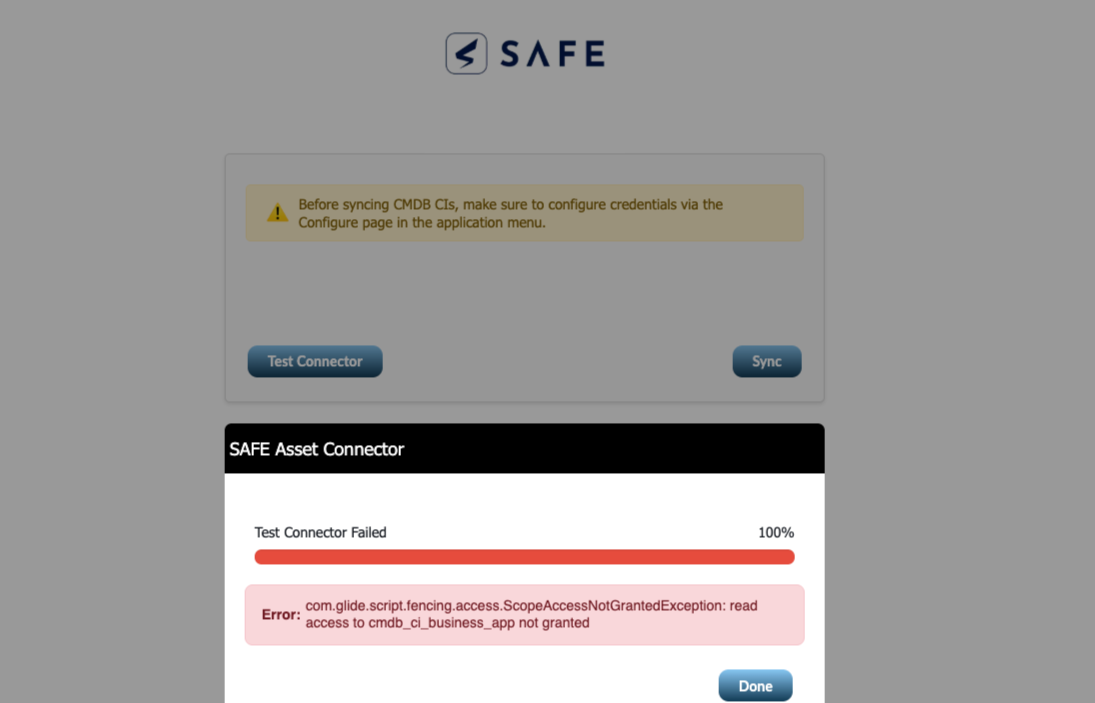
I see the error com.glide.script.fencing.access.ScopeAccessNotGrantedException when trying to sync data or when I run Test Connector. What does this mean?
This error typically occurs when the connector lacks the required permissions in ServiceNow. It is a common cross-scope access issue that prevents the SAFE Asset Connector from accessing the necessary data.
To resolve this, please refer to the steps in the SAFE Asset Connector ACL Issues.
Where can I get more help or support?
If you need further assistance, please contact your SAFE administrator or SAFE support.
SAFE Asset Connector ACL Issues Resolution
The SAFE Asset Connector previously used GlideRecord to query the ServiceNow database. Per the ServiceNow team's recommendation, we transitioned to GlideRecordSecure, which enforces Access Control Lists (ACLs) during data retrieval operations. While this change improves security by ensuring ACL compliance, it has led to connector failures across multiple customer environments due to insufficient permissions.
Verify Error Similarity: Begin by confirming whether the error encountered is consistent with a typical ACL-related issue.
Access Cross-Scope Privileges: If the error is identified as above, navigate to the All tab and search for Cross-Scope Privileges.
.png)
Change Application Scope: Change the application scope to SAFE Asset Connector.
.png)
Create a New Privilege: On the same page, click on New to create a new cross-scope privilege.
.png)
You should see a screen like this.
.png)
Configure Privilege Details: You will see a new screen. Here, proceed with the following configurations:
Set the Target Scope to Global.
Enter the Target Name as the name of the table causing the issue.
Specify the Operation based on the requirement.
Set the Status to Allowed.
.png)
Submit the Privilege: After completing the above configurations, click Save to create the cross-scope privilege. Users with a ServiceNow Admin role should be able to save the record directly, rather than submitting it and waiting for an approver to approve it.
Verify Privilege Creation: Double-check to ensure that the cross-scope privilege was successfully created.
.png)
Retry Sync Operation: Finally, attempt to run the sync operation again. The connector should now work as expected.
By following these steps, the ACL-related issues should be addressed, enabling the SAFE Asset Connector to function correctly while adhering to necessary access controls.
Migrating the SAFE Asset Connector to ServiceNow Yokohama
The SAFE Asset Connector for ServiceNow has undergone major improvements in performance, reliability, and core logic. The steps below are designed to ensure a smooth transition to the latest ServiceNow Release Yokohama.
Migration Steps
To avoid issues during the migration, follow the steps below:
Backup Existing Configuration: Take a fresh backup of the existing connector configuration. Upgrading may overwrite existing settings. Backing up configurations ensures we can quickly restore them without data loss or time-consuming manual re-entry.
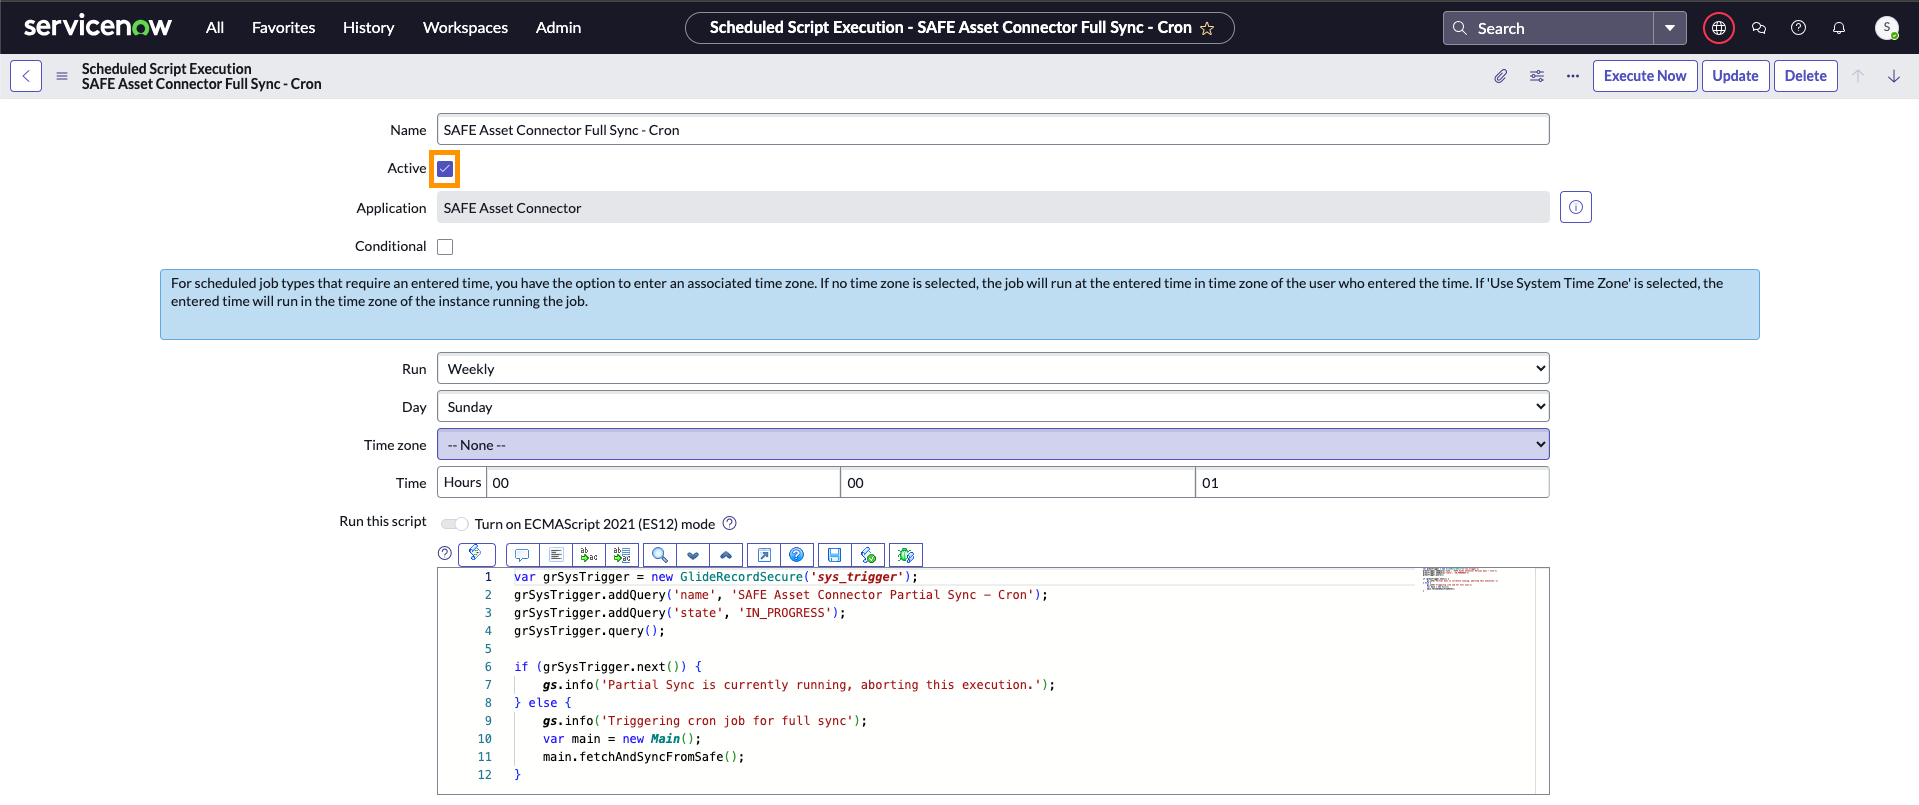
Deactivate Existing Cron Jobs:
Deactivate all cron jobs associated with the current version of the connector.
This prevents the possibility of legacy jobs interfering with the new logic or scheduling conflicts.
Navigate to Scheduled Jobs under System Definition.
.png)
Search for scheduled jobs in all and under the system definition, click on Scheduled Jobs.
Click the filter.
Filter by name that contains SAFE Asset Connector and then click on Run.
You will see a list of cron jobs running in the SAFE Asset Connector.

Go inside it and deactivate the highlighted button and then click on Update.
Verify Background Worker Scripts
Ensure that no background worker scripts are currently running.
Since synchronization tasks typically run in the background, it's essential to wait for all ongoing processes to complete to avoid partial data syncs or data corruption.
To check if any background workers are running, follow the given steps:
Under all, search for sys_progress_worker.list and press enter.
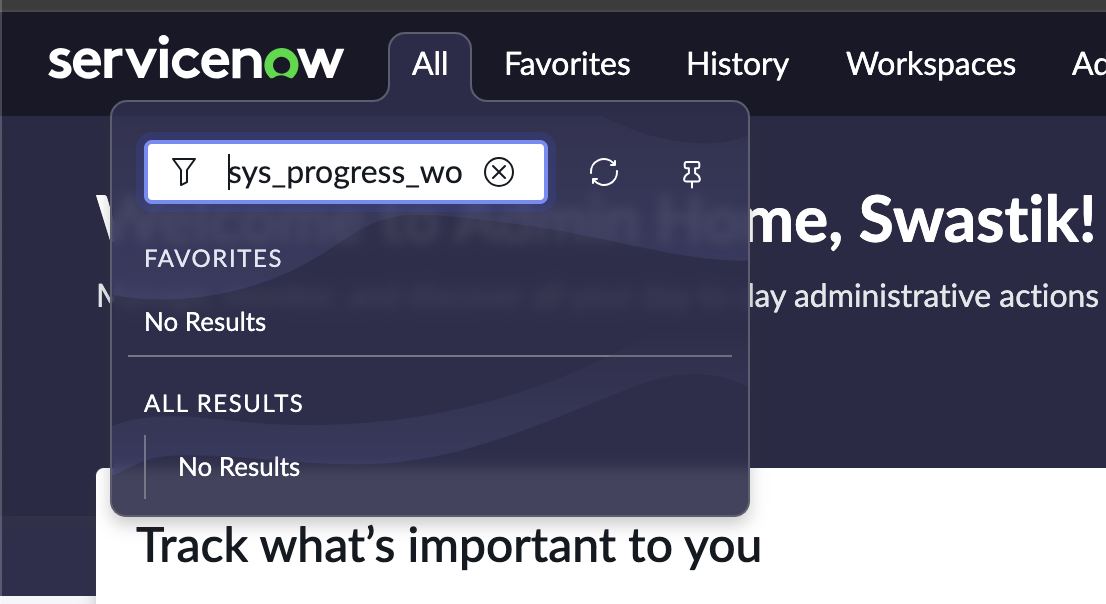
Under that table, filter on name contains SAFE.

Check the status: Ensure the completion code is Success.
If you see any jobs marked as Pending or In Progress, wait for them to finish before proceeding.
Install the Latest Application Version
Install the updated version of the SAFE Asset Connector versioned 2.0.0 from the ServiceNow Store.
Confirm that the installation completes without errors.
Restore Configuration
Use the backed-up configuration and Integration Guide to populate the new configuration page.
6. Run Sanity Test via Test Connector
Execute the “Test Connector” feature to validate configuration and connectivity.
Ensure all credentials, endpoints, and integrations function correctly.
Execute Full Sync
Initiate a full metadata sync into SAFE.
Monitor for errors and confirm that the expected data is being transferred correctly.
Validate Cron Job Execution
Verify that all required cron jobs are recreated and are running as expected.
Post-Migration Verification
Confirm data integrity in both ServiceNow and SAFE.
Monitor logs and sync history for anomalies. Refer to History.
Gather feedback from customers to ensure everything is functioning as expected.
Migration Complete
You’re done! The SAFE Asset Connector has been successfully migrated to the latest version. All configurations are restored, background processes verified, and sync operations tested. Your connector is now fully updated and ready for use—ensuring improved performance and stability moving forward.