About this document
This document provides the step-by-step procedure to configure AWS via ElectricEye in SAFE.
Introduction
The SAFE integration with AWS enables the onboarding of AWS accounts into SAFE and allows the retrieval of assets and their security misconfigurations through ElectricEye.
Add AWS Account
SAFE allows users to add Individual Accounts and Member Accounts.
Add Individual Account in SAFE
SAFE admins can onboard an Individual AWS Account in SAFE via the Role method.
Navigate to Integrations and search for the “AWS via ElectricEye” card.
Click the AWS via Electric Eye card.
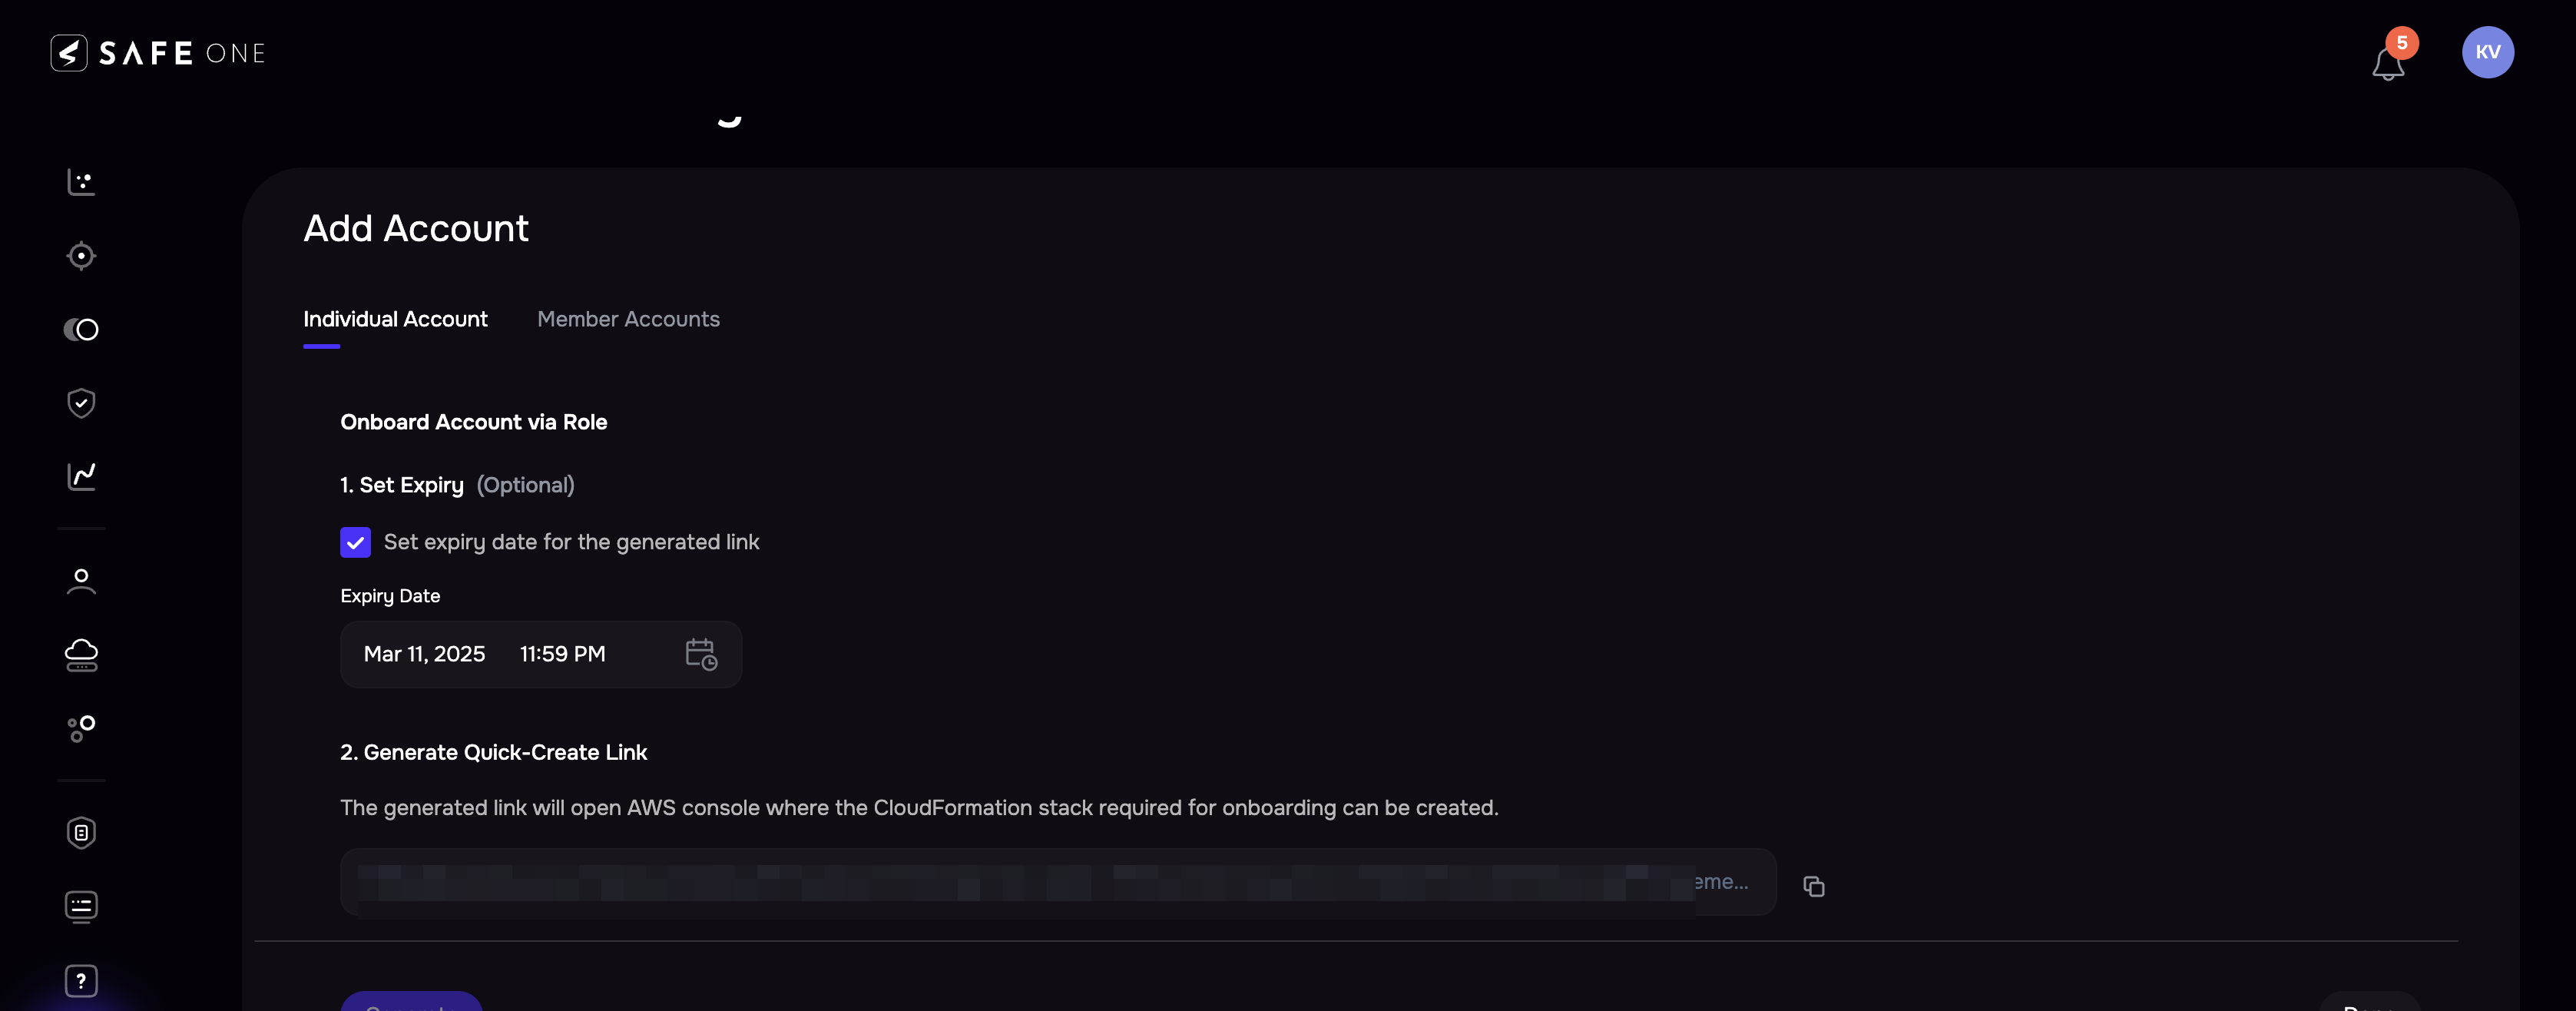
Go to the Individual Account tab.
(Optional) Set the expiry for the CloudFormation stack link you are going to generate.
Click the Generate button.
The system generates a CloudFormation stack link. Clicking the link will open the AWS console. You can also copy and paste the link into a browser.
If the system asks you to log in to your AWS account,
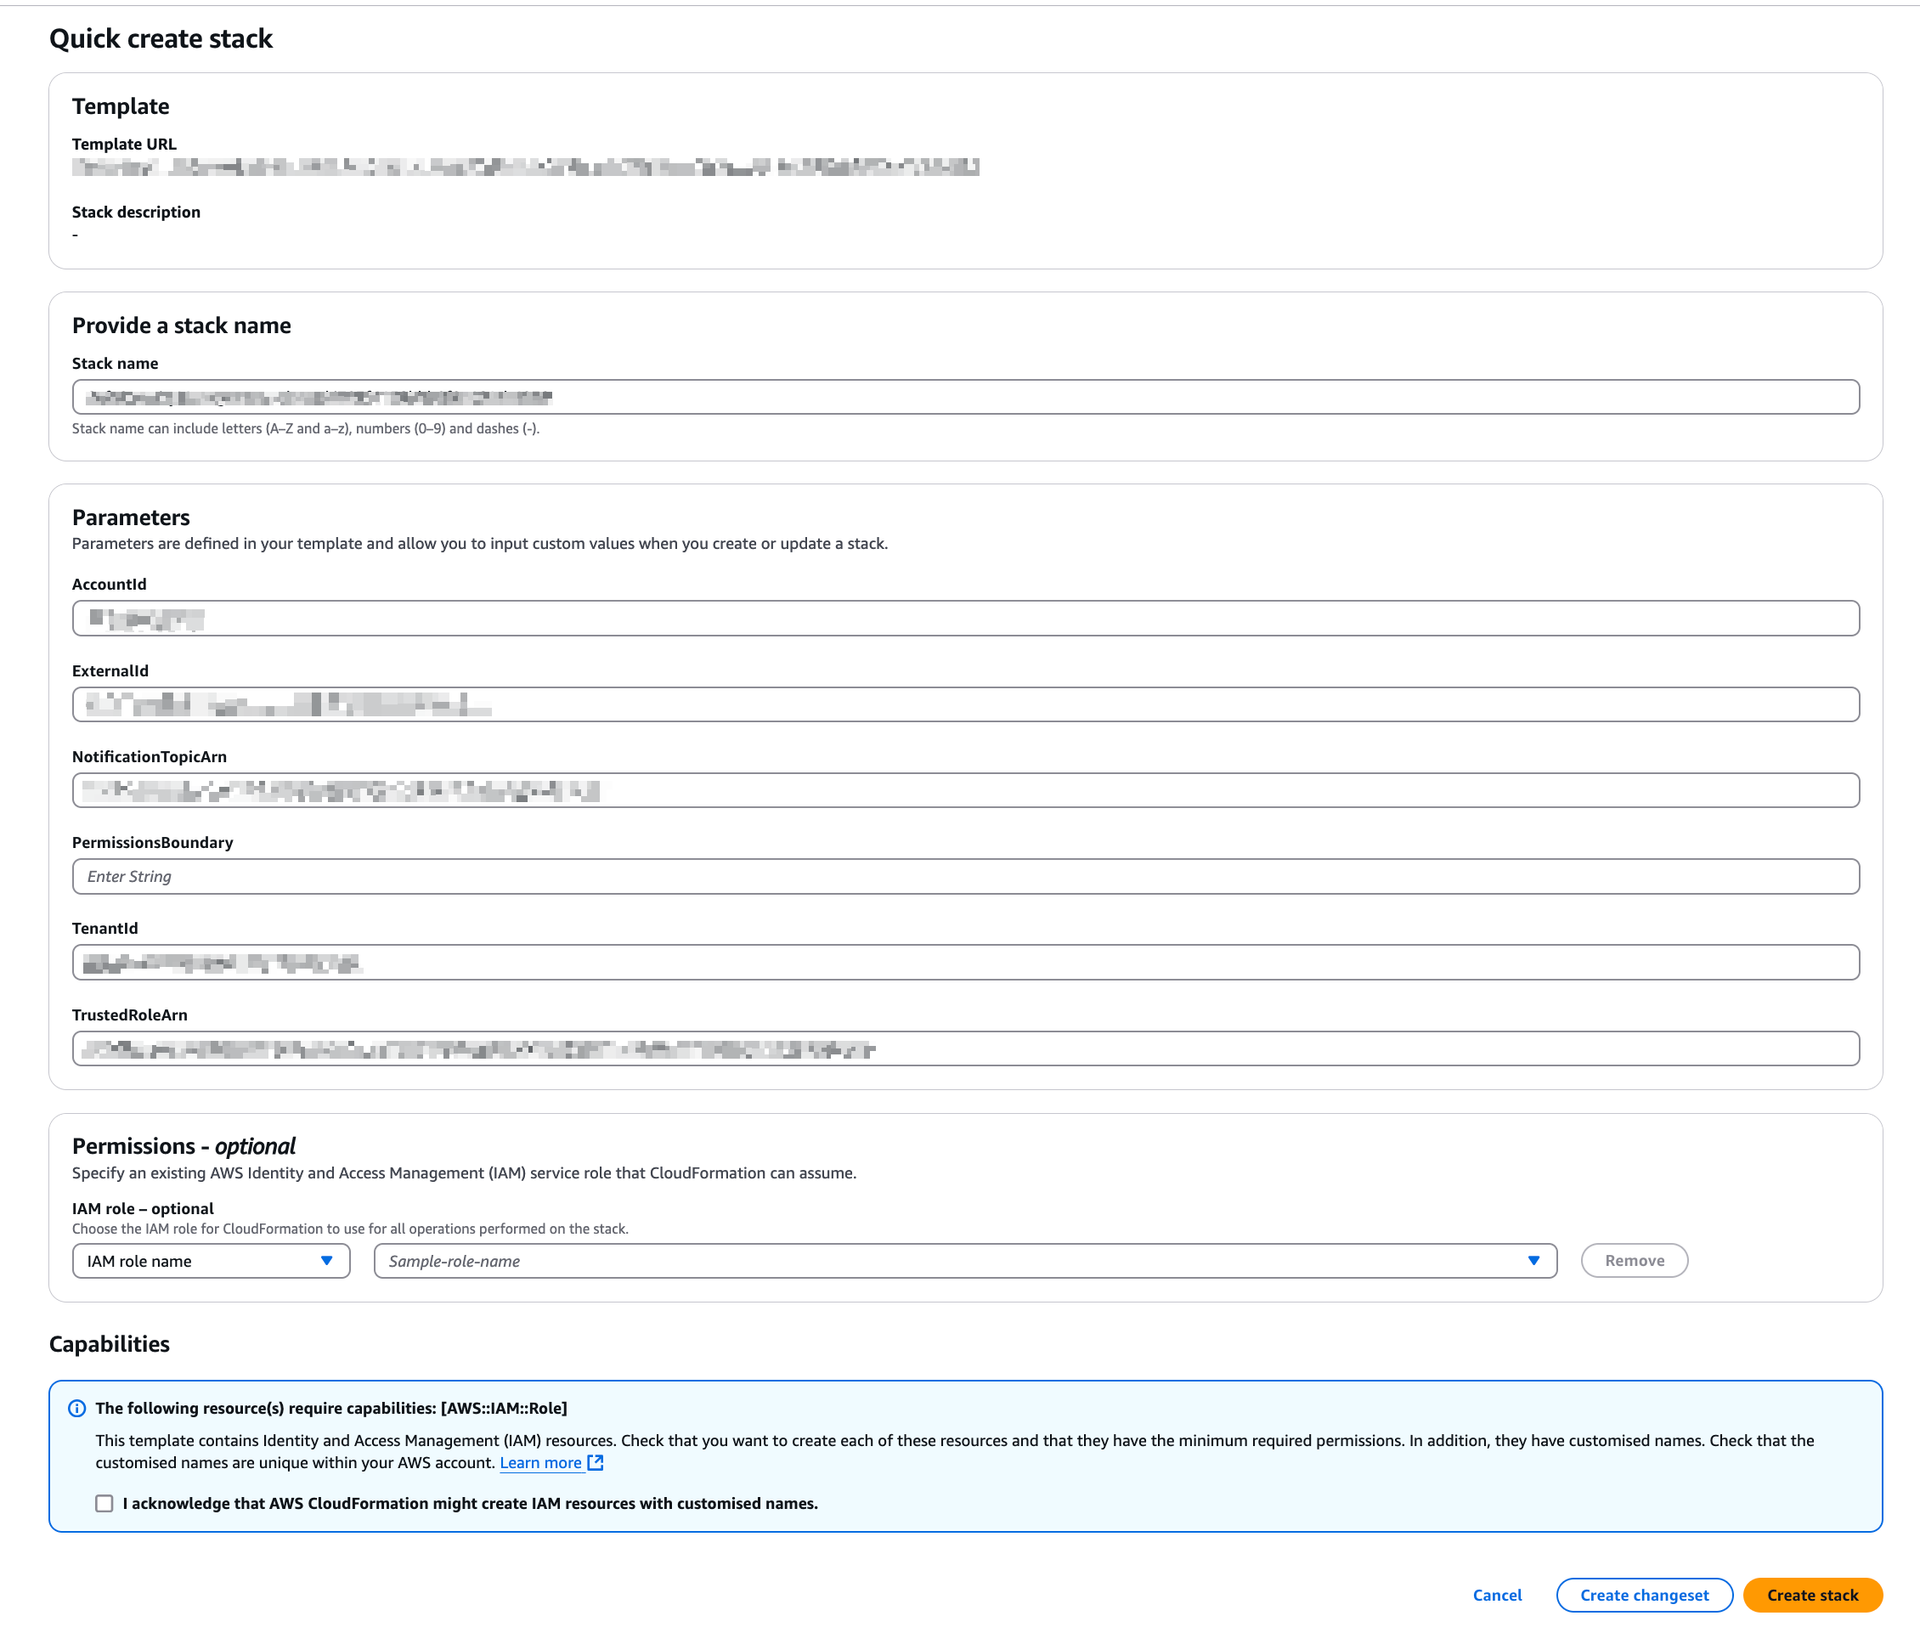
The system displays a pre-filled Quick Create stack page.
(Optional) If necessary, add the Permission Boundary ARN. SAFE supports adding the Permission Boundary ARN to allow the permission boundary to be attached to the IAM role (that is created as part of the stack).
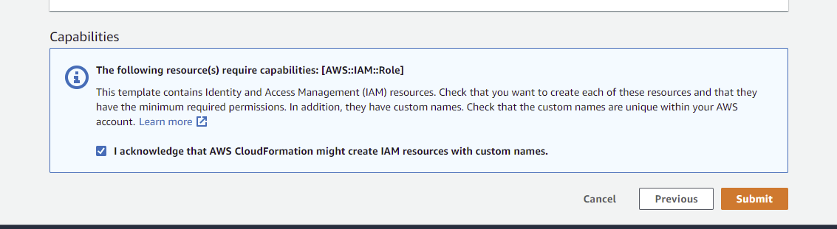
Mark the checkbox to acknowledge that AWS CloudFormation might create IAM resources with custom names.
Note: The CloudFormation template creates an IAM role and assigns read-only privileges to it. This access privilege is then used by SAFE during the automated/on-demand assessment of all supported services available under that cloud account.Click the Create stack button. The system might take a few minutes to create the stack, usually between 3 to 5 minutes.
SAFE auto-discovers your AWS account and displays it under Configured Accounts.
Add Member Accounts in SAFE
If your organization has set up multiple AWS accounts that are managed centrally under an AWS organization, then you can use the option to add Member Accounts setup in SAFE.
The onboarding and assessment of AWS Member Accounts using the Management Account in AWS is possible using the StackSets feature of CloudFormation in AWS. StackSets will enable the AWS Admin/Delegated Admin to deploy cloud formation stacks in multiple accounts from the Management Account.
To add AWS Member accounts:
Navigate to Integrations > AWS via ElectricEye card.
Click the AWS via ElectricEye card
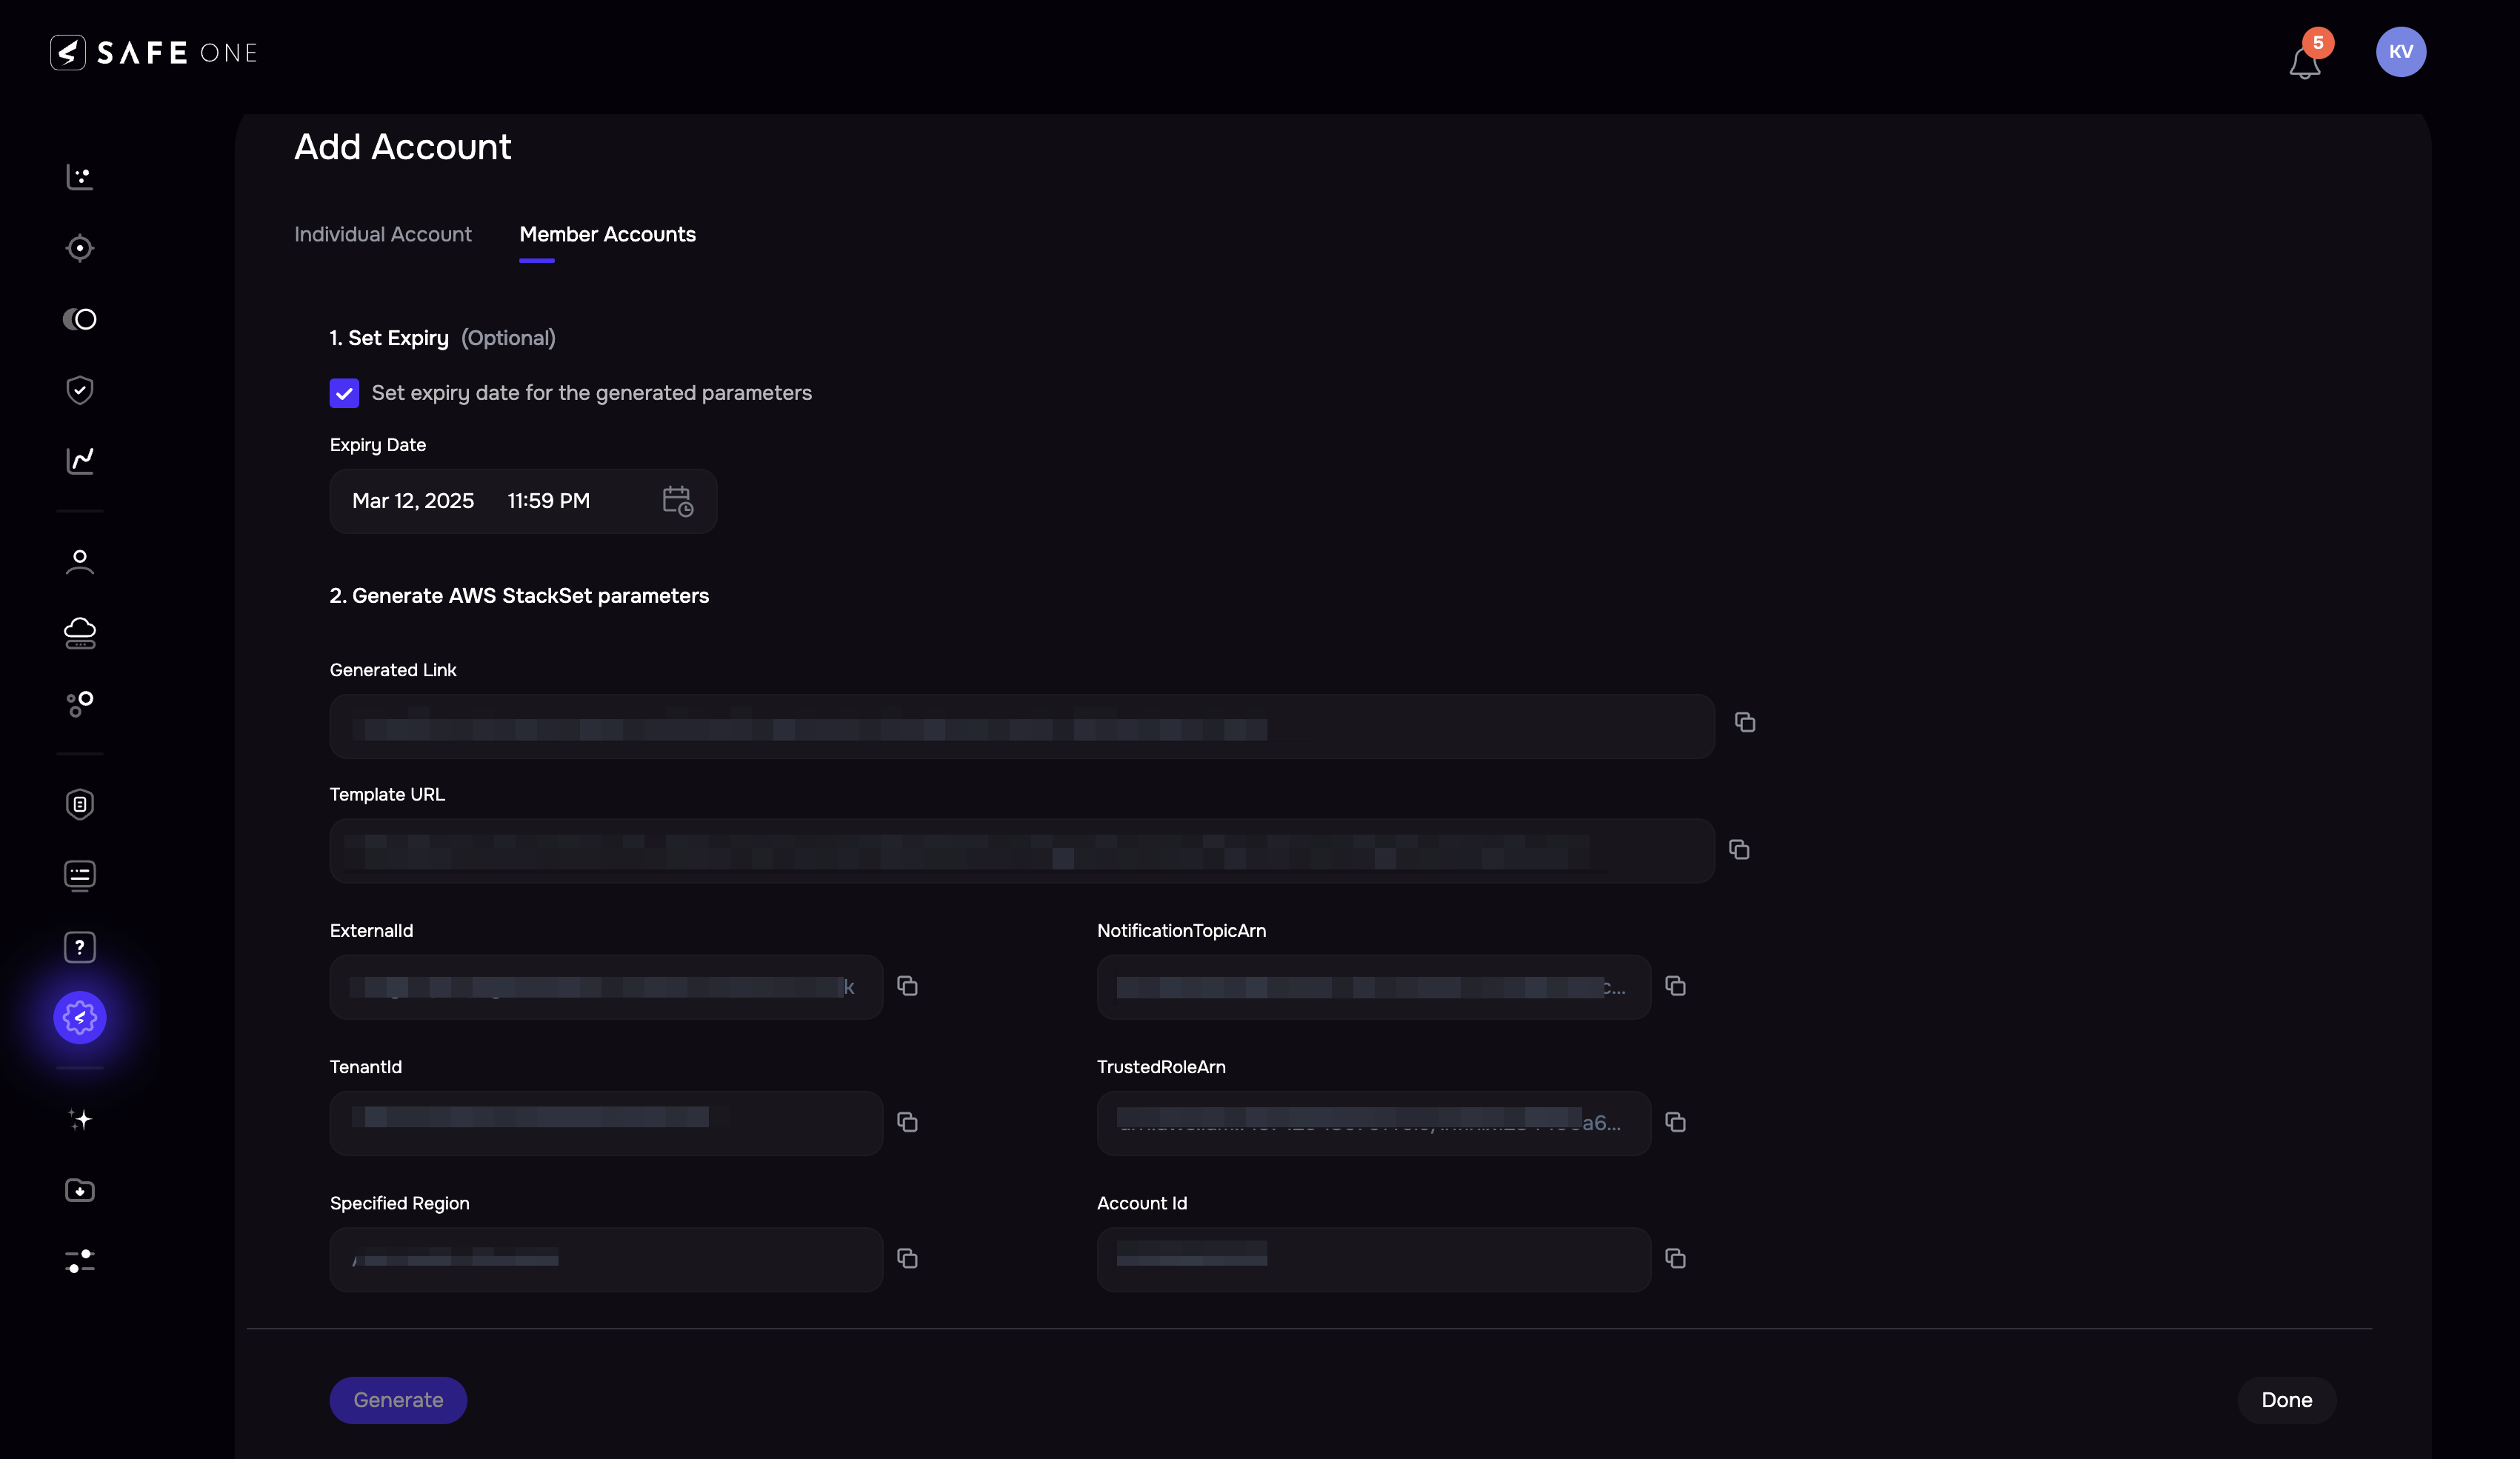
Click the Member Account tab.
(Optional) Set the expiry by marking the checkbox and selecting a date of expiry.
Click the Generate button to generate the AWS StackSet parameters. The system automatically generates the AWS onboarding link.
Click the redirect icon available for the generated link. The system will redirect you to the AWS console. You can also copy and paste the link into a browser.
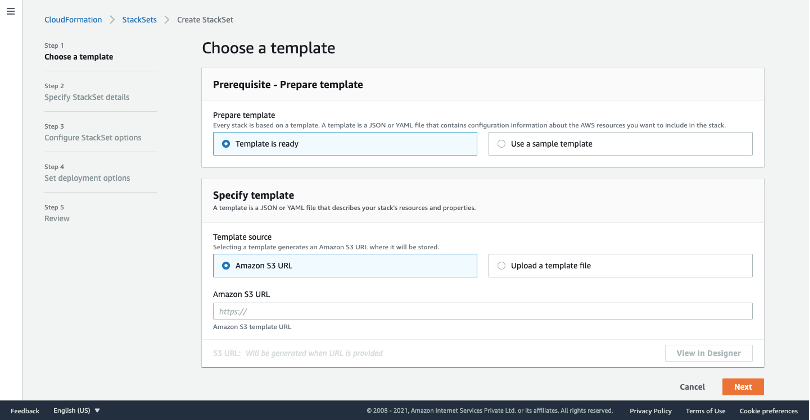
On the AWS console, a page with the title "Choose a template" will open up.
On the Choose a template page:
In the Prerequisite - Prepare template section, select the option Template is Ready.
In the Specify template section, under the Template source, select the Amazon S3 URL.
Copy the Template URL from SAFE and paste it into the Amazon S3 URL field.
Click Next.
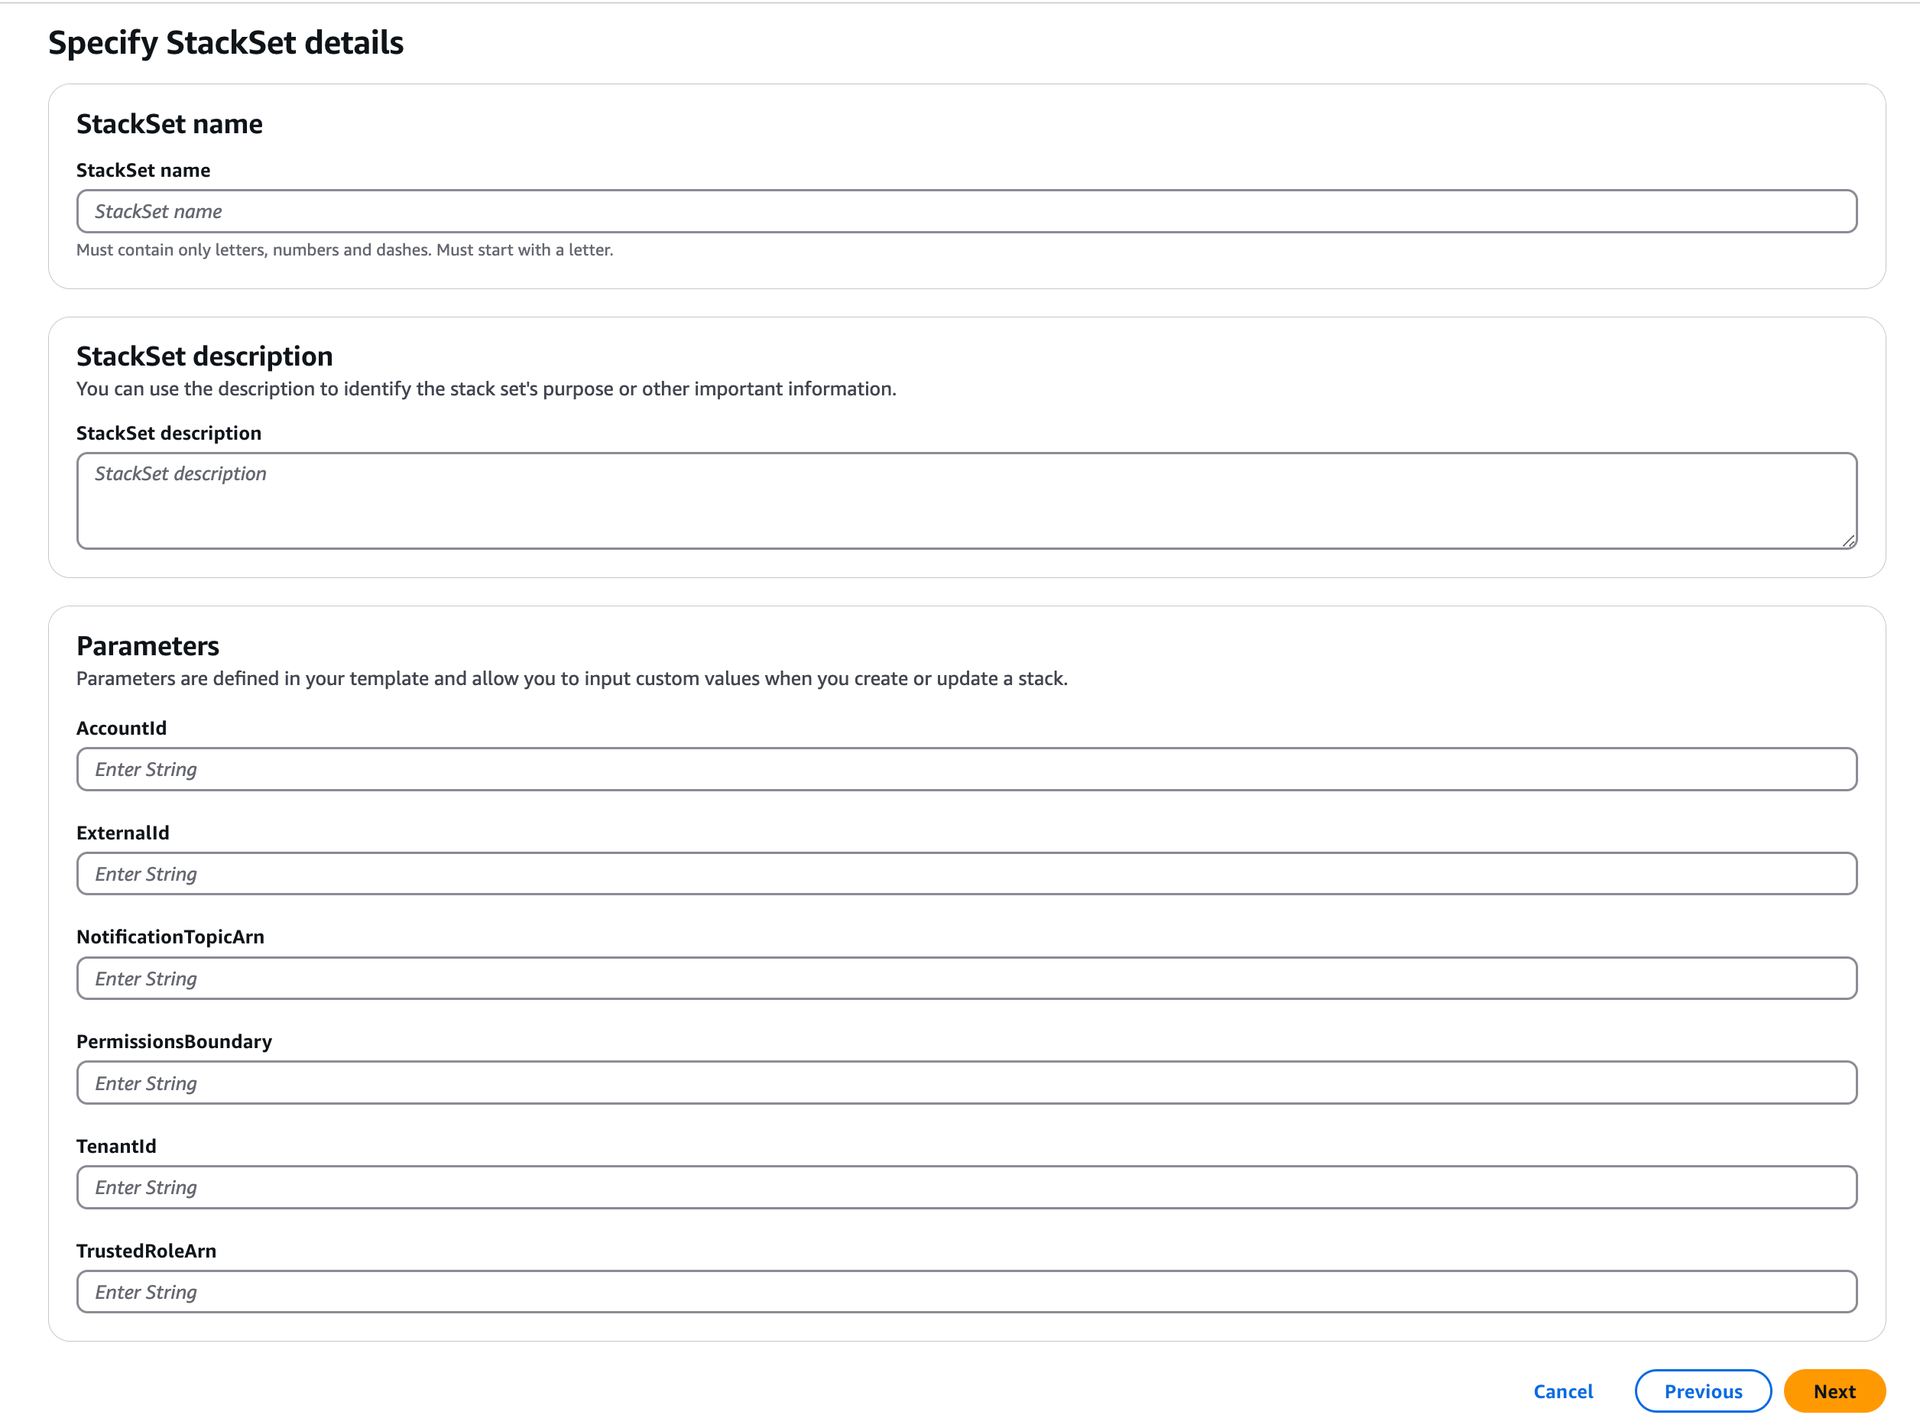
Specify StackSet details:
Specify an appropriate StackSet name and relevant StackSet description in the respective fields.
In Parameters:
Copy the ExternalID from SAFE and paste it into the respective field.
Copy the NotificationTopicArn from SAFE and paste it into the respective field.
Copy the TenantID from SAFE and paste it into the respective field.
Copy the TrustedRoleArn from SAFE and paste it into the respective field.
Copy the AccountId from SAFE and paste it into the respective field.
Click Next.
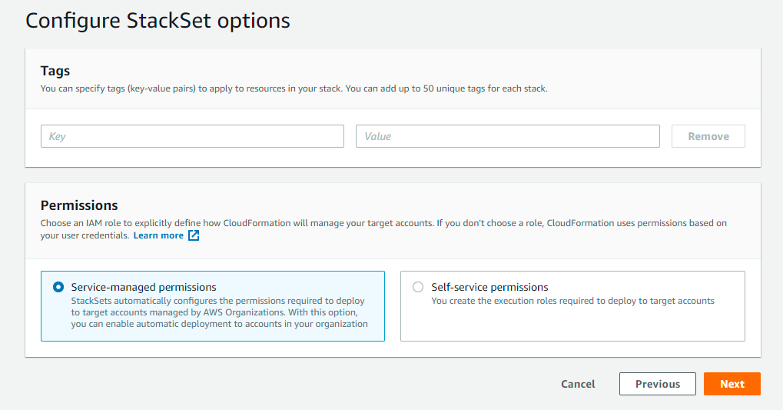
In the Configure StackSet section:
Configure tags, if needed, in Tags.
In Permissions - Choose any one of the two types of permissions shown:
(RECOMMENDED) Service-managed permissions - With these permissions, you can deploy stack instances to accounts managed by AWS Organizations in specific Regions. You don't need to create the necessary IAM roles; StackSets will create the IAM roles on your behalf. If any new account is added to the Management account in the future, it will get auto-discovered on SAFE, provided Automatic deployment is Enabled in the Set Deployment Target Section.
Self-Managed Permissions - You can deploy stack instances to specific AWS accounts in specific Regions with these permissions. You must first create the necessary IAM roles to establish a trusted relationship between the account you are administering the StackSet from and the account you are deploying stack instances to.
Note: If the customer wants "per-account" control (e.g., delete the stack in a single account after deployment) on the stack set, they should choose Self-Managed Permissions. Users can only perform actions (e.g., delete) at an OU level with the Service-managed permissions. Hence, Self-managed permissions offer more granular control, even though they will require higher maintenance effort than Service managed permissions.
Click Next.
In the Set deployment section:
In Deployment Targets:
If you want to deploy the stack to all accounts under the Management Account, choose to Deploy to the organization.
If you want to onboard only a subset of your OUs, choose to deploy to organizational units (OUs).
Choose the appropriate options for Automatic deployment and Account removal behavior.
In Specify regions, select the region as shown in Specified Regions in SAFE.
In Deployment options, specify values for Maximum concurrent accounts and Failure tolerance, if needed.
Note: If Failure tolerance is a small value, stack creation failure in that many accounts will cause the entire StackSets deployment to stop.Click Next.
Review the options and deploy the stack sets by clicking Submit.
Once deployed, StackSets can be viewed from AWS Console > CloudFormation > StackSets.
To view individual stacks, click on the StackSet Name > Stack Instances.
Note: If any of the AWS Member accounts were already onboarded individually in SAFE by “creating a Stack using the Quick create-link (from the Assume Role section of Add Account page) and we try to deploy another stack in the same account using StackSets from the Management Account, the stack creation will fail for that AWS member account where the stack already exists. Admin should delete the individual stack before deploying a StackSet in the OU containing the AWS Member account.
Import Tags from AWS to SAFE
Refer to Import tags from AWS.
Manage AWS Accounts
View AWS Account
Navigate to AWS via the ElectricEye integration page.
The system displays a list of all the configured accounts on the page.
View sync history for the AWS Account
To view the sync history of individual accounts, click on the Account ID in the “Configured Account” section.The page will display the sync history for the account.
Manually Sync AWS Account
To start a manual sync:
Navigate to the integration configuration page.
Click the options menu available in the Manage column.
Click the sync button. The system notifies you that a sync has been started. The status of the sync will be displayed under the “Assessment Status” column.
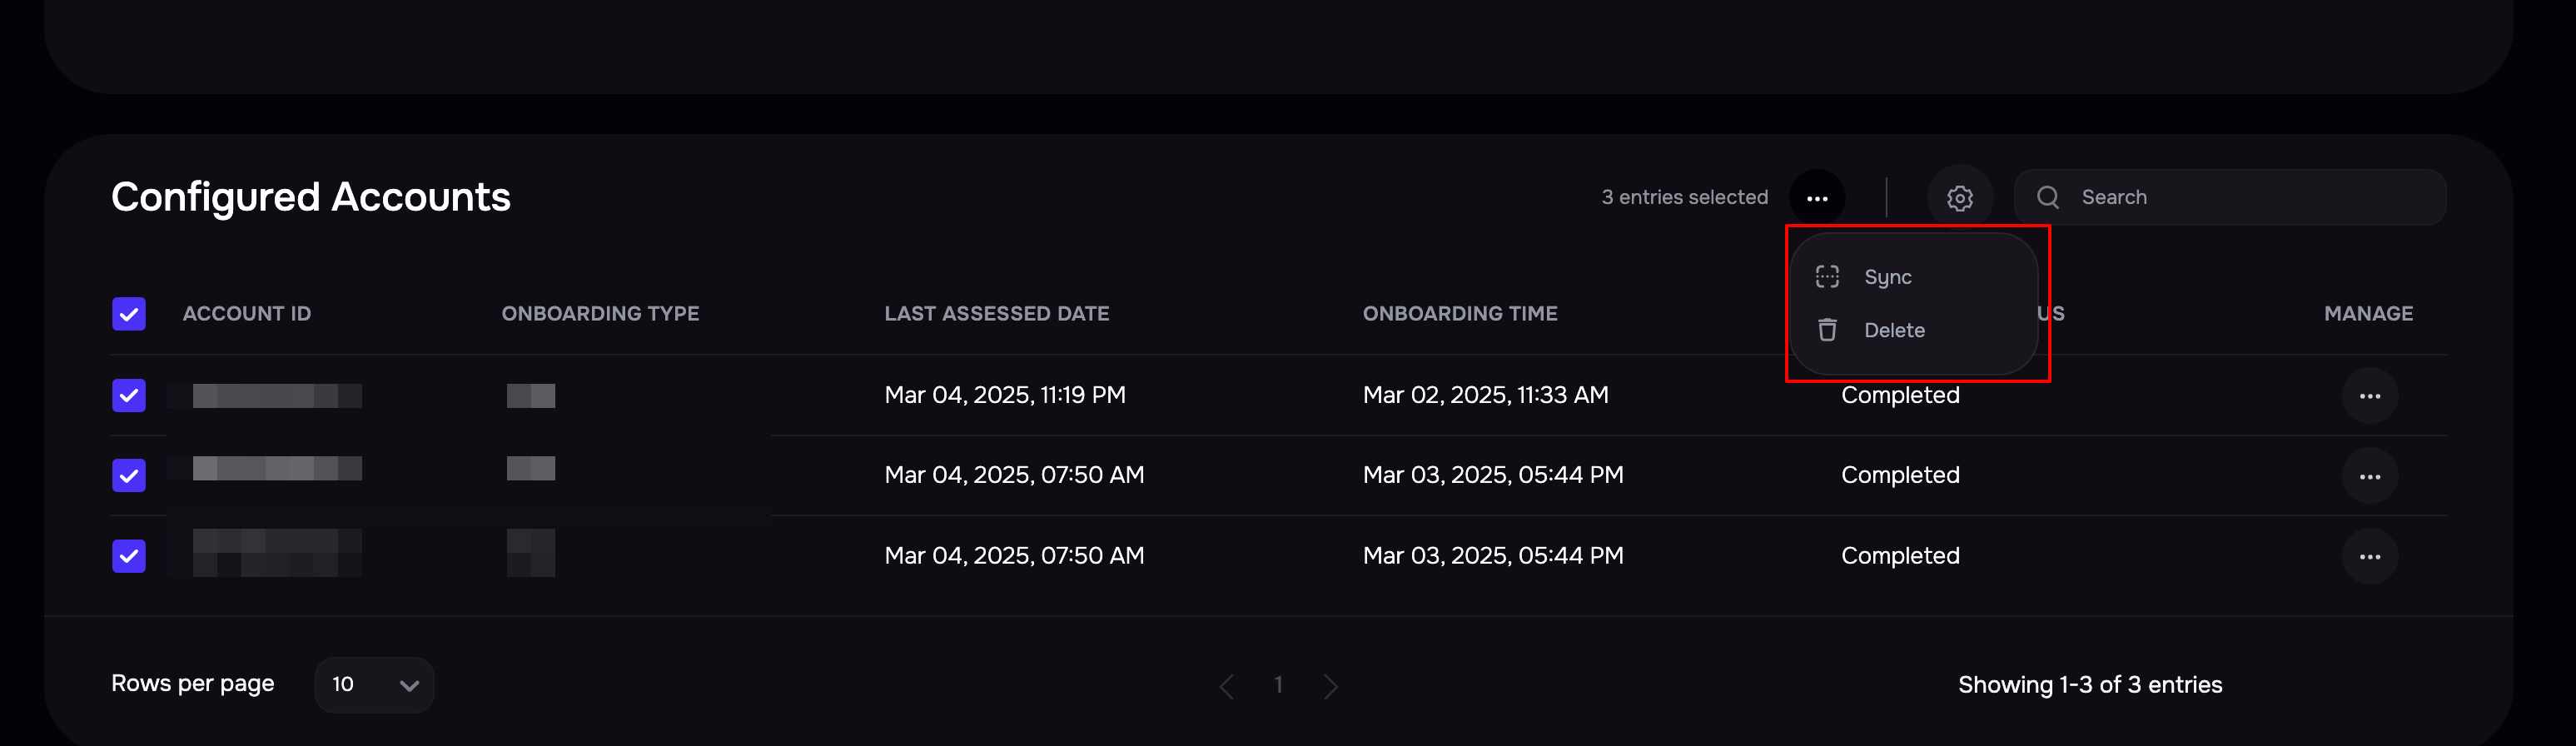
To sync AWS accounts in bulk, select the AWS accounts by marking the checkboxes available against them.
Click the Sync icon available at the top to start the sync.
Delete AWS Account
To delete multiple AWS accounts:
In the section for Configured Accounts, select the AWS accounts by marking the checkboxes available against them.
Click the Delete option from the top menu.
Click the “Yes, Delete” button on the confirmation screen.
AWS account can also be deleted individually by choosing the delete option from the “Manage” column menu.
Set Global Sync Frequency
Navigate to the AWS integration configuration page.
In the section for Configured Accounts, click on the Settings icon at the top.
Enter the number of days in the Global Sync Frequency field.
Click the Update button.

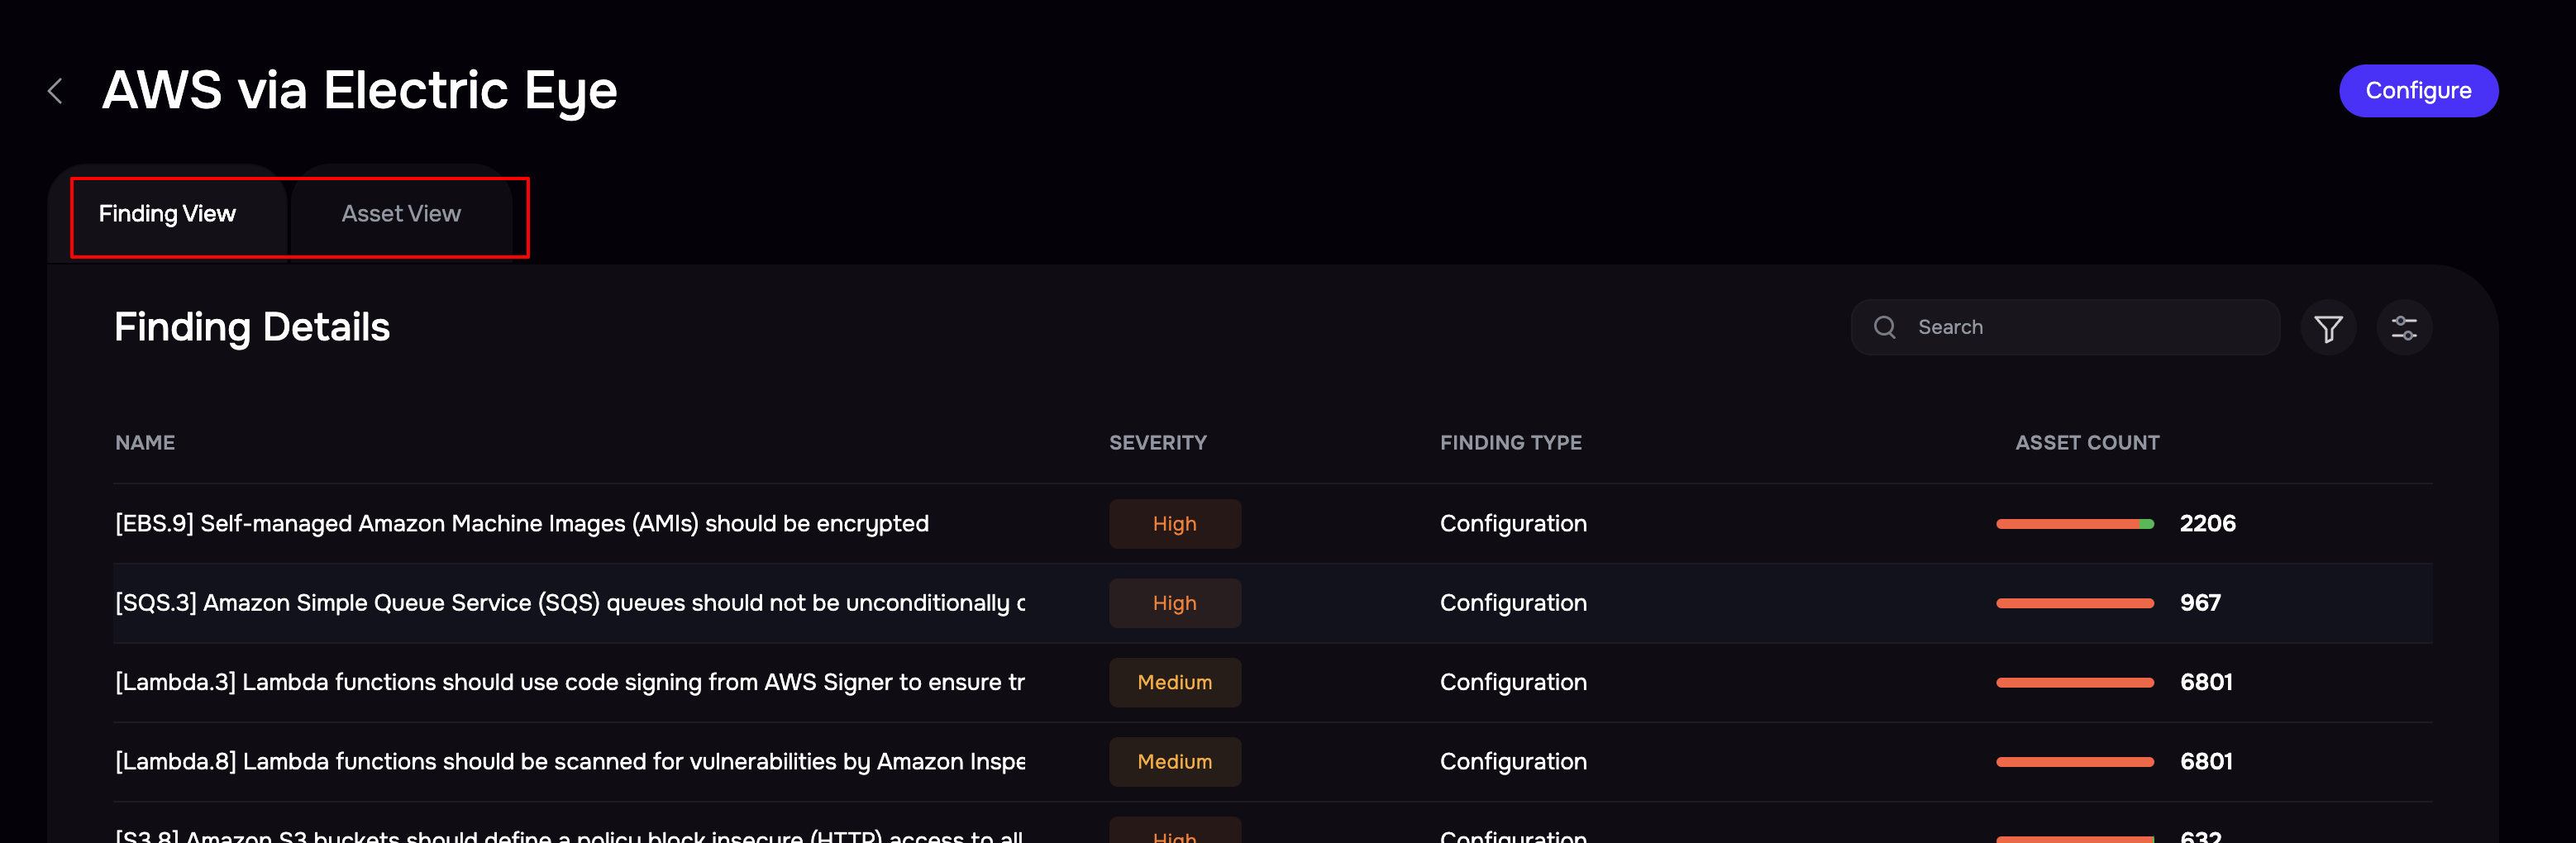
View results
Go to the AWS integration page.
Click the Asset View tab to see all the assets
Click the Finding View tab to see all the findings.
FAQs
If I pause/stop an EC2 instance, will SAFE still be able to assess it if the account is regularly assessed?
Yes. SAFE will continue to assess the instance as long as the account is onboarded and regularly assessed.
If I set the expiry for a stack-creation link as April 7, 2021, when will it become inactive?
The link will become inactive from April 8, 2021, at 12:00 AM onward.
What happens if I use the stack-creation link after its expiry date?
The stack creation will still be initiated and completed, but the account will not appear in SAFE.
What if I try to create another stack in an account that already has one stack created?
You can deploy multiple stacks if they correspond to different SAFE instances.
If you attempt to create another stack for the same SAFE instance, the stack creation will fail.
To resolve this, delete the existing stack first. However, deleting the stack will cause the account’s assessment status in SAFE to fail unless the new stack is deployed before the next sync.
If an AWS account sync is in progress and I delete the account from SAFE, what will happen?
The ongoing sync will continue in the background, but sync results will not be updated in SAFE.
Why is the "Add Account" button disabled even though I am logged in as an Admin?
Please contact the SAFE Support team to enable the "Add Account" button.
Why did SAFE opt to make use of Electric Eye in the AWS integration?
While designing a scalable and cost-effective security solution, we needed a tool that could assess AWS configurations without relying on paid services. While AWS Security Hub offers robust capabilities, it is a paid service, and not all customers choose to enable it due to cost considerations.
To address this, we evaluated free and open-source tools that provide cloud configuration assessments. After reviewing several options, we focused on ScoutSuite and ElectricEye, both widely used in the security community.
ElectricEye was ultimately selected over ScoutSuite due to several key advantages:
It offers stronger alignment with industry-standard security frameworks such as CIS, NIST, PCI-DSS, and HIPAA.
It provides more actionable findings and a broader set of AWS-specific controls.
Electric Eye looks to replicate security controls already present in AWS, what additional value is provided over a native AWS integration?
While it's true that ElectricEye evaluates configurations that already exist in AWS, its value lies in how it standardizes, and aligns those checks with recognised security frameworks. Here's how it adds meaningful value:
Standards Mapping
One of ElectricEye’s key strengths is its built-in mapping to compliance standards such as CIS Benchmarks, PCI-DSS, HIPAA, and NIST. While AWS provides raw configurations and findings (e.g., via Config, Trusted Advisor, or Security Hub), ElectricEye translates these into actionable, standards-aligned insights.Reporting and Visibility
ElectricEye outputs findings in a structured format (e.g., JSON ), making it easy to aggregate, visualize for tracking and remediation.
Cost Efficiency
It provides many of the same benefits as AWS Config or Security Hub at no extra cost, which is especially valuable for customers who want security visibility without incurring additional AWS service charges.
ElectricEye doesn’t just duplicate what AWS already provides—it enhances it by adding context, compliance mapping, and flexibility in a cost-effective way.
Is Electric Eye suitable for large-scale AWS environments?
At our end, we use Electric Eye in an optimized and efficient way to handle larger AWS accounts seamlessly. We rely on the IAM role automatically created during the CloudFormation stack deployment to streamline the process of generating temporary credentials. Once the IAM role is in place, we programmatically assume this role using AWS SDKs, which triggers the generation of temporary credentials through the AWS Security Token Service (STS). These credentials are short-lived, ensuring that we follow best security practices by avoiding long-lived access keys and minimizing exposure to potential risks.
We then process the Electric Eye reports auditor by auditor, breaking down the task into smaller, more manageable units. This ensures that smaller reports are generated, optimizing both performance and resource utilization. By handling each auditor individually, we can scale efficiently, allowing us to manage larger AWS accounts without any performance bottlenecks or issues.
Are AWS cost metrics available for the impact of a sync with SAFE?
Currently, we do not have specific metrics on the impact of syncing data from AWS to SAFE. However, Electric Eye retrieves metadata using AWS’s read-only calls such as Describe, List, and Get, typically through an assumed role in a cross-account setup. These API operations and the use of STS:AssumeRole do not incur additional AWS charges. As a result, we do not expect any significant AWS-side cost impact from this sync process.
Which commit/version of Electric Eye does SAFE use?
We are using Electric Eye at commit ID 092d151f90cc07a351f4758a39536ed501797dfc (refer to GitHub). Going forward, we plan to follow a six-month update cycle. If an upgrade is needed (for a new AWS service or a security patch), we will re-clone the project and check out the latest suitable commit. We’ve also raised a pull request for a bug we identified, which is pending approval and merge. Once merged, we’ll update to the latest commit.
Which auditors in Electric Eye does SAFE use?
We are skipping the following auditors:
ElectricEye_AttackSurface_Auditor
Amazon_CloudWatch_Auditor
Additionally, in the following auditors, we are skipping certain checks:
Amazon_EBS_Auditor: Skipping ebs_snapshot_encryption_check and ebs_snapshot_public_check
Amazon_RDS_Auditor: Skipping rds_snapshot_encryption_check and rds_snapshot_public_share_check
All other auditors are being used.
Which role/permissions and connectivity method does SAFE use?
We use AWS-managed read-only access with additional denial permissions to restrict unnecessary data exposure. The CloudFormation template for this role can be found here -
We assume the role created through this CloudFormation template to generate temporary credentials for accessing AWS resources via electric eye.
Can a custom customer provided AWS role be used?
No, custom roles cannot be used.
What processes do you have in place to dispose of any residual data that you collect outside of that required for risk assessment?
Any data retrieved by Electric Eye auditors that isn’t required for the risk assessment is neither stored nor logged. It exists only temporarily in the memory of the ECS task. Once the sync is completed, the ECS task is stopped and deleted, ensuring data is disposed of properly.
SAFE's Outgoing IP Addresses
Click here to find the outgoing IP addresses of SAFE. All traffic to any integrations in SAFE will see one IP address as the source IP of the incoming connection.