About This Document
This document provides step-by-step instructions for configuring the Jira (Cloud) and create Issues directly from SAFE.
Introduction
The integration allows you to create issues in Jira for Risk Treatment Plans directly from SAFE. SAFE Admins can configure this integration from the "Jira" card available on the integrations page.
Prerequisites
A Jira user or service account with the required roles and access to create issues, add attachments, and retrieve issue status. The account must have permissions for the relevant Jira projects, including:
Browse Projects
Create Issues
Add Attachments
SAFE access with Admin role.
Generate Connection Details
To integrate SAFE with Jira, we need the following details:
Jira Domain (Example: https://xxx-xxx.atlassian.net)
Client Email
API Token
Jira Project Key
Jira Issue Type
Mandatory Jira Fields
Part A — Steps to be performed by the Jira Admin
Who should do these: A Jira Cloud Administrator or a Project Administrator depending on your org.
Create (or Invite) a Service User (Recommended)
We strongly recommend creating a dedicated service user (e.g., jira-api-integration@yourcompany.com) for the integration. However, you may also use your personal Jira account if it has the required project permissions.
Go to Jira Settings by clicking the Gear icon.
Navigate to User Management.
Invite a new user, such as jira-api-integration@yourcompany.com (you can also invite users via Atlassian Admin).
Assign this user access to the Jira product used by your project (e.g., Jira Software or Jira Service Management).
Do not add this user to admin groups.
API tokens inherit the user’s permissions.
Using a dedicated service account limits access scope and improves security.
Create a Project Role with Minimal Permissions
Go to Jira Settings.
Navigate to System > Project Roles.
Click Add Project Role.
Enter a name such as API_Integration_Role (or a similar descriptive name).
Click Save.
Note
If the administrator prefers not to create a new project role, the service user can instead be added directly to the project’s People list and granted the required three permissions (Browse Projects, Create Issues, and Add Attachments) via the project’s Permission Scheme.
Grant the Required Project Permissions
Grant the three permissions in the project’s Permission Scheme to enable SAFE integration:
Browse Projects
Create Issues
Add Attachments
Navigate to Jira settings > Issues > Permission schemes.
Either:
Edit the existing scheme used by the target project, or
Duplicate the scheme and attach the duplicate to your target project(s) — recommended if you want to avoid impacting other projects.
In the scheme, grant the above three permissions to the newly created role (API_Integration_Role) or directly to the service user account.
Leave all other permissions (Edit Issues, Delete Issues, Transition Issues, Administer Projects, etc.) unchanged — do not assign them to the integration role or account.
Notes: If the org policy prefers, admin can grant the 3 permissions to an existing role (e.g., Developers), and then add the service user to that role in the project.
Associate the Role and Add the User to the Project
Navigate to the target project; Project settings > People > Add people.
Add the service account you created (e.g. jira-api-integration@…) and assign the API_Integration_Role.
Confirm that the user appears in the project People list with that role.
(Optional) Confirm attachments are enabled globally
If Add Attachments returns 403, attachments may be disabled. Admins can check Jira settings > System > Attachments (or General configuration) and enable attachments if needed.
Now the service user can generate the API token or generate on their behalf and deliver securely.
Part B — Steps you (non-admin user) will perform
Assumes the admin completed Part A and added either your account or the service account to the project role.
Once the service account is added, the account should get an email that you’ve been added to the project, or check the project: Project > Project settings > People (you’ll see your account and role).
If you can’t see People, ask admin to confirm they added the account to the project.
Create your API token (your account or the service account)
Open your browser and sign in as the service account (or your own account if admin granted the permissions).
Click Create API token.
Give the token a clear name, e.g. jira-integration-<project>-YYYYMMDD.
Click the Create button.
Copy the token and store it securely (you won’t be able to view it again).
Click Done.
Note
API tokens inherit the account’s permissions. If the account only has the three project permissions above, the token will be limited accordingly.
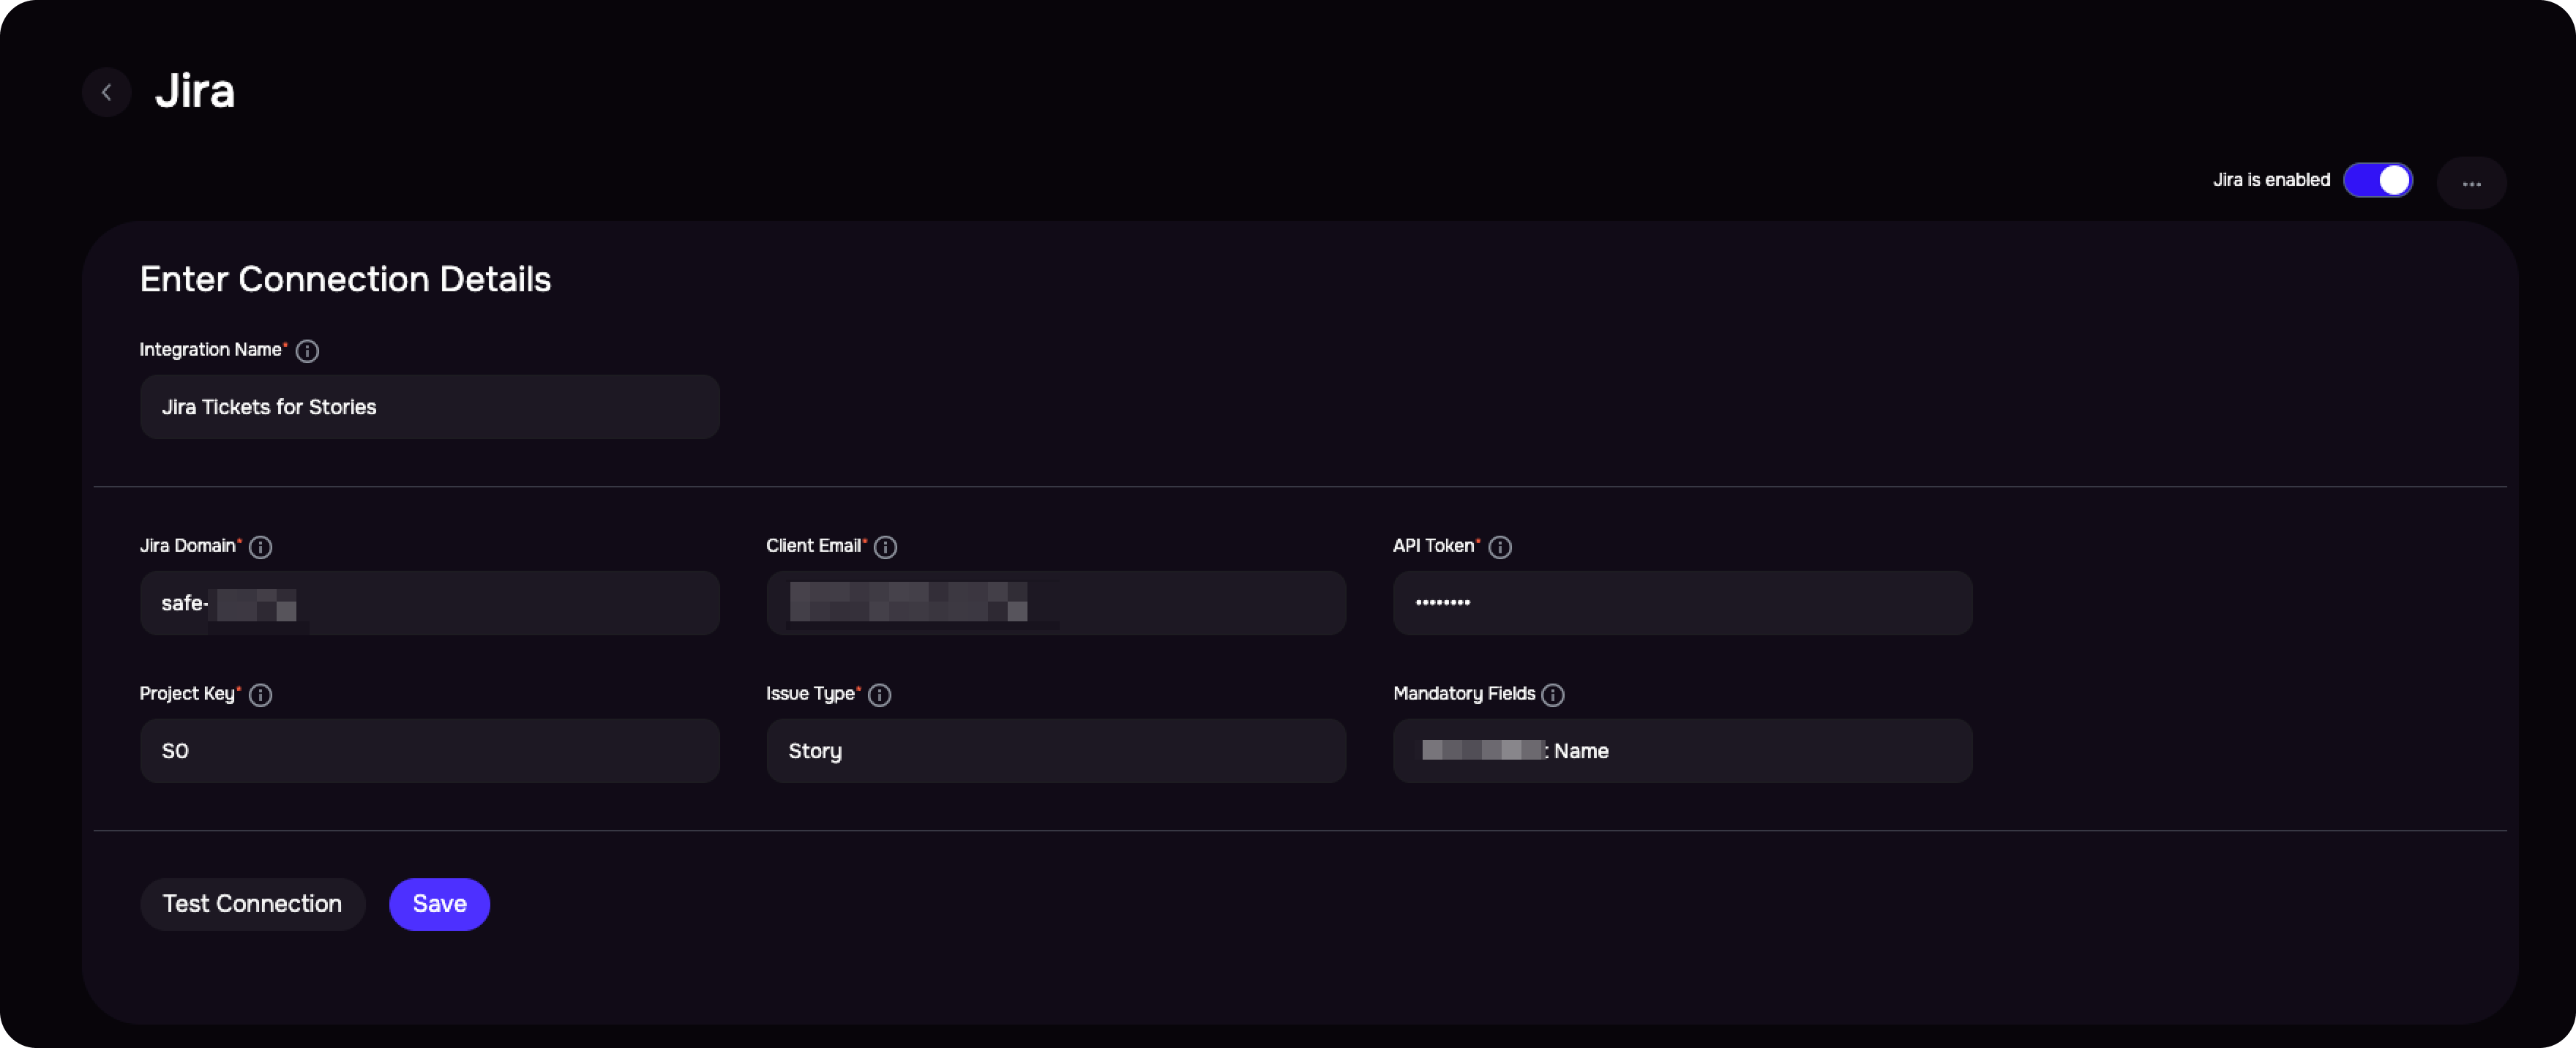
Configure Jira in SAFE
Follow the below steps to configure Jira in SAFE.
Go to the Integrations page and click the "+" button.
Search and click the Jira card.
Open the Configure page.
Enter the details the respective fields.
Integration Name: Enter a name for the Integration.
Jira domain: If your Jira domain is my-company.atlassian.net, enter my-company here.
Project Key (Case sensitive): The key of the project where you want your issues to be created.
API Token: Refer to Refer to Generate Connection Details.
Issue Type (Case sensitive): The type of the Issue that you want to create in your project (for eg: Bug, Story, Epic, etc.)
Mandatory Fields (comma separated and case sensitive): The mandatory fields required to create a work item of the issue type in your project. If there are multiple fields, make them comma separated.
If a mandatory field in your work item gets populated with a default value, you need not enter that field here.
Click the Test Connection button.
Once the connection is validated, click the Save button.
Create Jira Issue in SAFE
Navigate to the Risk Treatment Plan page and select any Risk Treatment Plan.
Click the three-dot options menu and choose Create Jira Issue.
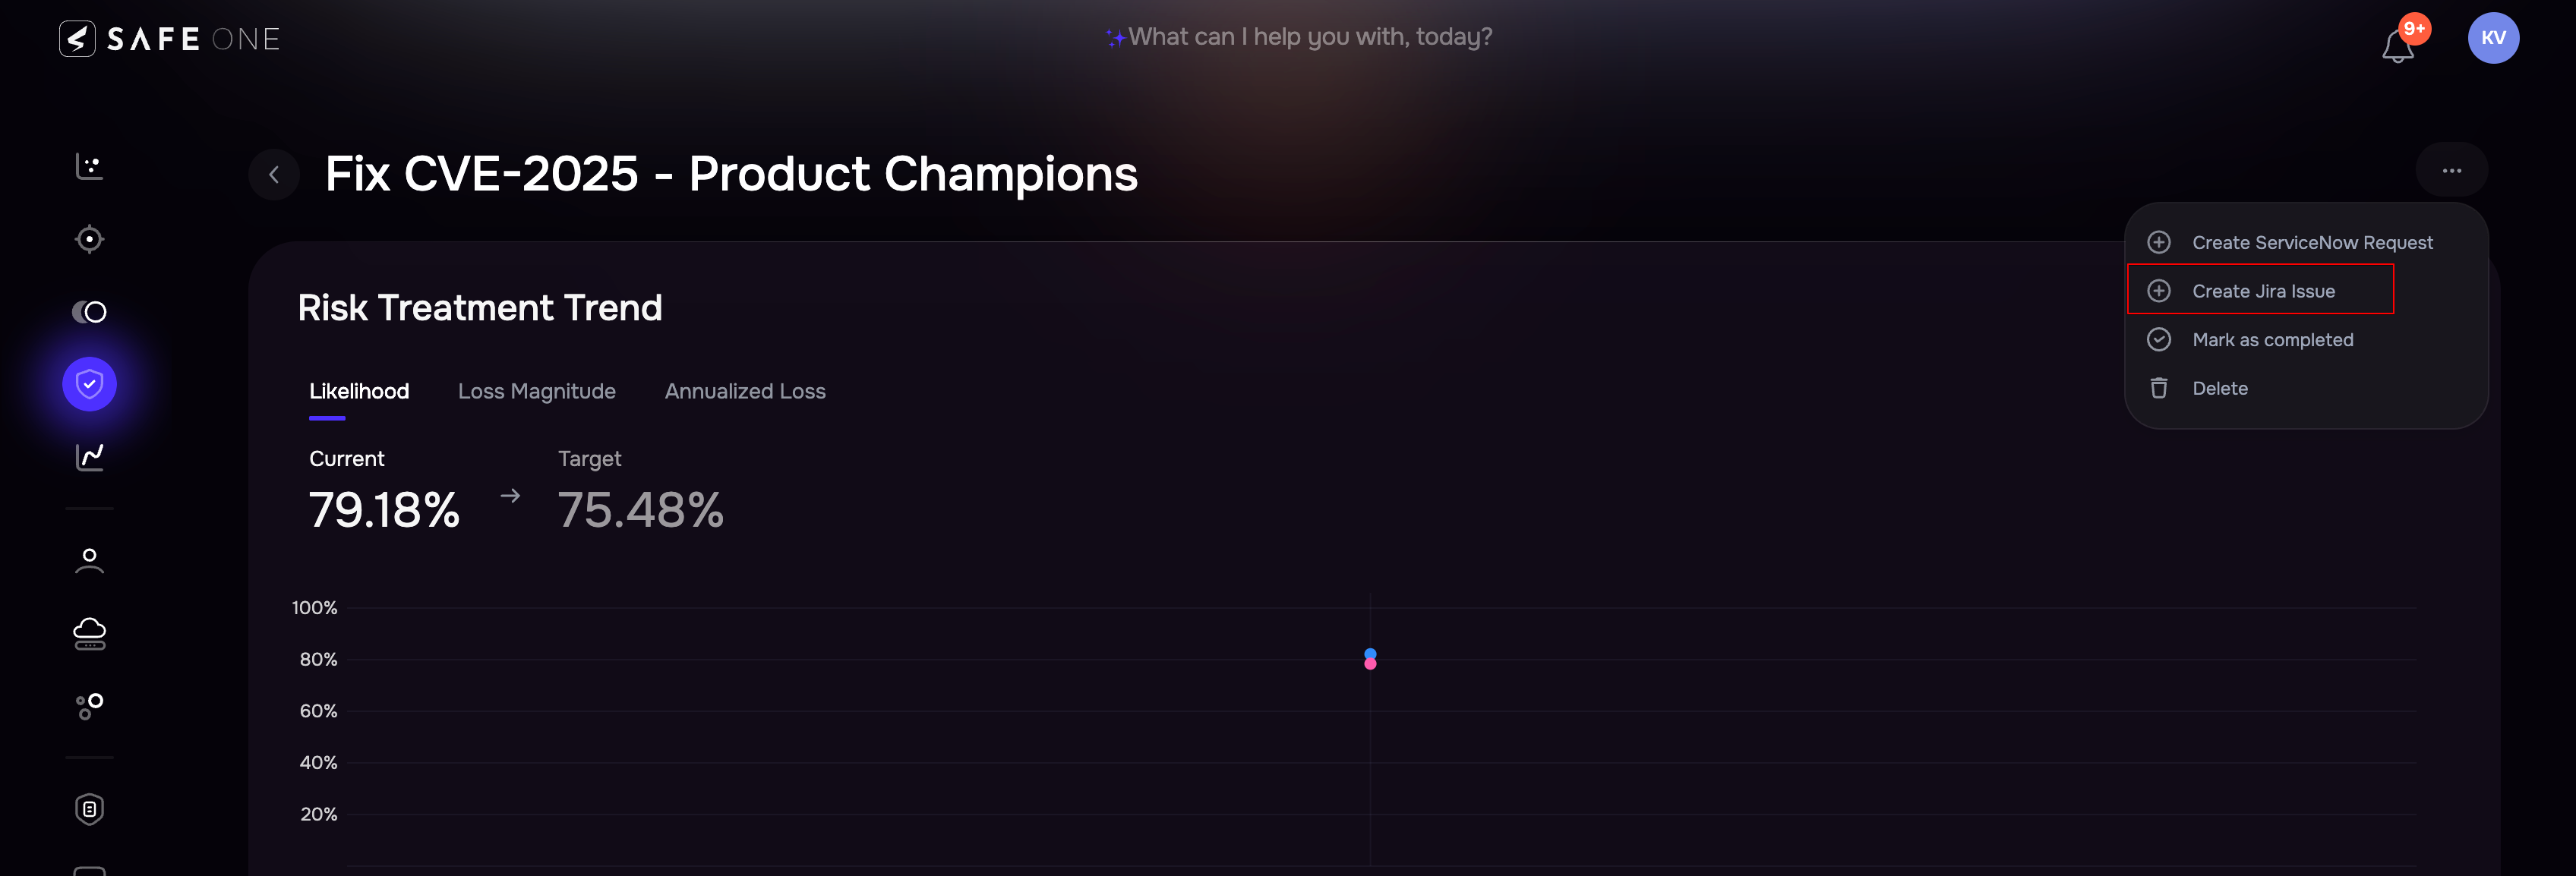
Fill in the required details: Summary, Description, and all mandatory fields configured during setup.
For fields that accept multiple values, separate each value with a comma.
Click Create Issue.
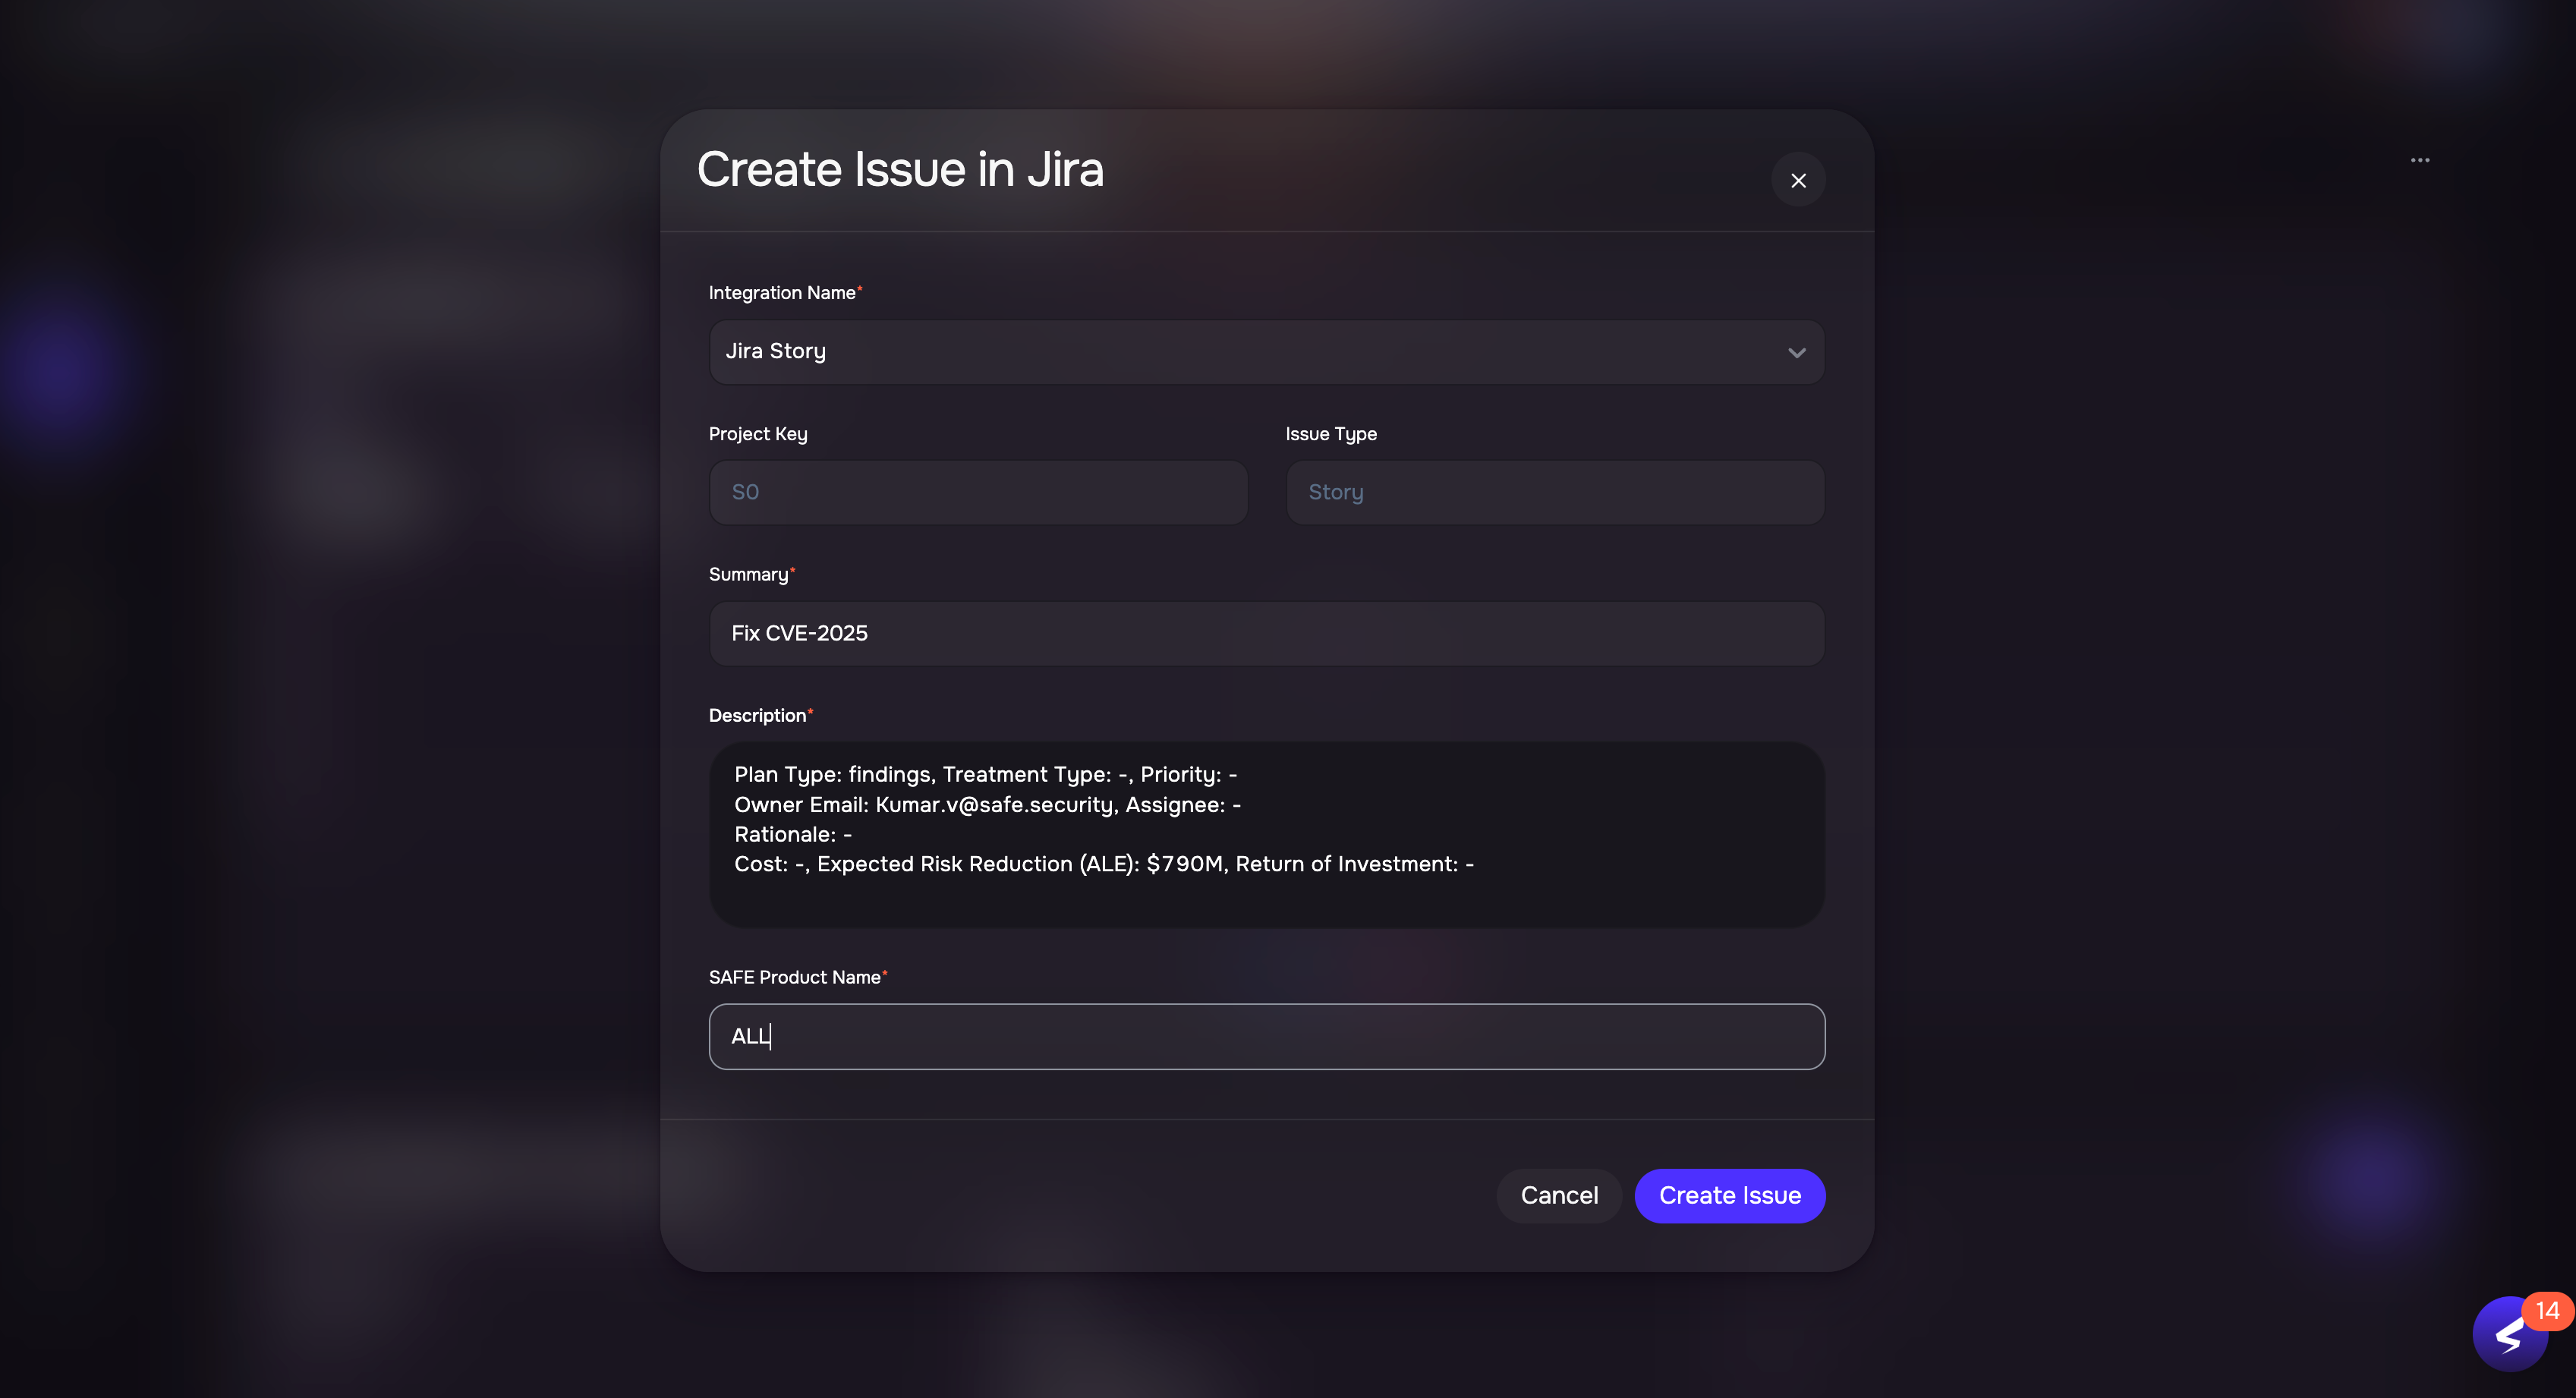
If multiple Jira integrations are configured (for different projects or accounts), select the appropriate integration from the Integration Name dropdown.
Once the issue is successfully created:
The issue ID will appear in the Risk Treatment Plan Details section along with its current status.
Clicking the ID will take you directly to the issue in Jira.
To unlink a Jira issue, click the unlink icon next to the request status and confirm.
FAQs
Q: Does unlinking an issue delete it from Jira?
A: No. As the name suggests, unlinking only disconnects the Jira issue from the current Risk Treatment Plan. The issue itself remains in Jira.
Q: How many issues can I create for a single Risk Treatment Plan?
A: You can create only one Jira issue per Risk Treatment Plan at a time.
If an issue has already been created, the Create Jira Issue option will be disabled.
To create a new issue, you must first unlink the existing Jira request.