About this document
This document provides a step-by-step procedure for configuring PingCastle in SAFE.
Introduction
The integration between SAFE and PingCastle enables SAFE to ingest Active Directory security assessment results generated by PingCastle scans. SAFE imports domain risk findings and associated assessment data to provide centralized visibility and risk analysis within the SAFE platform.
Since PingCastle is executed within the customer’s on-premises Active Directory environment, SAFE provides an on-premises connector that runs on the customer’s local network. The connector securely receives scan reports locally and forwards the processed result to SAFE, ensuring that sensitive Active Directory data, credentials, and internal systems remain protected.
Integration Flow
The integration follows a store-and-sync model, designed to keep scan execution fully within the customer’s environment while enabling secure ingestion into SAFE.
Connector access to PingCastle
The SAFE connector (Docker) calls the customer’s PingCastle API using the configured base URL, API key, and location: it authenticates, lists domains, and downloads each eligible report, applying the configured “last seen” window so only in-range reports are processed.
Connector polling for sync commands
The connector posts a heartbeat to SAFE at regular intervals (every 10 minutes). If SAFE returns a sync command, the connector starts a sync run. The container should stay running so heartbeats continue, and syncs are picked up without a long delay.
Synchronization with SAFE
During sync, the connector refreshes selected integration settings from SAFE, pulls the relevant PingCastle reports, maps report data into SAFE signals, uploads them for ingestion, and reports progress and completion back to SAFE.
Processing and risk analysis
SAFE ingests those signals and updates findings, risk insights, and analytics in the platform.
PingCastle API flow
The connector calls POST /api/Agent/Login (with API key and location), then GET /api/Domains, then for each eligible domain, from the eligible domain get the last ReportId and then call GET /api/Reports/{reportId} to retrieve the healthcheck JSON for that report.
Prerequisites
Functional Prerequisites
Install Docker CE Engine (Refer to the official documentation).
Host machine with Docker installed, to set up an on-premise Docker-based component for communicating with SAFE
Network access from the host machine to the following:
SAFE Instance (Refer to SAFE’s Outgoing IP Addresses )
PingCastle Instance
A 32-character-long Encryption Key (Refer to the FAQs section for more details)
Host Prerequisites
Docker Engine on the server where the PingCastle connector needs to be deployed.
For on-premise deployment with PingCastle integration, we recommend the following Docker configurations :
CPU: Minimum 2 vCPUs
Memory: 8 GB RAM
Storage: 100 GB available disk space
PingCastle Prerequisites
You must have the PingCastle Enterprise plan.
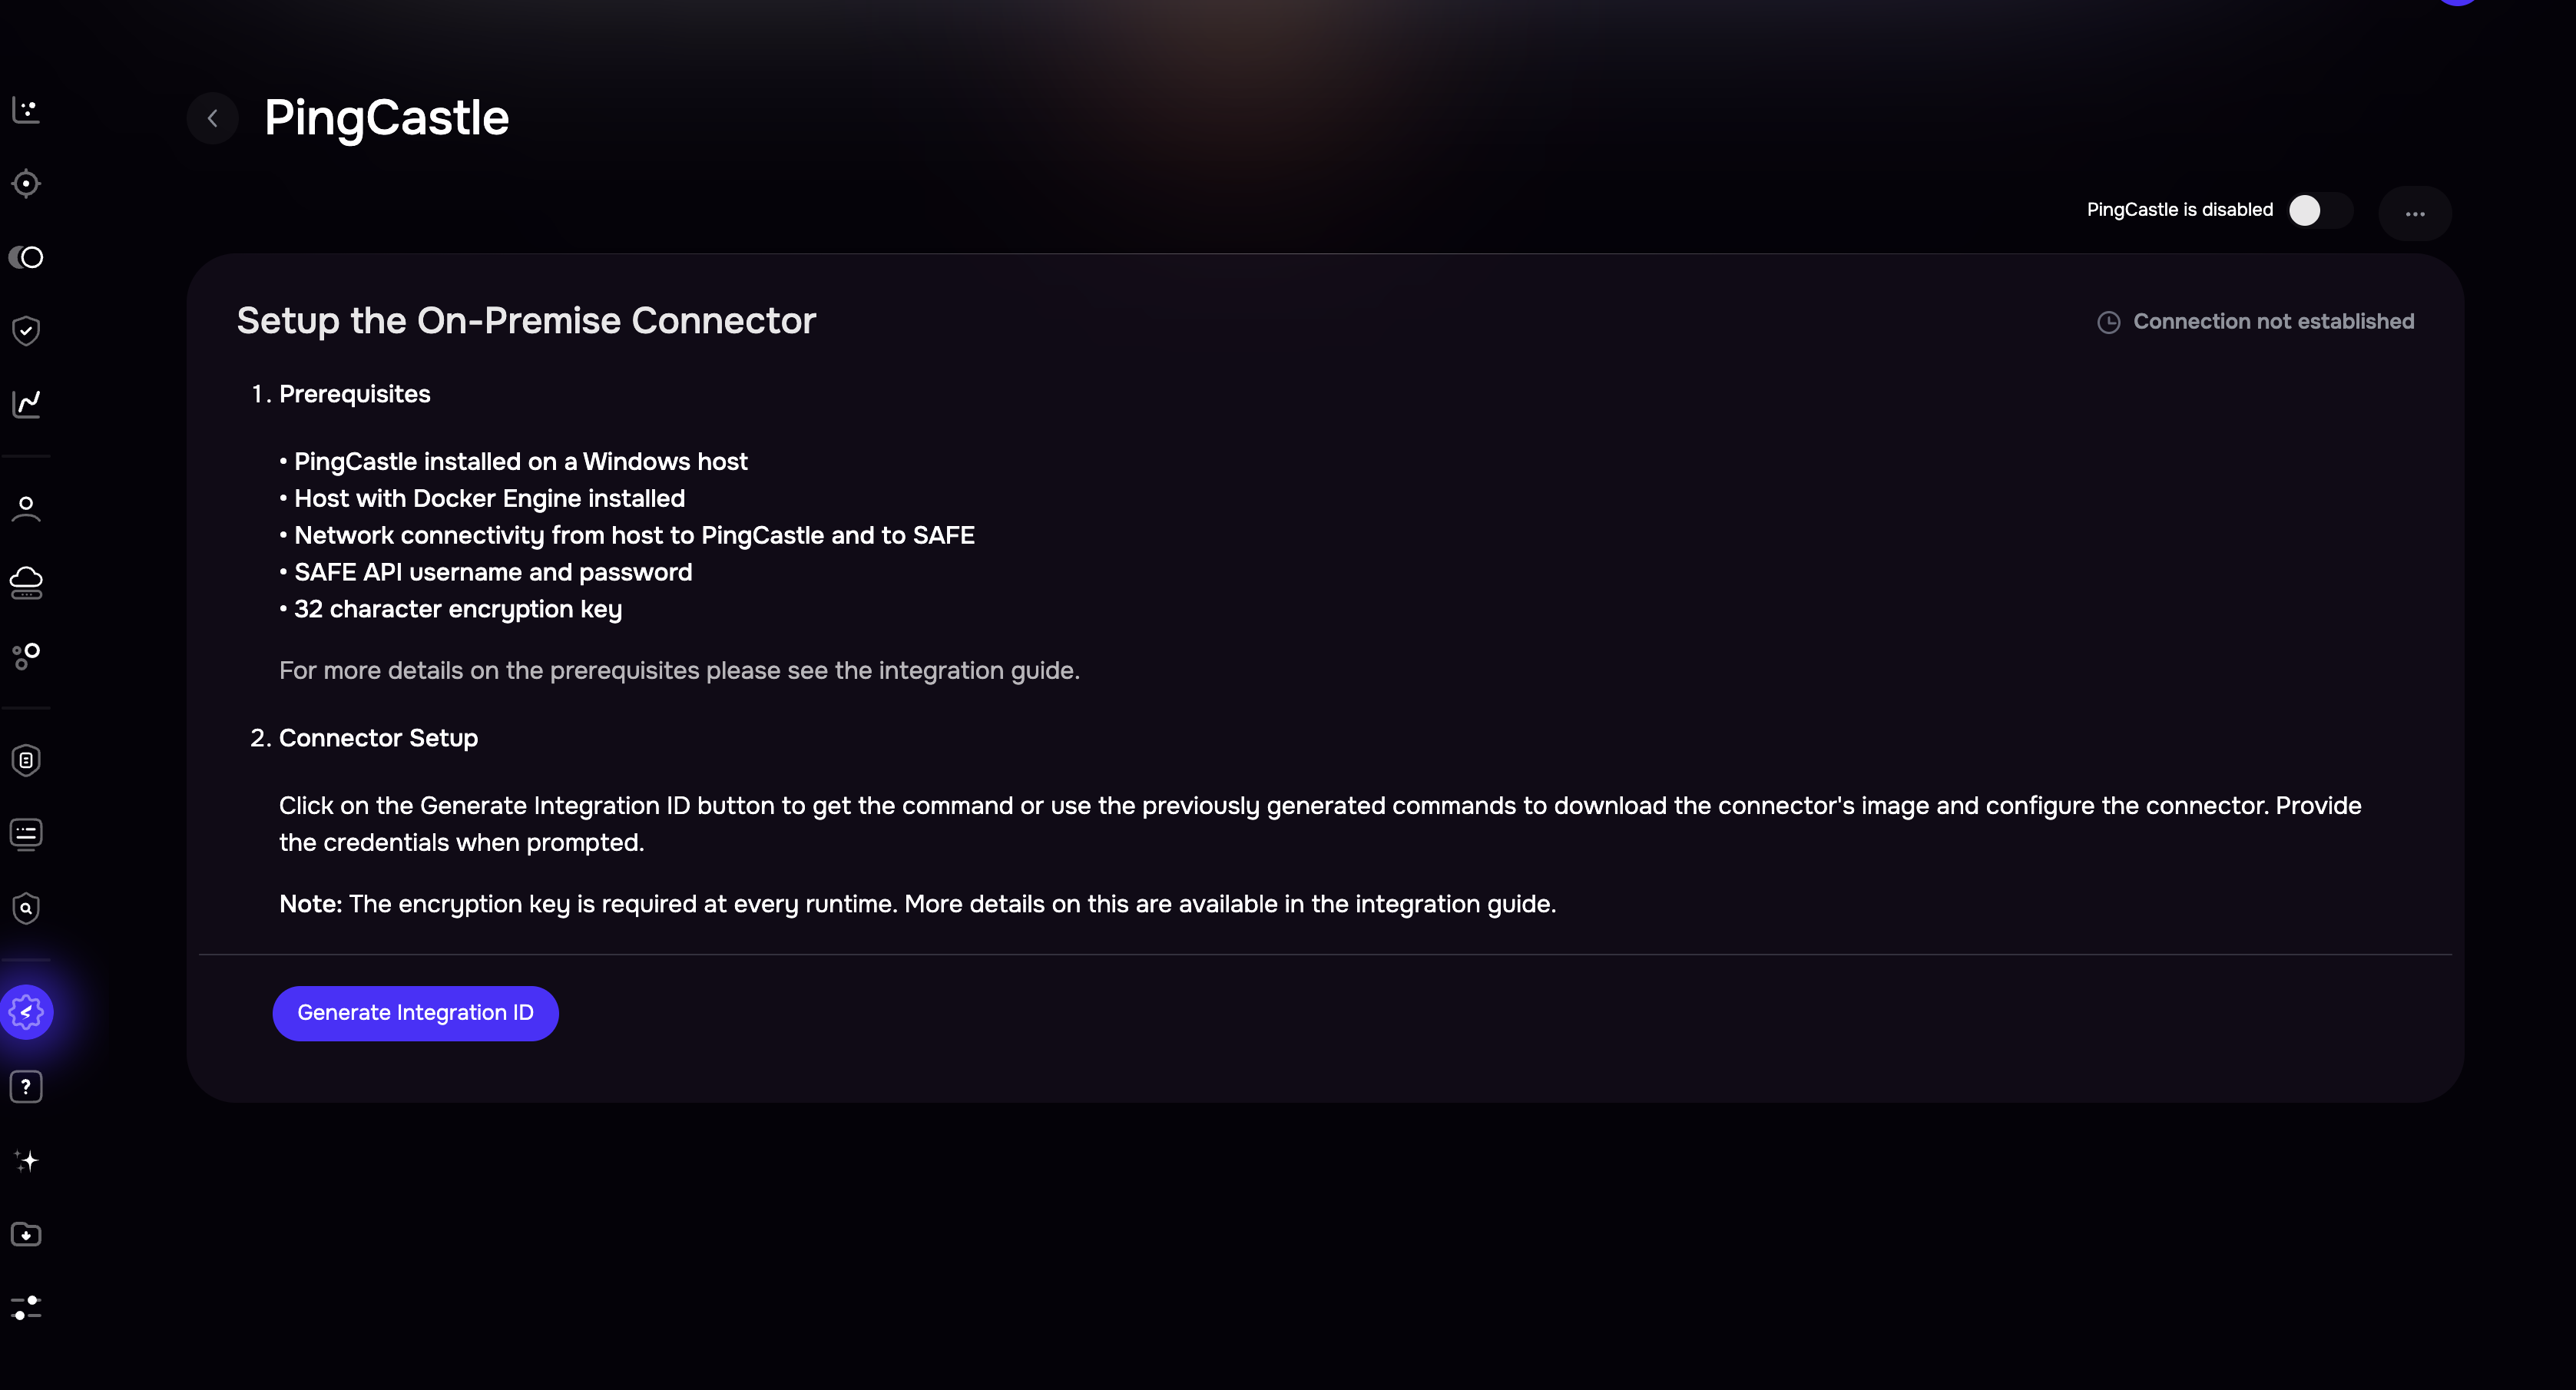
Configure PingCastle with SAFE
Follow the steps below to configure the PingCastle integration in SAFE
SAFE Setup
Log in to SAFE and navigate to SAFE Integrations.
Click the + button available at the top-right.
Search and click the PingCastle card.
Click Generate Integration ID to view the required commands, as shown below.
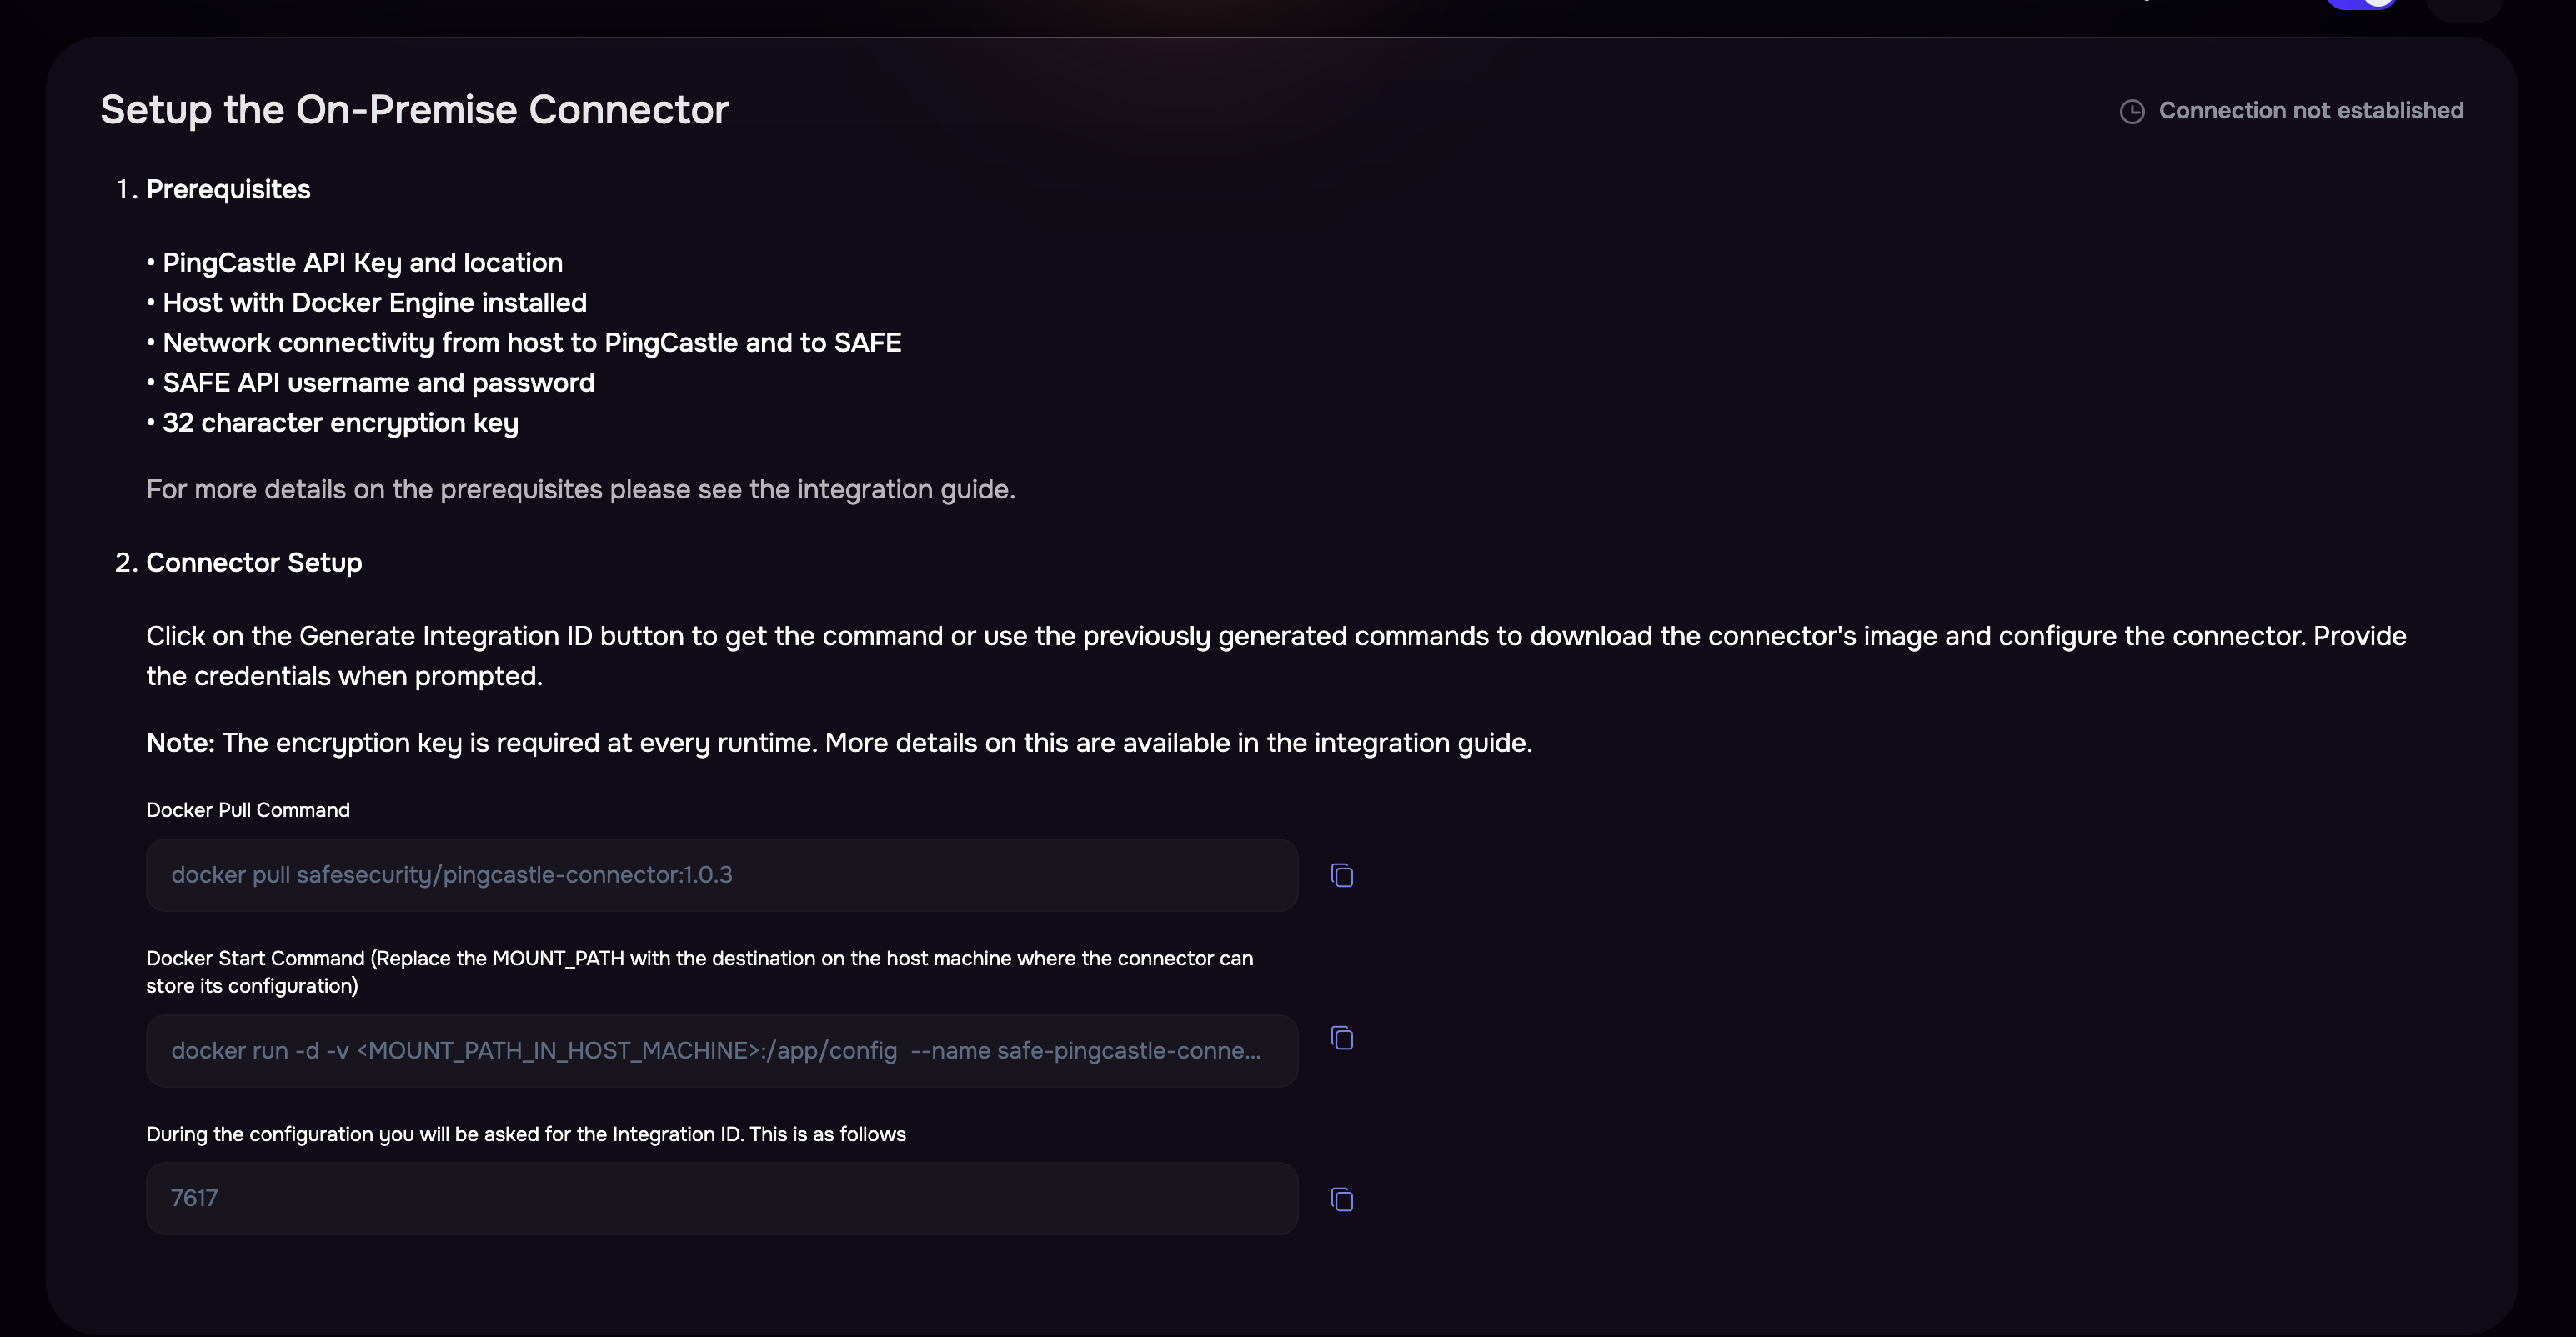
The generated commands need to be configured on the on-premises connector, as covered in the next section.
On-Premise connector setup
Run the Docker Pull Command on the terminal.
docker pull safesecurity/pingcastle-connector:1.0.3Run the Docker Start Command and replace '<MOUNT_PATH_IN_HOST_MACHINE>' with the actual value.
docker run -d -v <MOUNT_PATH_IN_HOST_MACHINE>:/app/config --name safe-pingcastle-connector safesecurity/pingcastle-connector:1.0.3 && docker exec -it safe-pingcastle-connector bash initialise.sFill in the required details as per the prompt shown on the terminal:
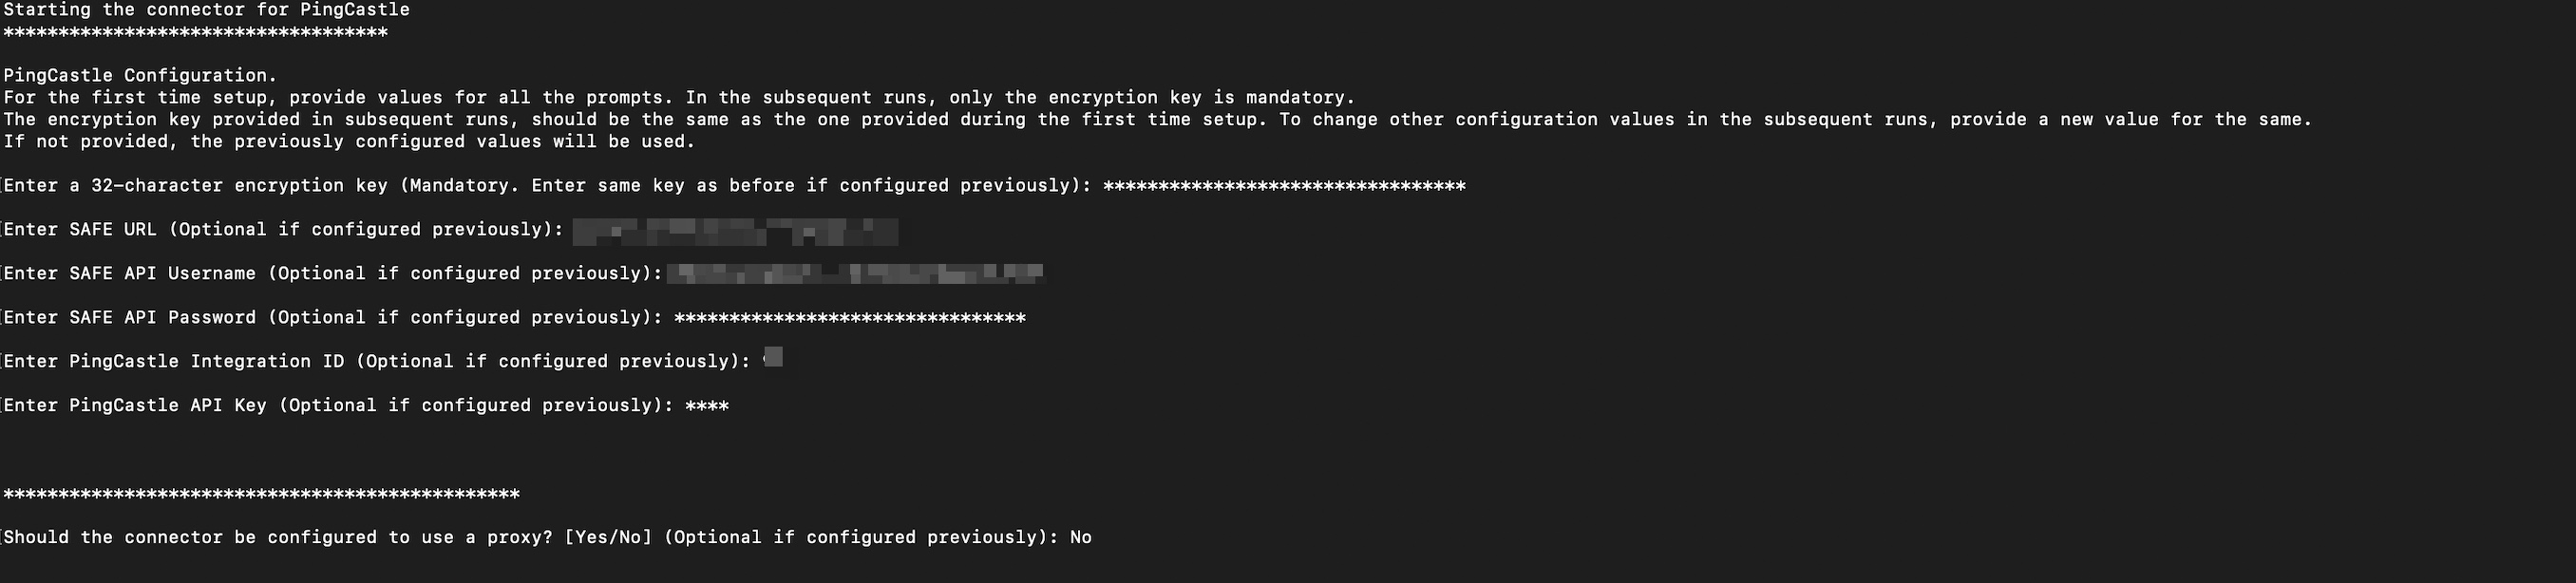
Note
For the first time setup, provide values for all prompts. In the subsequent runs, only the encryption key is mandatory.
The encryption key provided in subsequent runs, should be the same as the one provided during the first time setup. To change other configuration values in the subsequent runs, provide a new value for the same.
Once all required details are provided, logs similar to the following will be displayed:

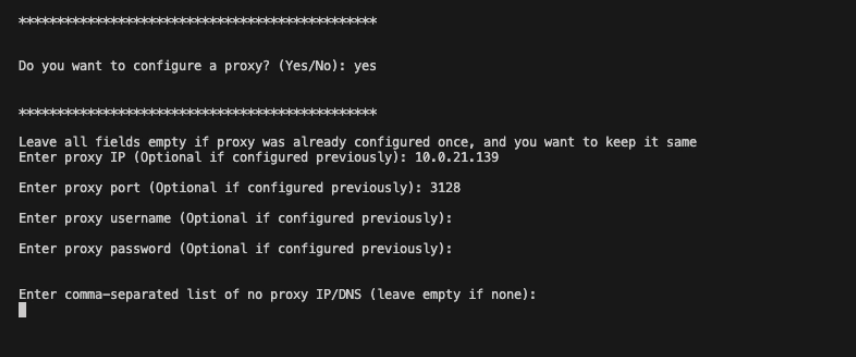
[Optional] Proxy Setup
Follow the steps below to set up the proxy:
On the prompt Do you want to configure a proxy? (Yes/No):
If yes, fill in all the required fields that are present below. Leave all fields empty if the proxy was already configured once, and you want to keep it the sameEnter proxy IP (Optional if configured previously): <IP>
Enter proxy port (Optional if configured previously): <PORT>
Enter proxy username (Optional if configured previously): <PROXY_USERNAME> If configured on Proxy
Enter proxy password (Optional if configured previously): <PROXY_PASSWORD> If configured on Proxy
Enter comma-separated list of no proxy IP/DNS (leave empty if none): <IP>
PingCastle Setup
Retrieve the API key and the enterprise server location, ensuring that the key has all the necessary permissions and required access levels.
Set Auto Sync Frequency
Navigate to the Ping Castle Card on the integrations page.
Enter the auto-sync frequency, then click Save.
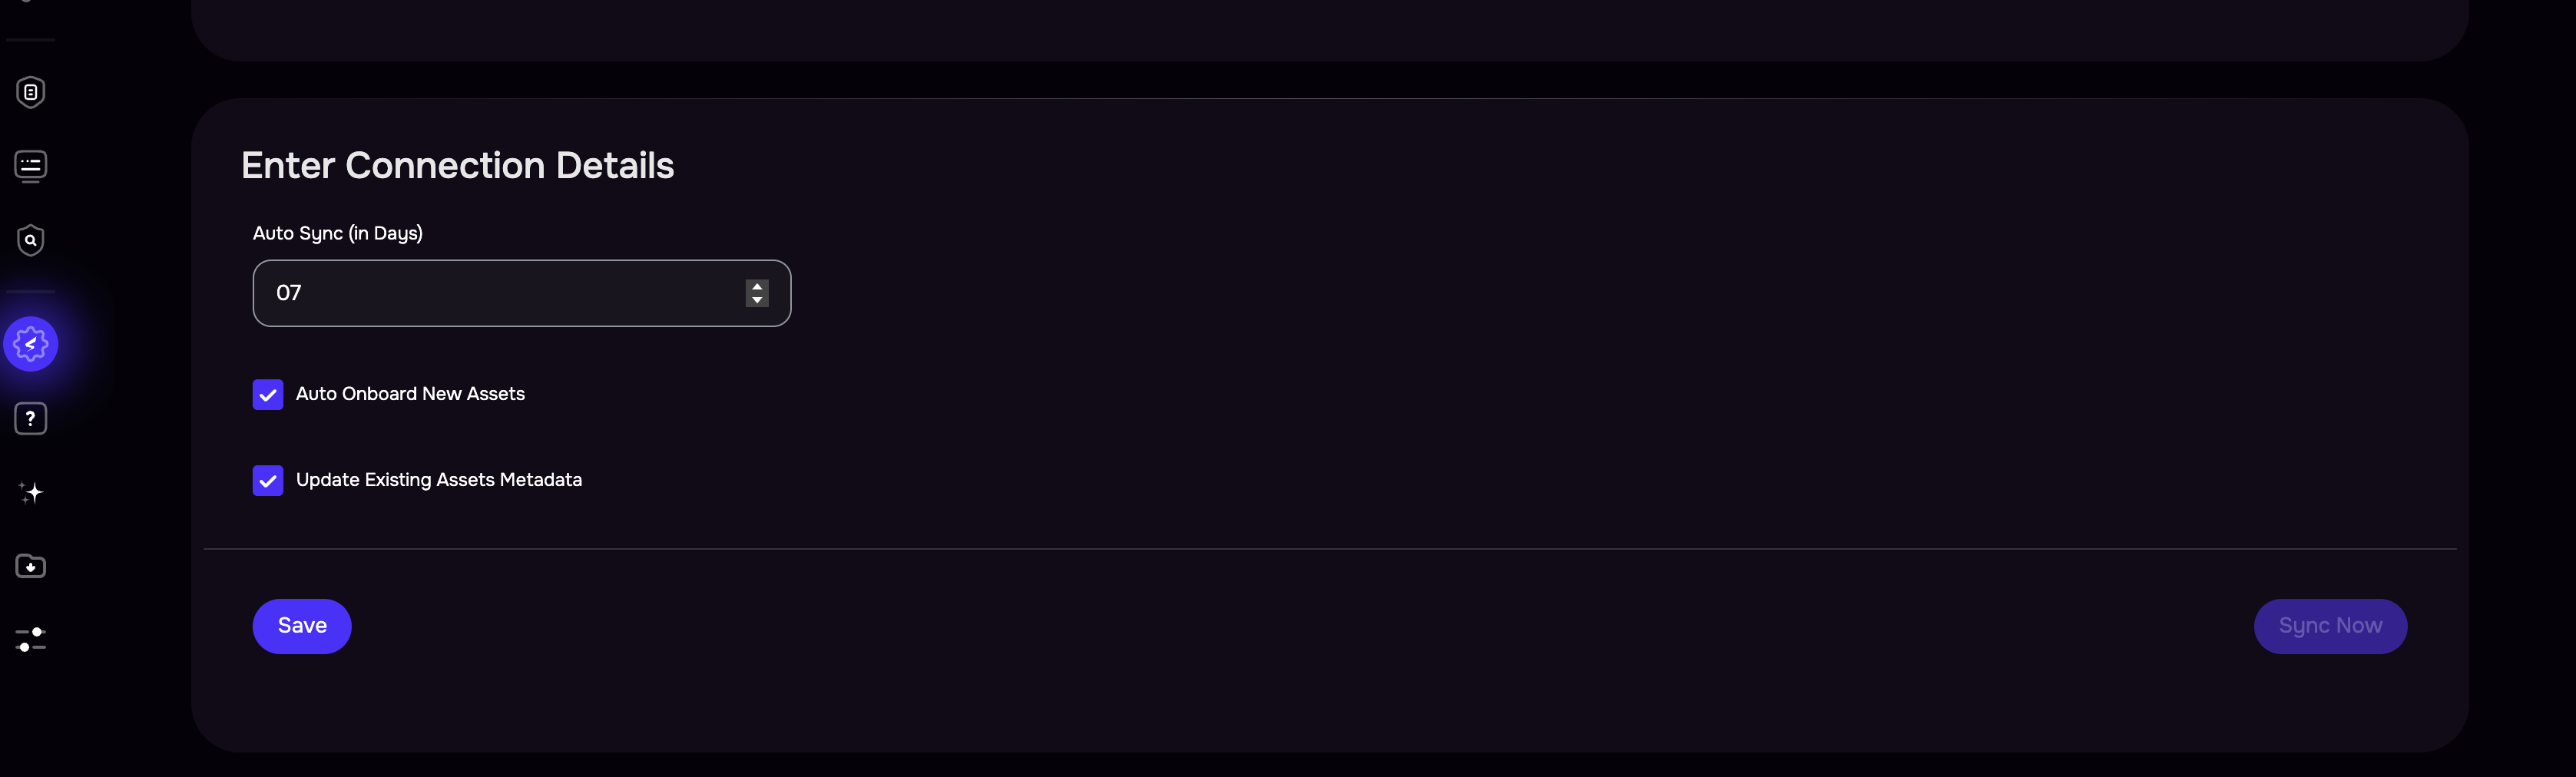
Once the configuration is saved, click the Sync Now button to trigger the on-demand sync outside of the scheduled auto sync.
View Results
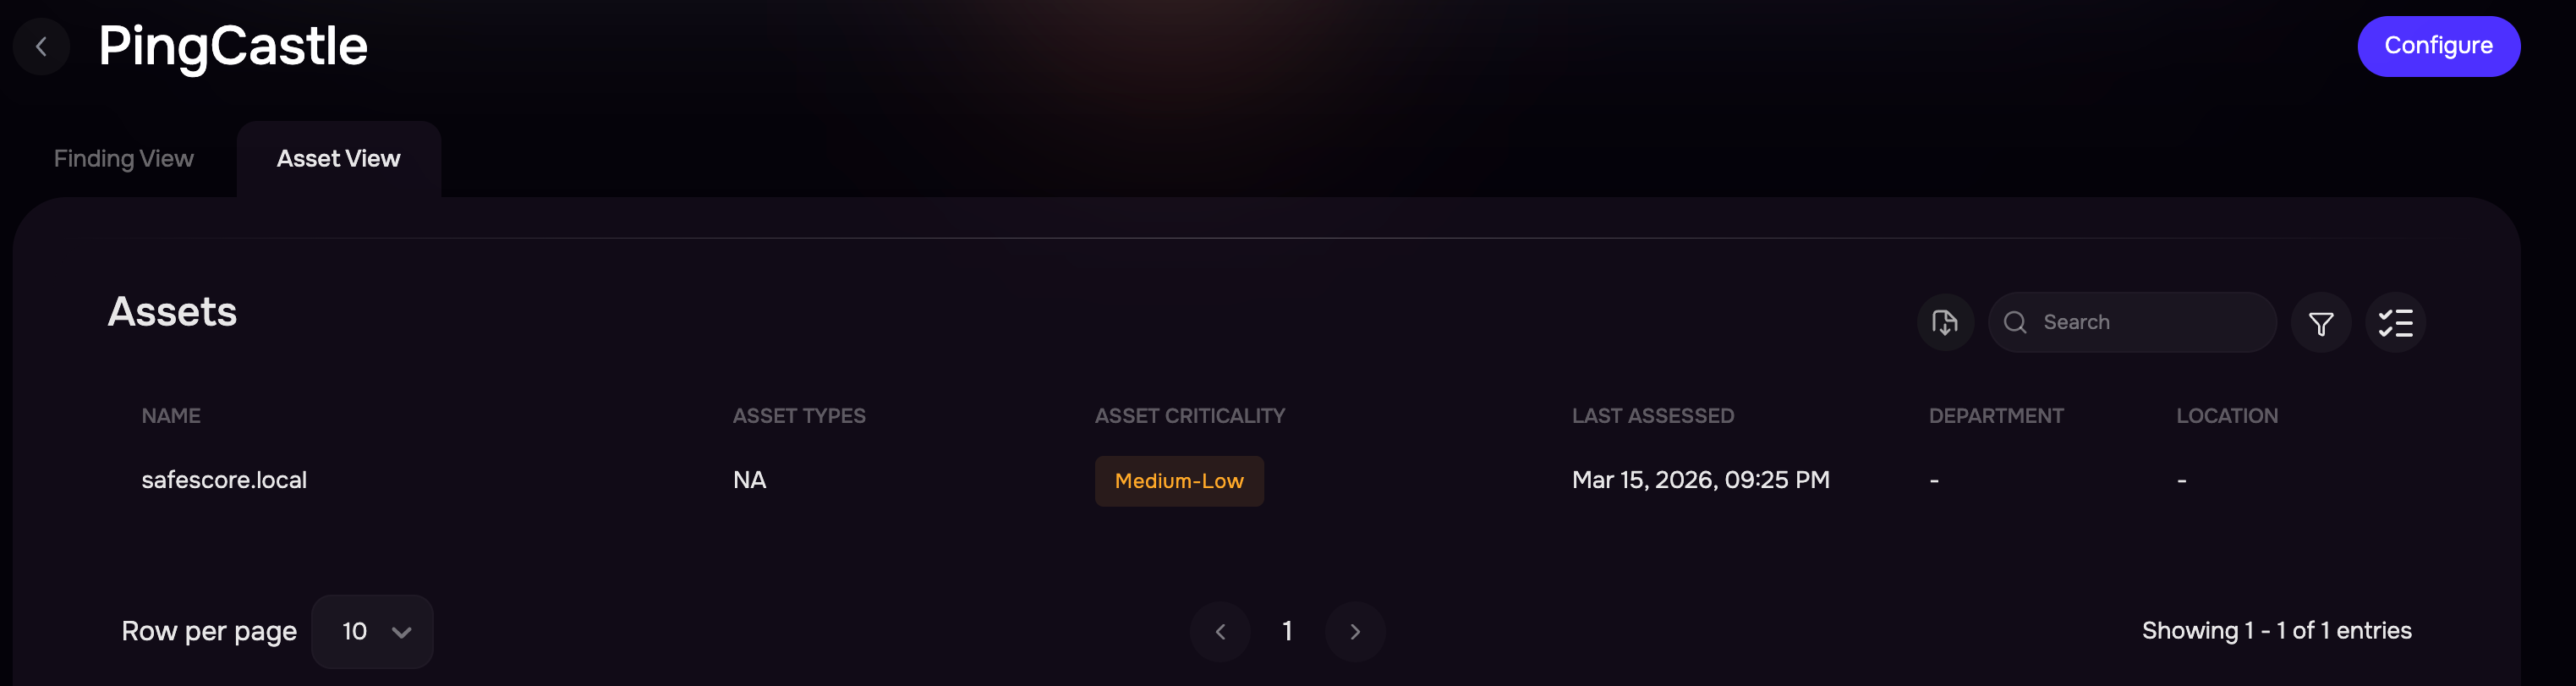
After a successful sync, the PingCastle assets are automatically imported into SAFE.
On the PingCastle integration page, review the Assets and Findings
Alternatively, you can navigate to Technology > Assets and filter the assets list to Onboarding Source equal to security.safe.pingcastle.
When you click a finding, you can see its score and the CAM Control Mapping related to it.
Severity mapping
PingCastle generates findings with scores ranging from 0 to 100 and provides a legend describing how these scores represent risk levels within Active Directory assessments. Based on the PingCastle scoring legend, SAFE maps PingCastle scores to SAFE severity levels to ensure consistent risk representation within the SAFE platform.
PingCastle Score Range | SAFE Severity |
|---|---|
0 | Info / None |
1–5 | Low |
6–10 | Medium |
11–30 | High |
31–100 | Critical |
PingCastle Score Interpretation

FAQs
How to generate a Encryption Key?
SAFE’s on-premises connector for PingCastle uses offline encryption to protect PingCastle and SAFE API credentials on the machine.
The encryption key required for this has to be exactly 32 characters and must be entered every time the container has to be started/updated/re-started.
32 bytes encryption key can be generated using any online tool, e.g., RANDOM.ORG - String Generator.
It is highly recommended to store the Encryption key in any PIM/PAM tool or any other credentials manager.
What to do if the Encryption Key is lost?
In the case when the Encryption Key is lost:
Remove the previously mounted config path directory on the host machine.
Reconfigure the on-premise connector.
How do I upgrade the connector when a newer version is available from SAFE?
Follow the steps below to upgrade the connector to a newer version:
Stop the currently running on-premise Connector using the following command:
docker rm -f safe-pingcastle-connector
Copy the Docker pull command (which would have been updated with a newer version) and, after pulling the latest image for the PingCastle, go ahead with the starting command (i.e., the second command on the Hooks Page)
Keep the config path as configured earlier; no need to change it.
Enter the Encryption Key when prompted.
The user is not required to fill in any other details again (if they are already configured).
How to use private SSL certificates with the on-prem connector? (with Deep Packet Inspection-ing Firewalls)
To be able to use private certificates, customers will have to ensure that the certificates are available in a directory on the server/machine where the On-prem connector is being configured. Let’s say <CERTIFICATES_DIRECTORY>
You will also need the path to the certificate used to access the SAFE server from inside the container. So, if the certificate is ca-certificates.crt, then the path of the certificate file will be /etc/ssl/certs/ca-certificates.crt, for e.g. <CA_CERTIFICATE_FILE_PATH>
To make the connector work using these certificates, modify the second command from Integrations page.
Original Command
docker run -d -v <MOUNT_PATH_IN_HOST_MACHINE>:/app/config --name safe-pingcastle-connector safesecurity/pingcastle-connector:1.0.3 && docker exec -it safe-pingcastle-connector bash initialise.shUpdated Command
docker run -d -v <MOUNT_PATH_IN_HOST_MACHINE>:/app/config -v <CERTIFICATES_DIRECTORY>:/usr/local/share/ca-certificates -e NODE_EXTRA_CA_CERTS=<CA_CERTIFICATE_FILE_PATH> --name safe-pingcastle-connector safesecurity/pingcastle-connector:1.0.3 && docker exec -it safe-pingcastle-connector bash initialise.sh