1. About this document
This document provides the step-by-step procedure to configure Rapid7 InsightVM in SAFE.
2. Introduction
SAFE integrates with Rapid7 InsightVM and allows you to discover and import assets from Rapid7 InsightVM along with the respective vulnerability assessment results in SAFE.
Here are the key highlights of this integration:
Import Assets and Vulnerability Assessment Results: With this integration, you can now discover and import assets from Rapid7 InsightVM along with the respective vulnerability assessment results for a comprehensive view of your assets' security posture.
Automated and On-Demand Sync: You can set a pre-configured time interval for automatic synchronization of assessment results for assets. Also, it allows you to Initiate on-demand pulling of assessment results for assets as needed.
On-Premise Connector: Rapid7 InsightVM is an on-premises deployed solution, and now, SAFE supports seamless communication with it. Configure an on-premise connector in your environment using Docker technology that ensures a secure and efficient data transfer between Rapid7 InsightVM and SAFE.
3. Prerequisites
3.1. Functional Prerequisites
To proceed, make sure the following prerequisites are met:
Host Machine with Docker: You must have a host machine with Docker already installed. This will be used to download, install, and configure an on-premise Docker-based component that facilitates communication with SAFE.
Note:
Refer to the below documents to install the Docker CE Engine:
Rapid7 InsightVM User Credentials: You must have credentials (Rapid7 InsightVM Username and Password) to access Rapid7 InsightVM APIs. Refer to generate credentials for Rapid7 InsightVM.
SAFE API Credentials: Refer to Accessing SAFE APIs to create SAFE API credentials.
Network Access: Your host machine should have network access to the following resources:
SAFE Instance: refer to SAFE’s Outgoing IP Addresses
Rapid7 InsightVM Instance
Encryption Key: SAFE's on-premise connector for Rapid7 InsightVM employs offline encryption to secure both Rapid7 InsightVM and SAFE API credentials stored on the local machine. To enable this encryption, an exact 32-character encryption key is required. This key must be provided each time the container needs to be initiated, updated, or restarted. You can generate a 32-byte encryption key using online tools such as RANDOM.ORG's String Generator.
3.2. Host Prerequisites
To host the connector successfully, your server must meet the following prerequisites:
Docker Engine: Ensure that Docker Engine is installed and operational on the server where you intend to deploy the connector.
For optimal performance and compatibility, we recommend the following server specifications:
CPU: At least 2 virtual CPUs (vCPUs).
RAM: A minimum of 8 Gigabytes (GB) of RAM.
Storage: Allocate at least 100 Gigabytes (GB) of disk storage.
4. Generate Rapid7 InsightVM Credentials
To integrate SAFE with Rapid7 insightVM, SAFE needs a user that has permission to view Site and Group Asset Data and view Vulnerability Investigations. If a user with this level of permissions is available, then the same can be used for configuring the connector.
If not, then follow the steps mentioned in the sections below and create a custom user with the minimum required permissions.
Note:
SAFE doesn’t need to perform any write operations on the Rapid7 InsightVM platform. The user created here will have read-only permissions.
4.1. Create Custom Role
Note:
You need Rapid7 InsightVM Admin access to create a custom role and user.
Follow the below steps to create a custom role:
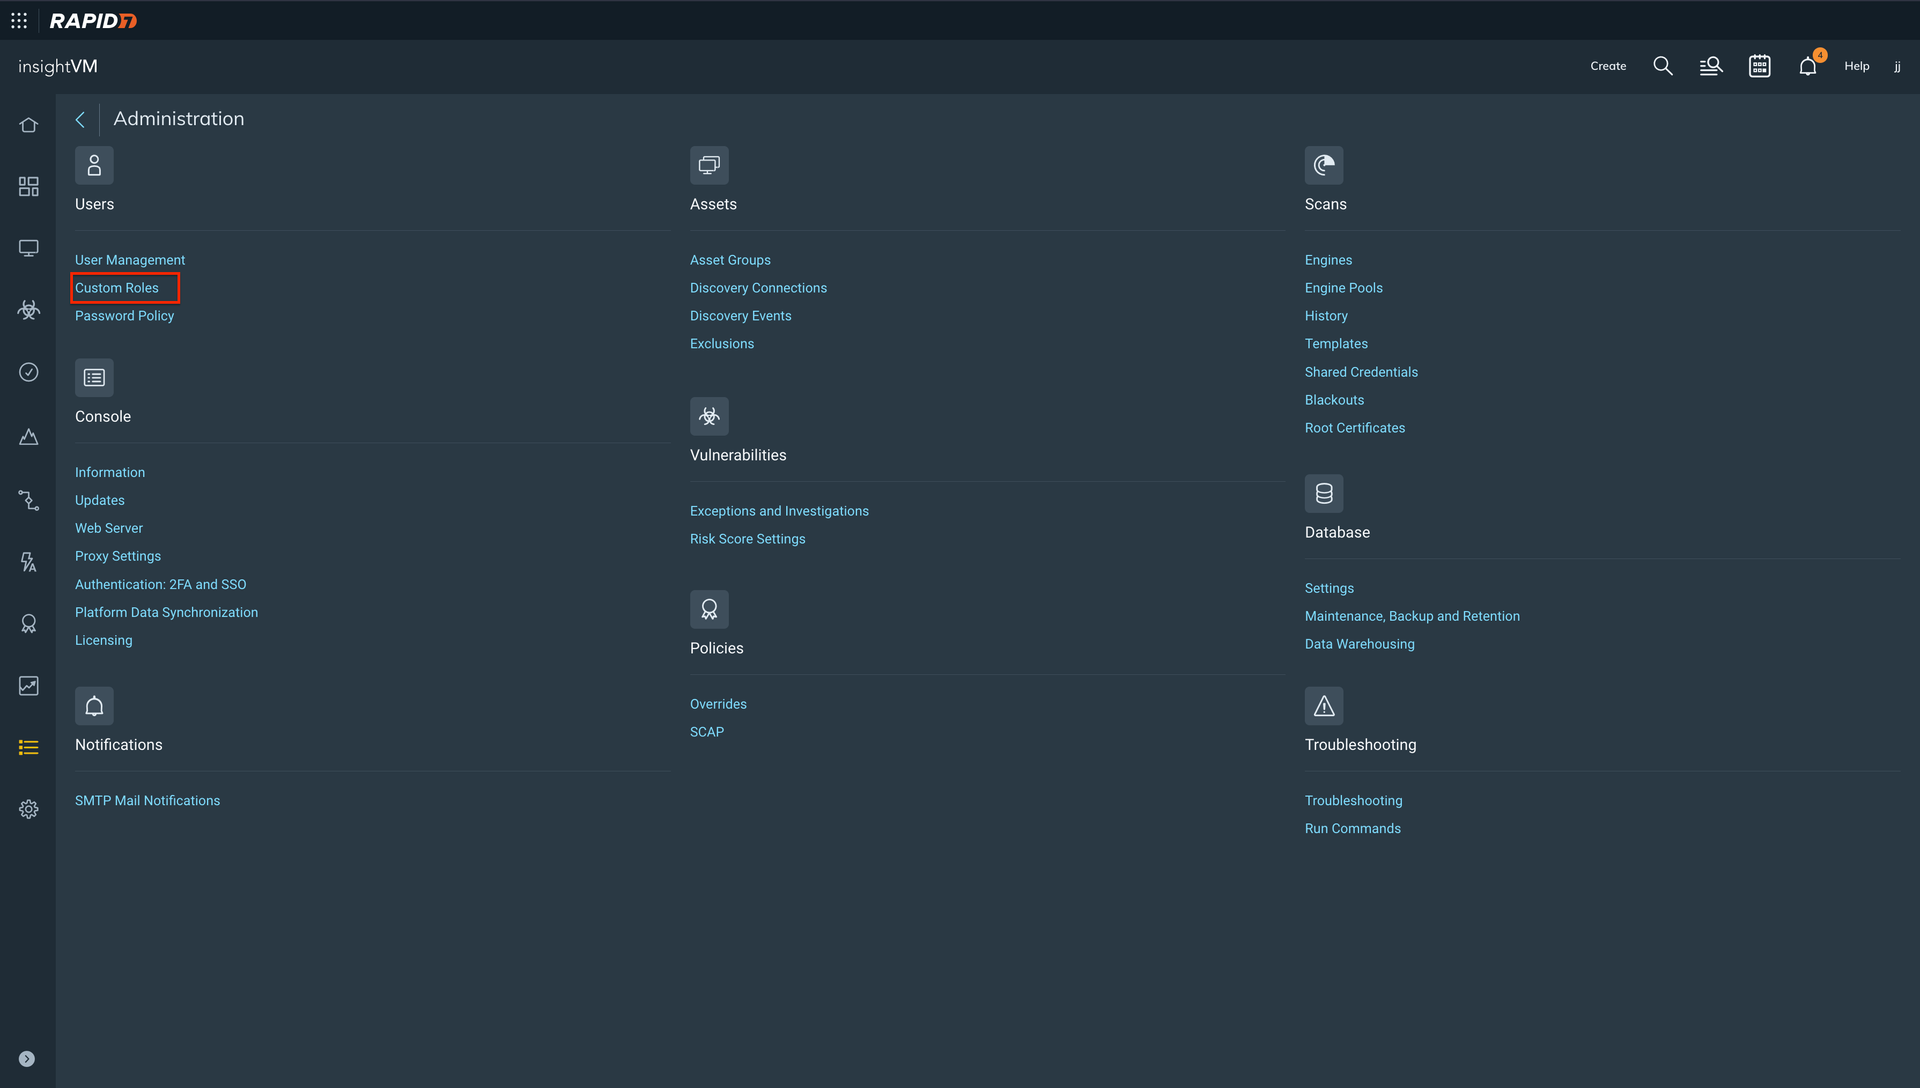
Login to your Rapid7 InsightVM account as Admin.
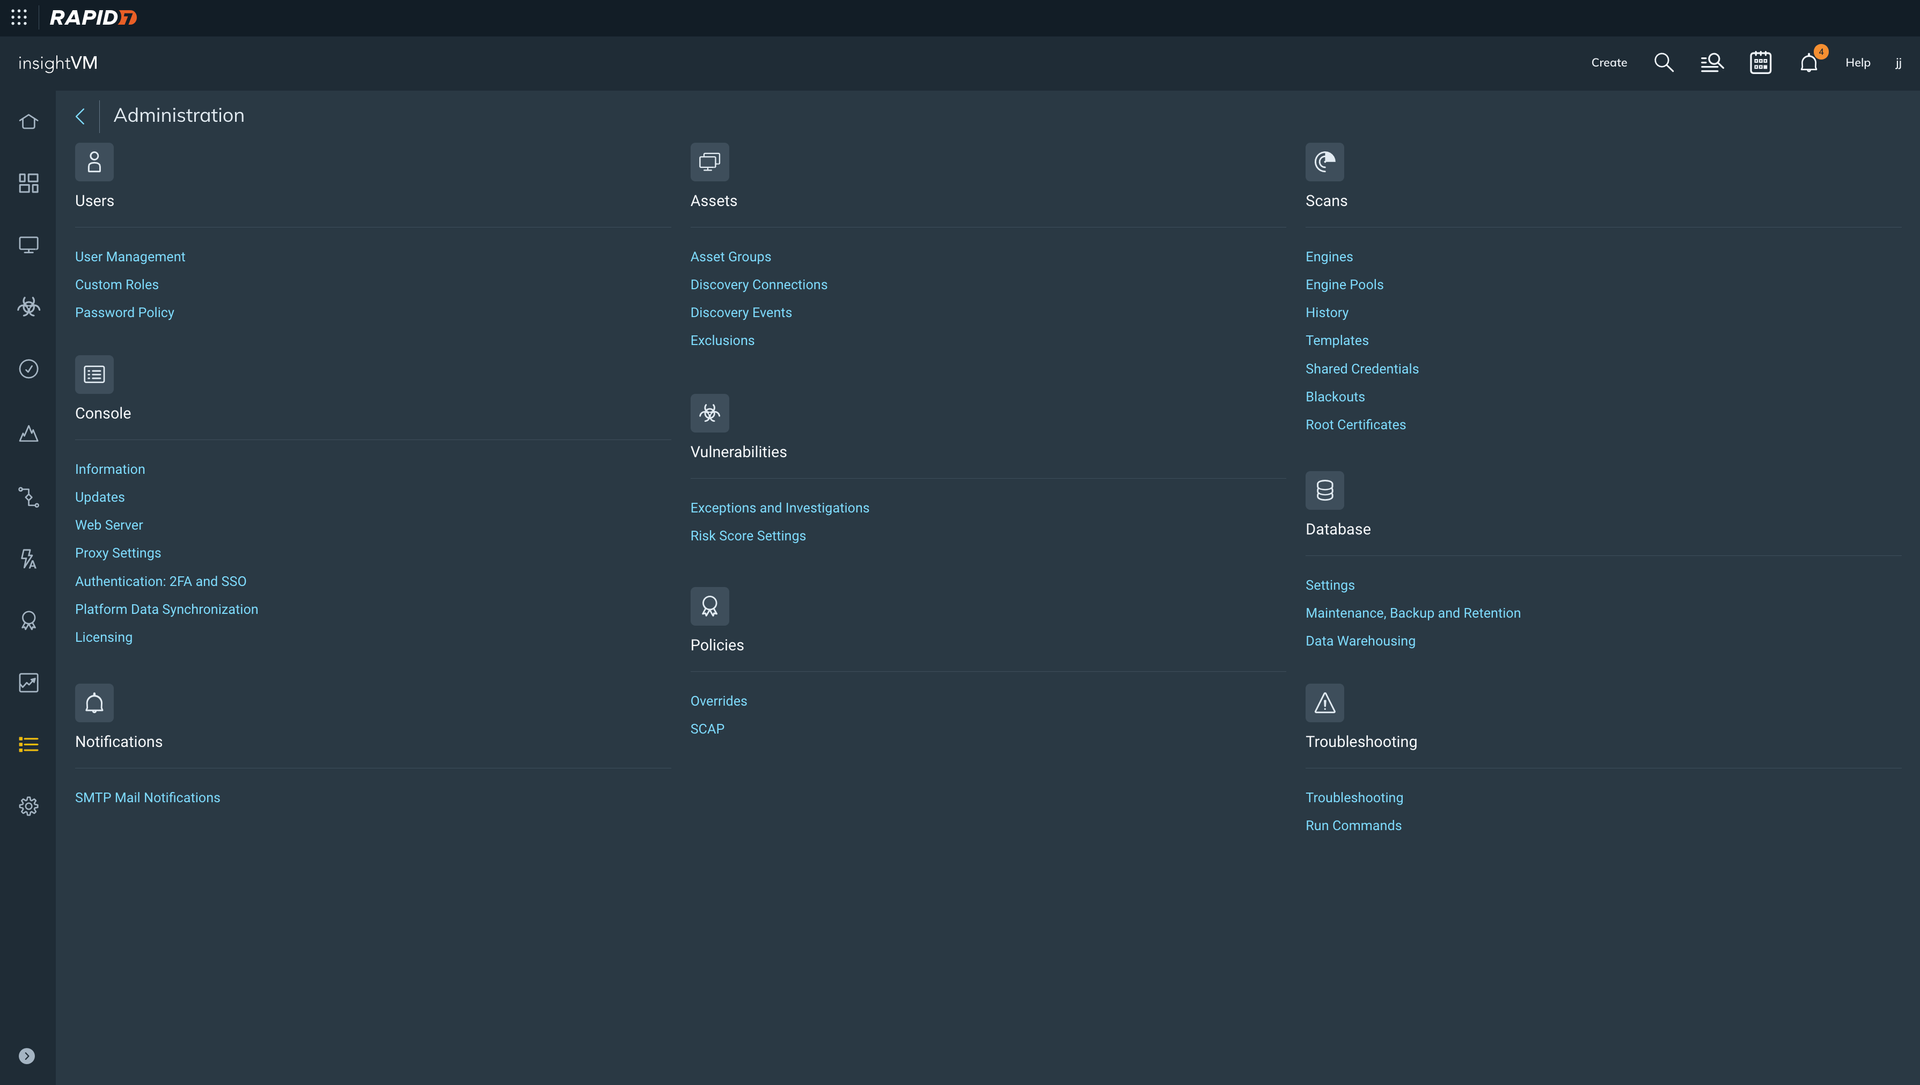
From the Main menu, Navigate to Administration.
Click the Custom Roles option available under User.
Click the Create User Role option.
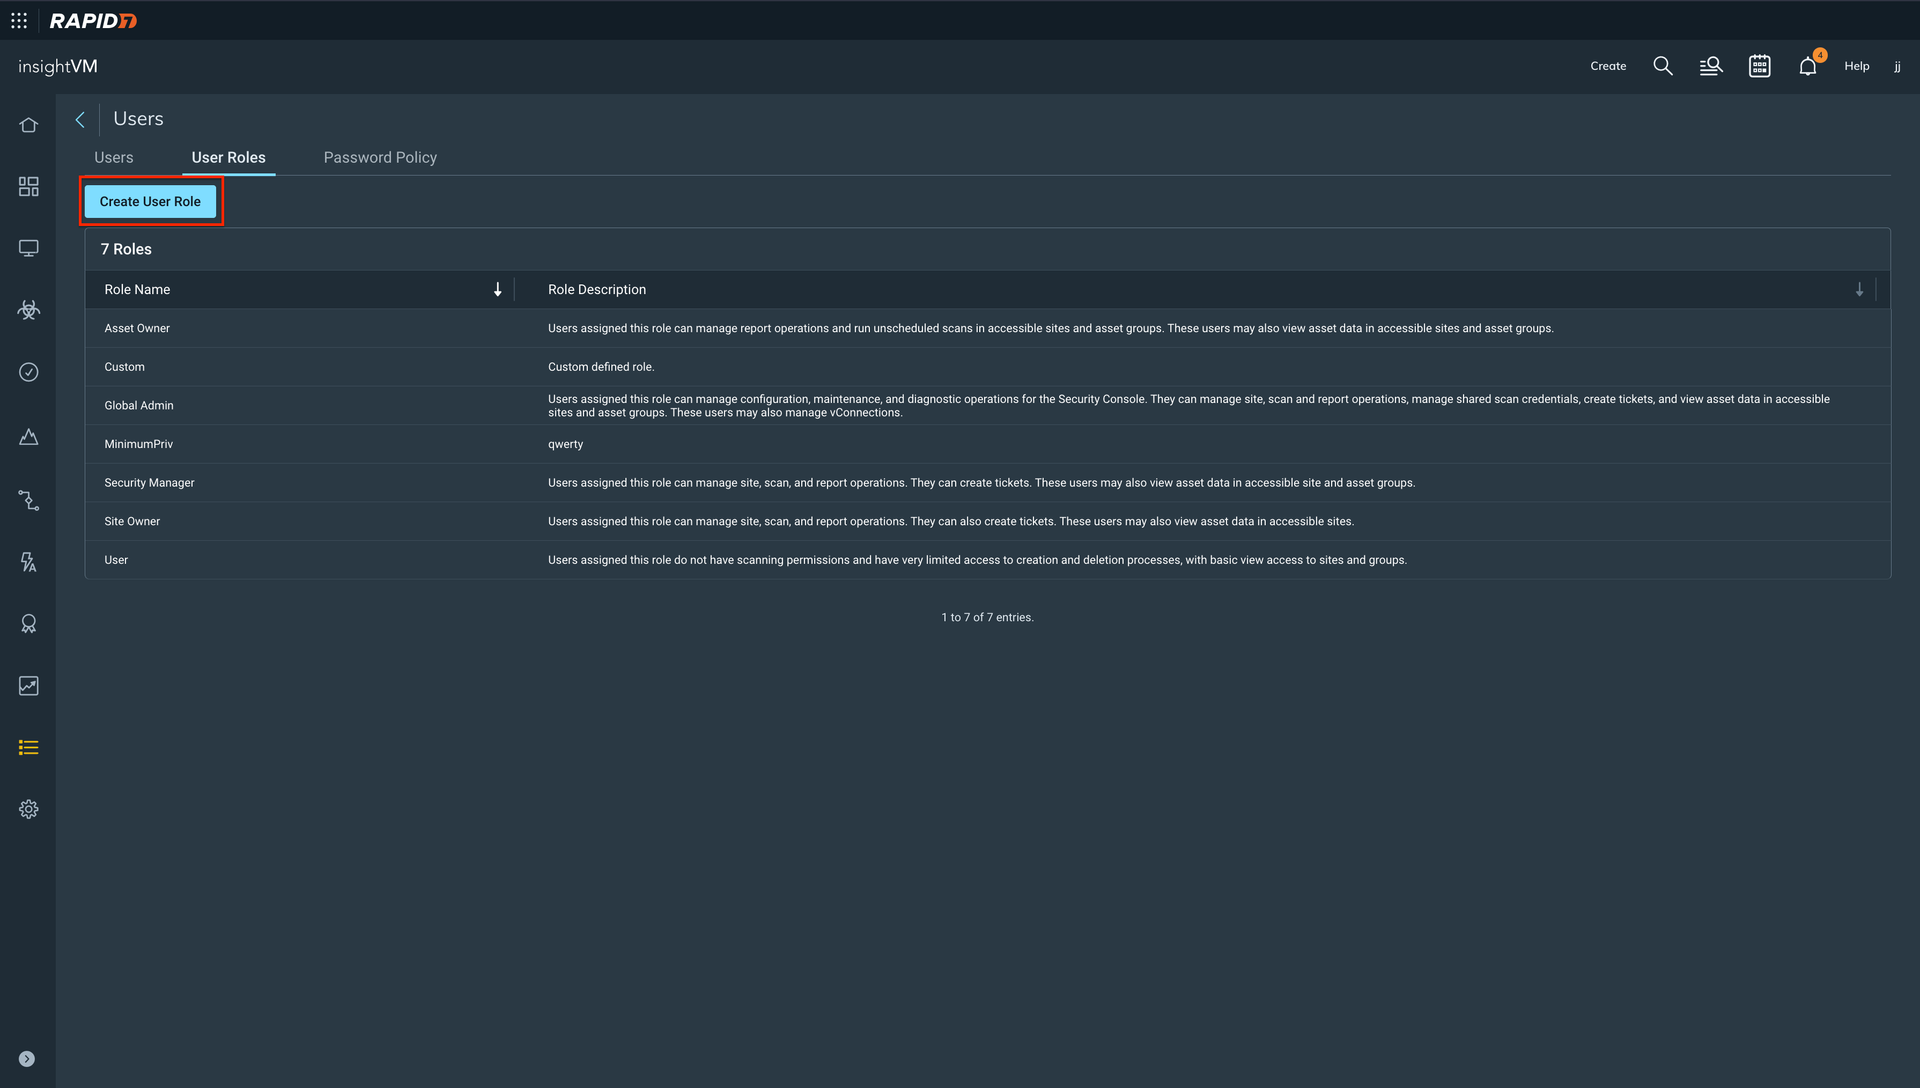
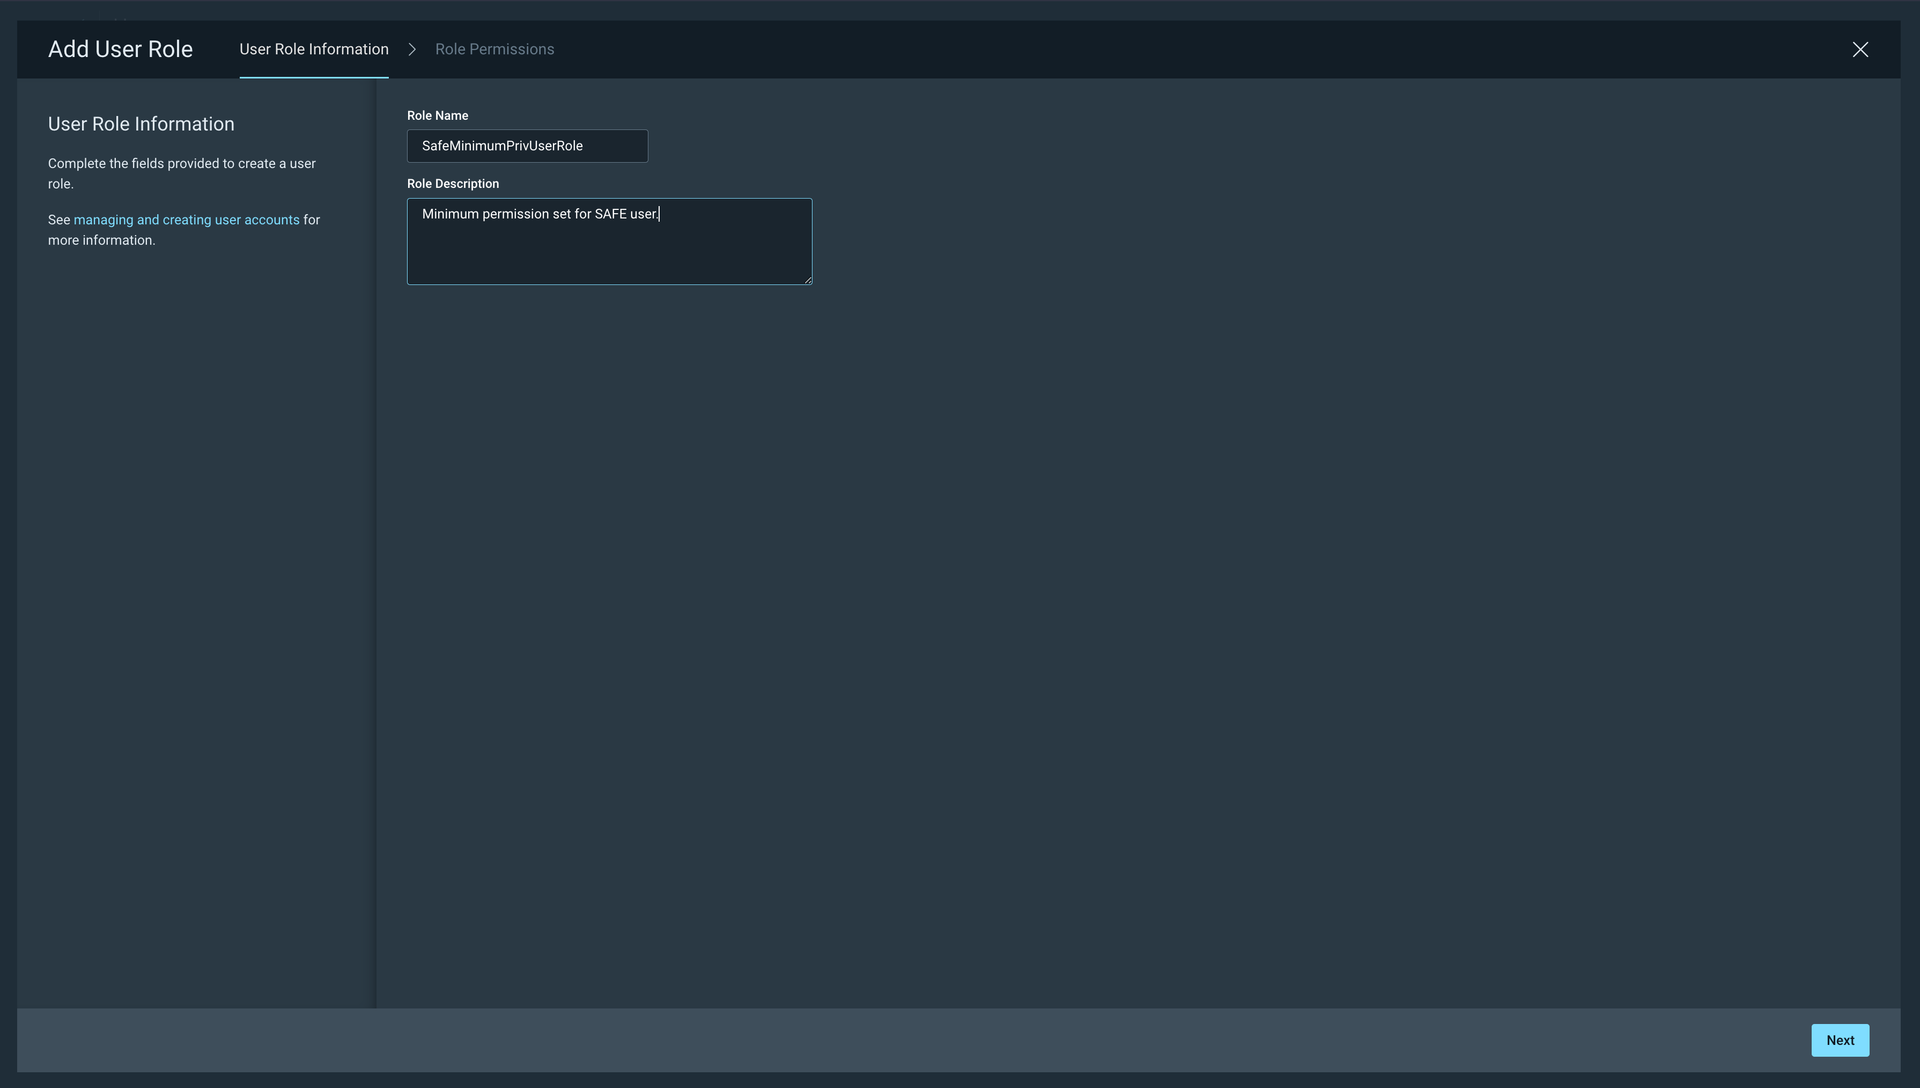
Enter the Role Name and Description.
Click Next.
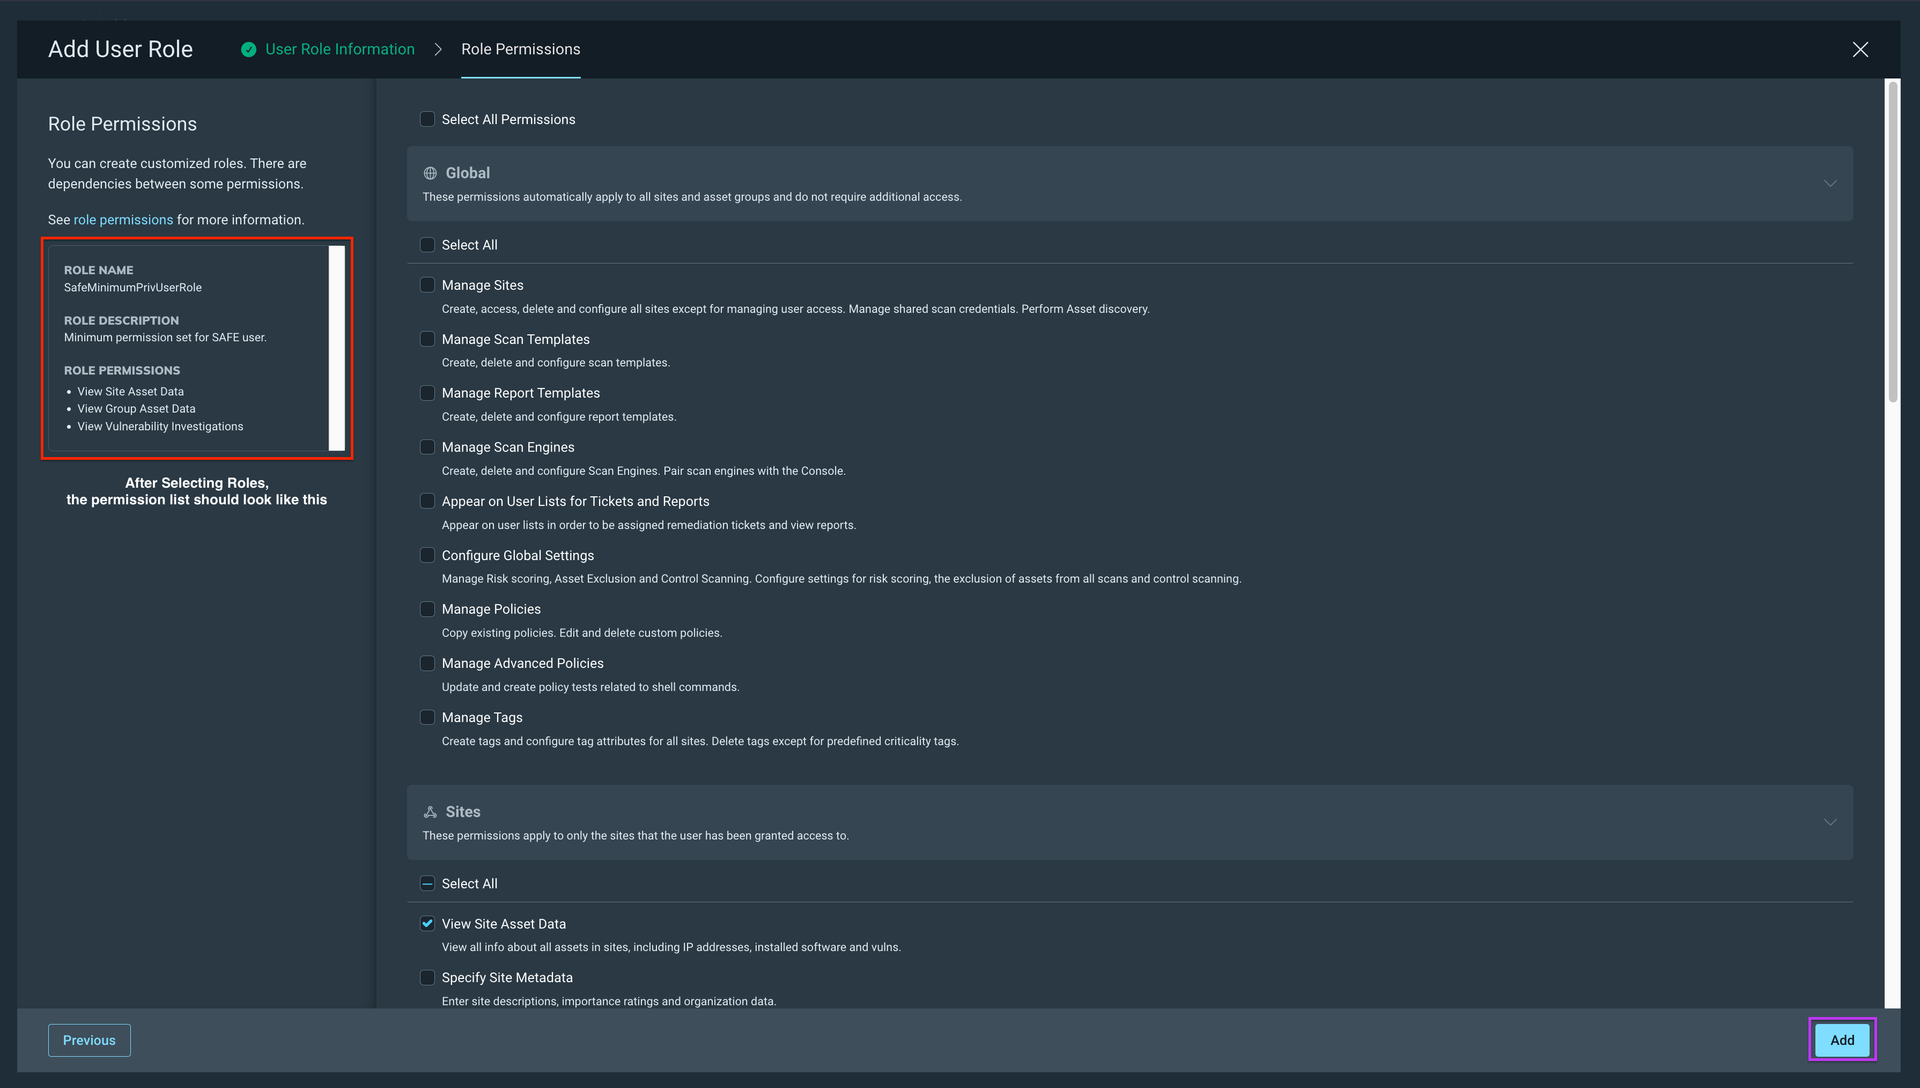
Select the below permissions from the permission list.
Select View Site Asset Data availabe under Sites.
Select View Group Asset Data availabe under Asset Groups.
Select View Vulnerability Investigations available under Vulnerability Exceptions and Policy Overrides.
After selecting the above permission, click the Add button. Now, you have to add a user with this custom role.
4.2. Add a User with a Custom Role
Login to your Rapid7 InsightVM as Admin.
Navigate to Administration.
Click the User Management option available under Users.
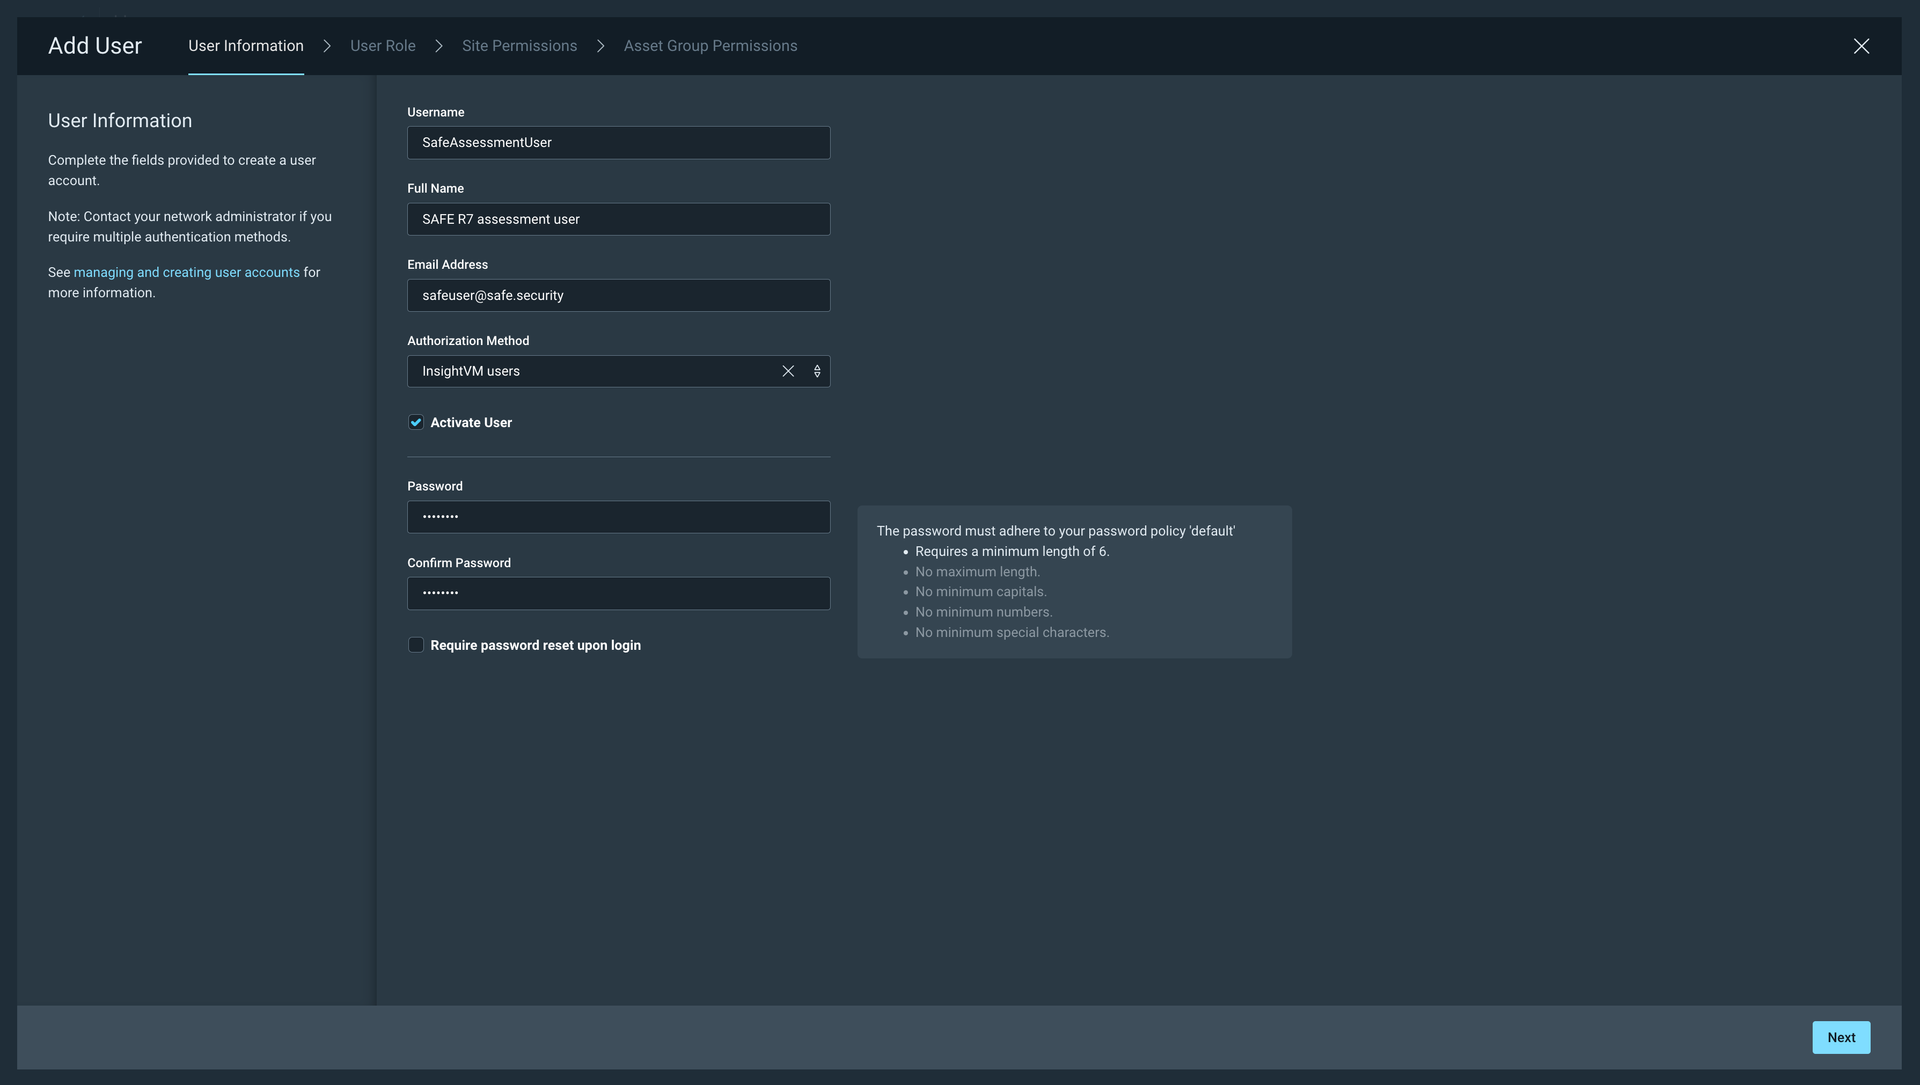
Click the Add User button.
Enter the Username, Full Name, Email, AuthorizationMethod, and Password.
Click Next.
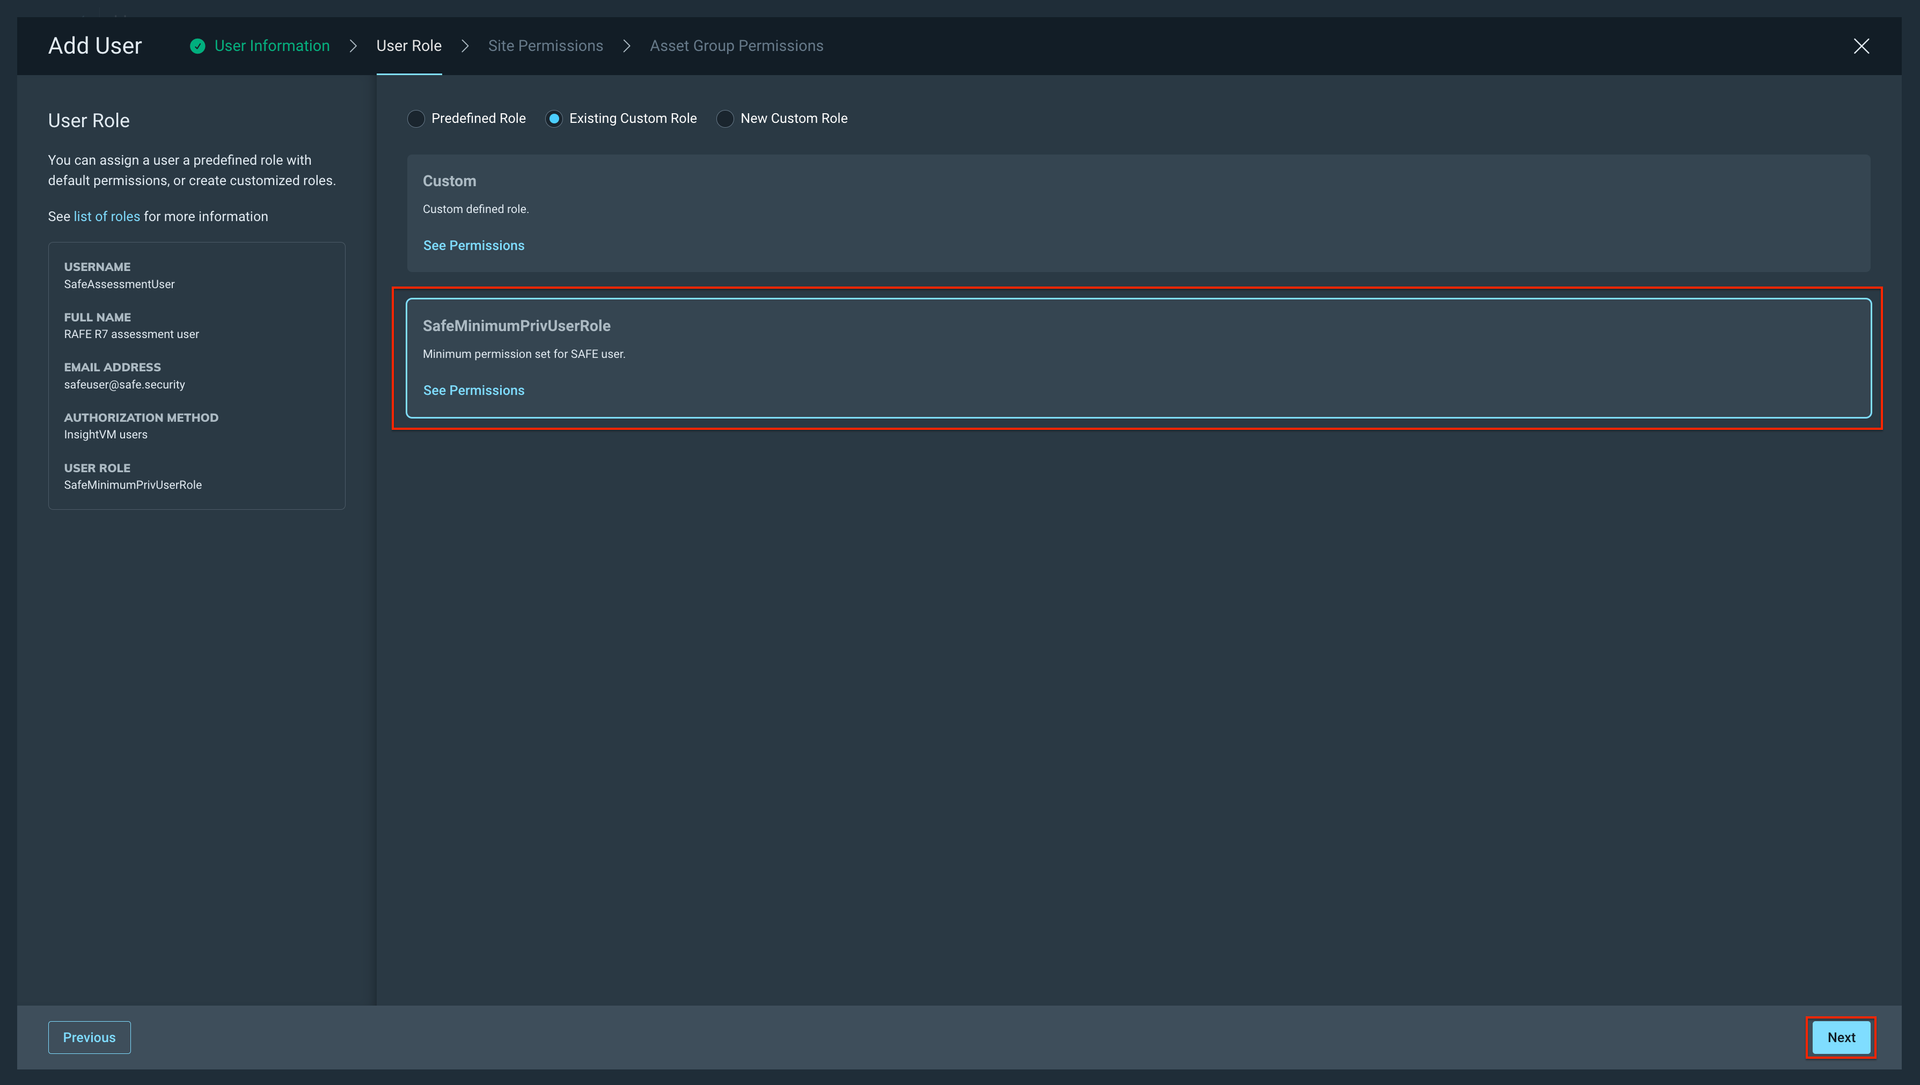
Select the Existing Custom Role option. The system displays all the custom roles available.
Select the Custom Role you have created above.
Click Next.
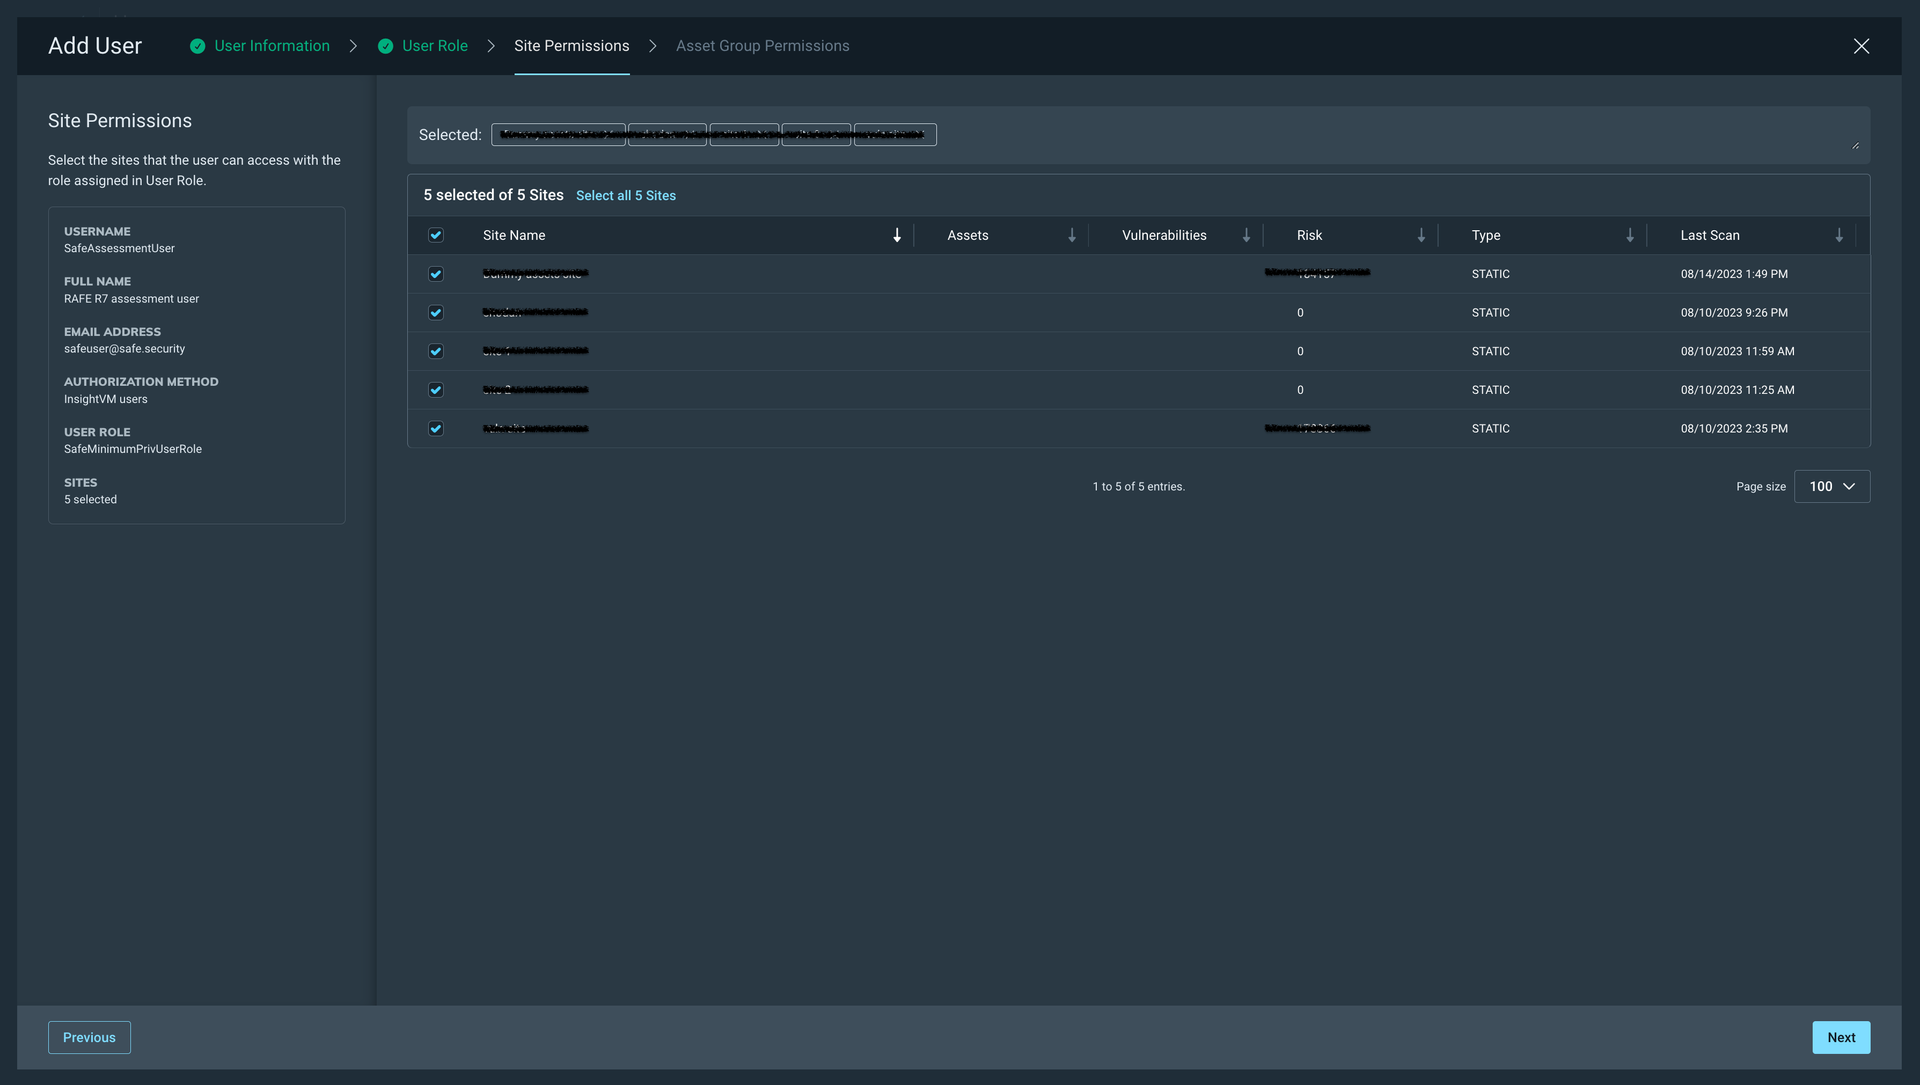
Select the Site Permissions. Here, select all the sites that you want to be assessed. We recommend selecting all the sites.
Click Next.
Select the Asset Group Permissions. We recommend selecting all.
Click the Save button. The system creates the user.
5. Configure Rapid7 InsightVM in SAFE
Follow the below steps to configure the Rapid7 InsightVM integration in SAFE.
5.1. SAFE Setup
Log in to your SAFE account as Admin.
Click on the Integrations from the left navigation.

Click the Rapid7 InsightVM card.
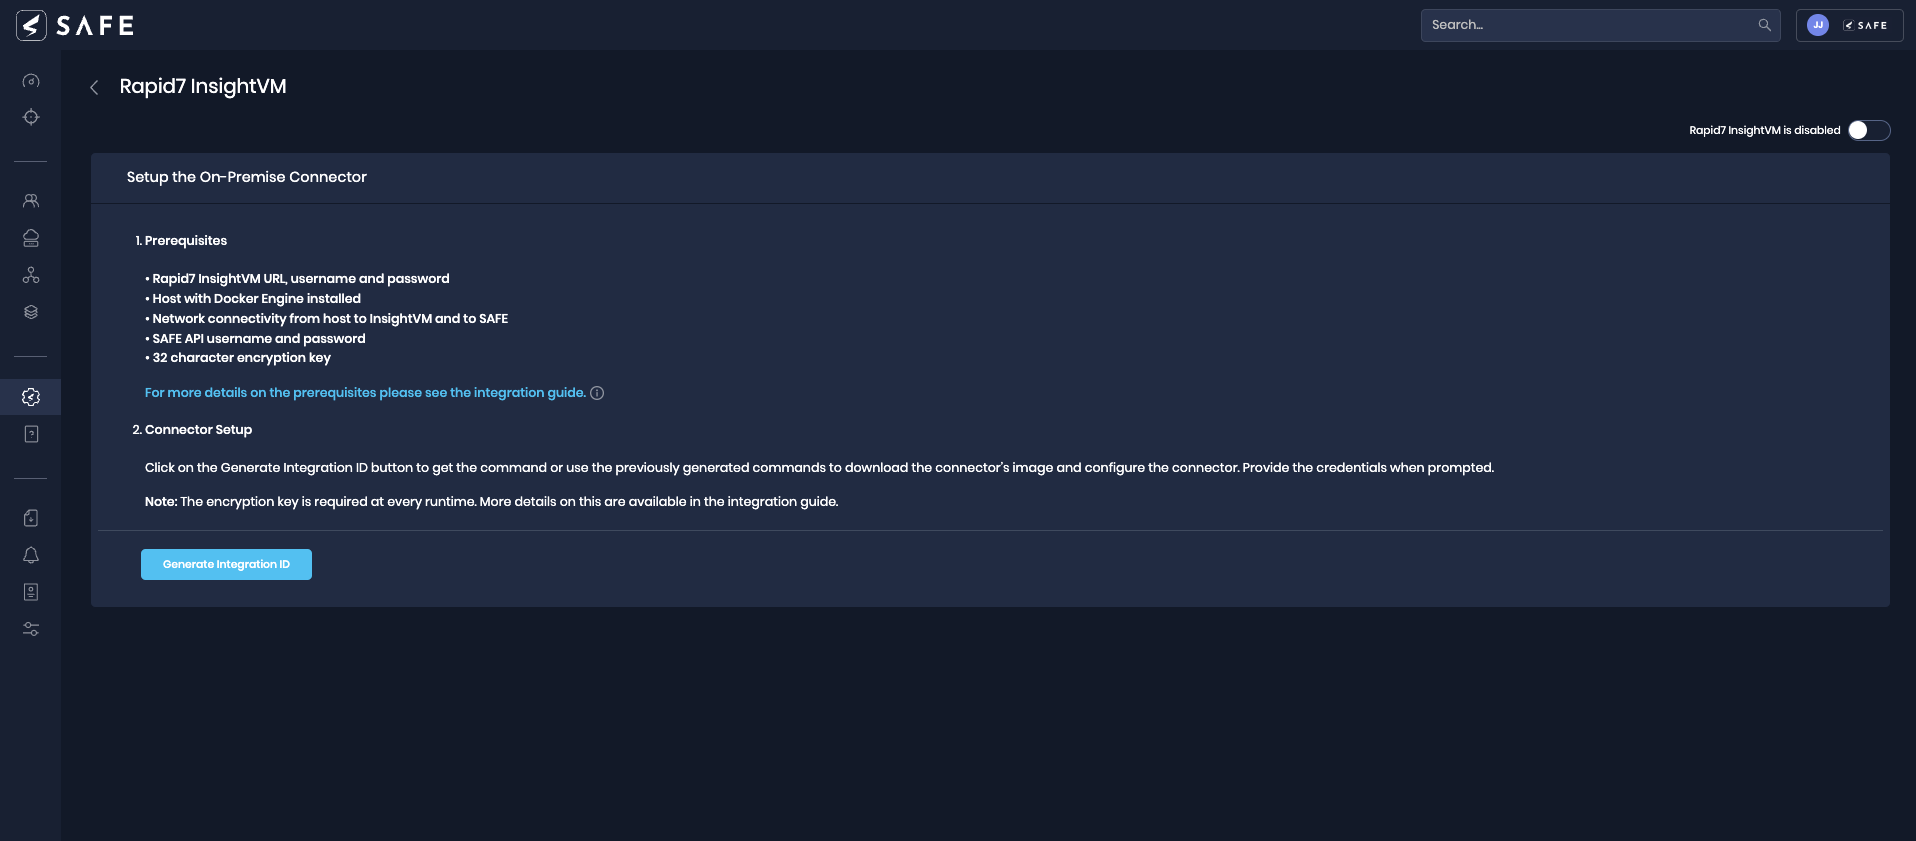
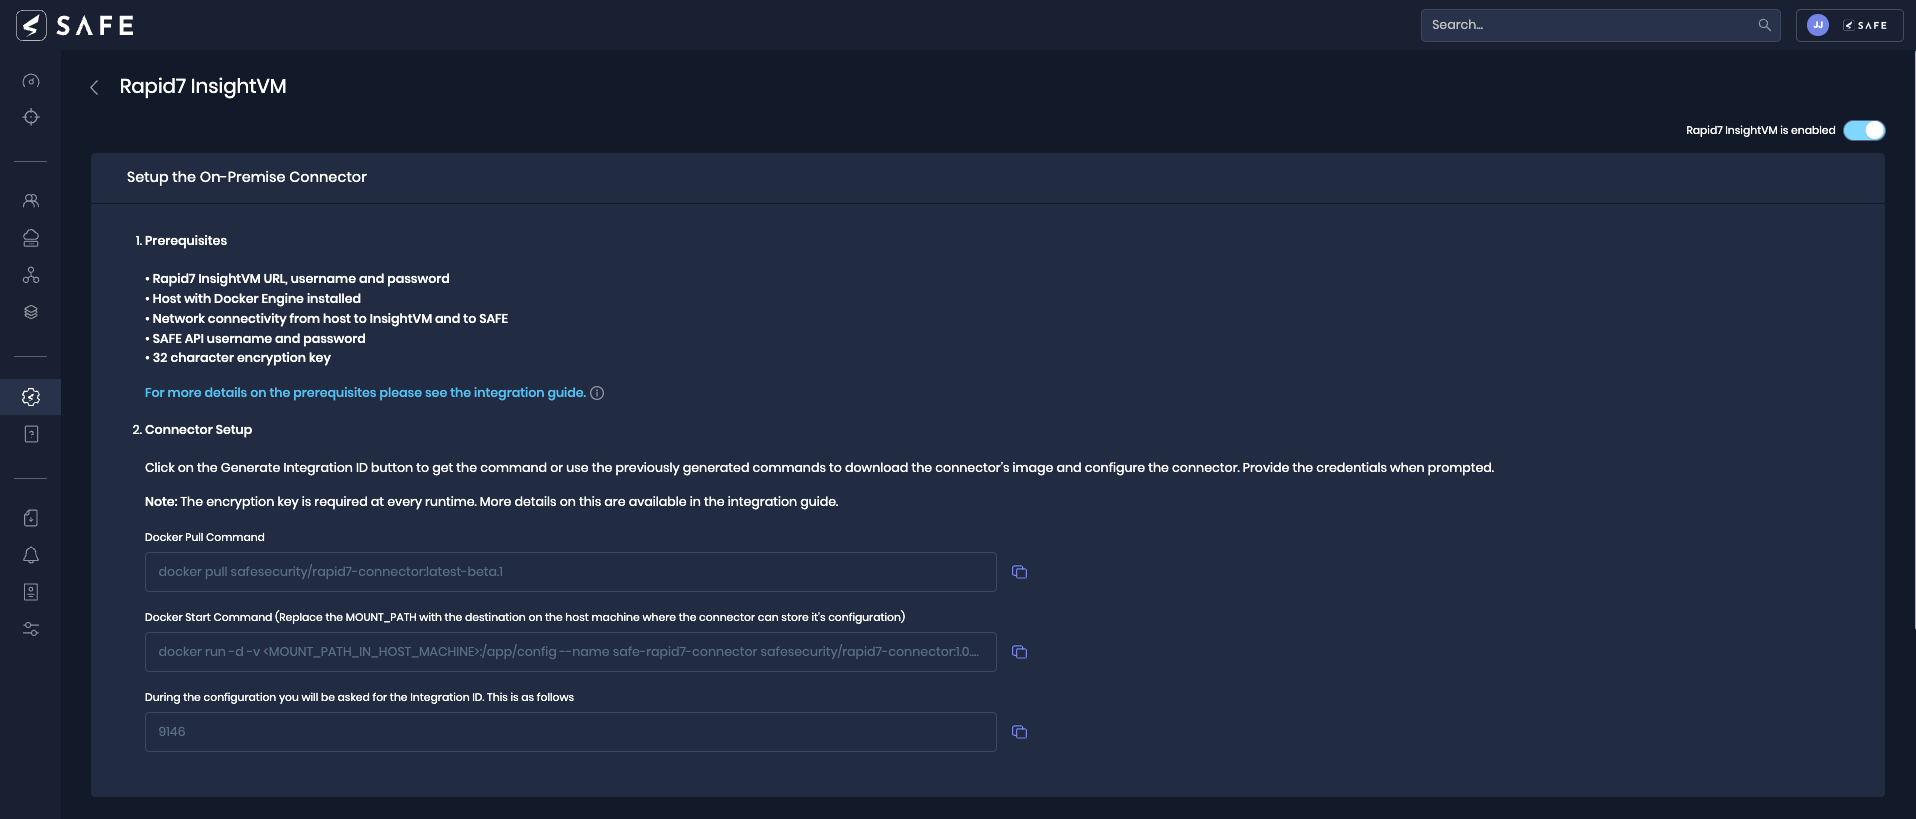
Click the Generate Integration ID. The system displays the commands on the UI.
The generated commands need to be configured on the on-premise connector. Refer to the next section for the step-by-step procedure.
5.2. On-Premise connector setup
Run the Docker Pull Command on the terminal.
docker pull safesecurity/rapid7-connector:1.0.0Run the Docker Start Command and replace '<MOUNT_PATH_IN_HOST_MACHINE>' with the actual value.
docker run -d -v <MOUNT_PATH_IN_HOST_MACHINE>:/app/config --name safe-rapid7-connector safesecurity/rapid7-connector:1.0.0 && docker exec -it safe-rapid7-connector bash initialise.shFill in the required details as per the prompt shown on the terminal.
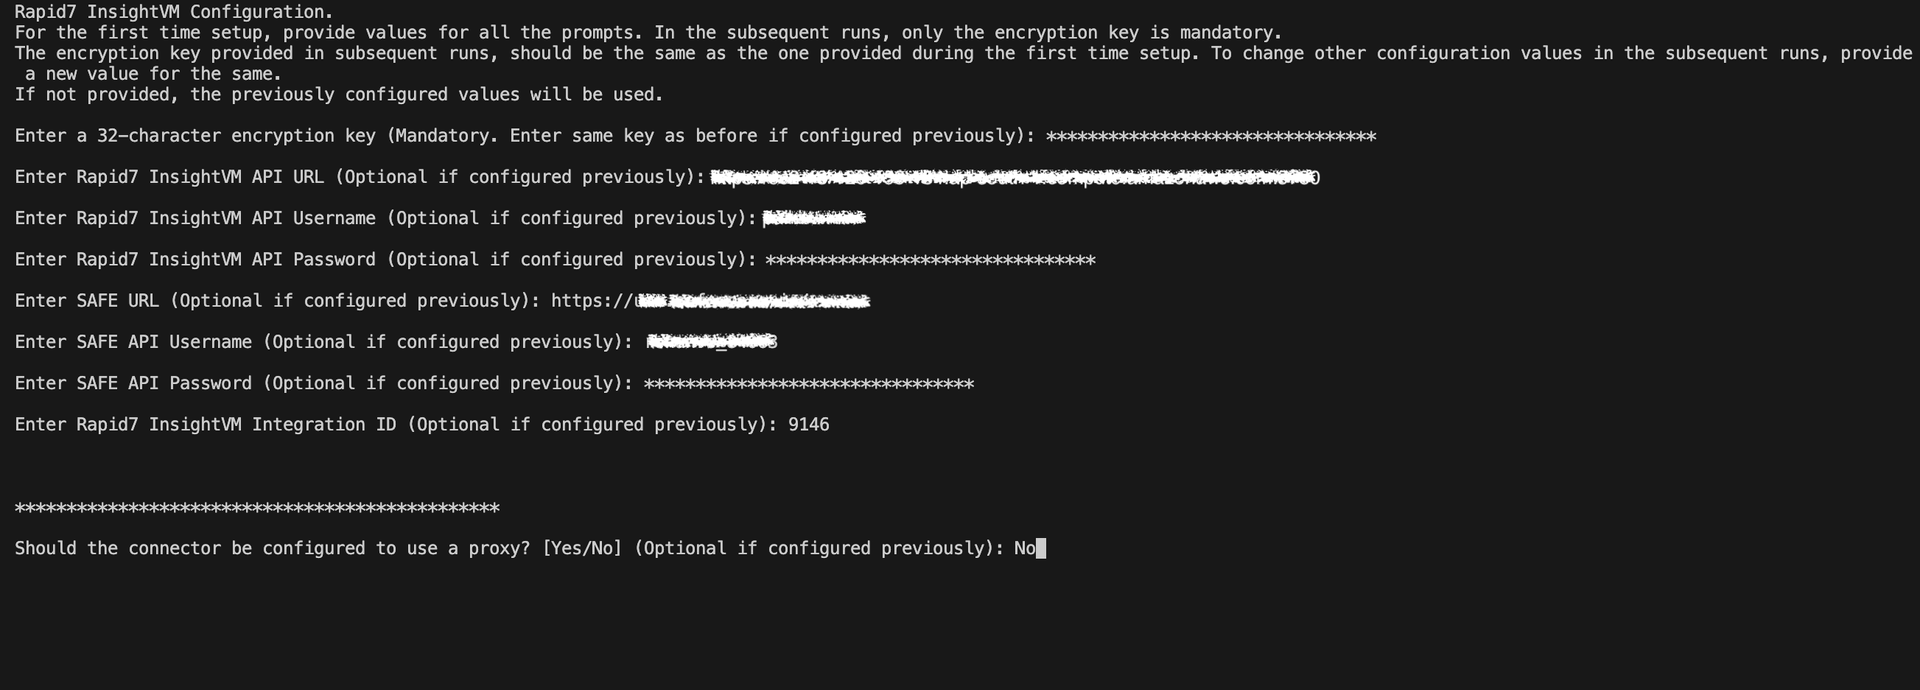
Note:
For the first-time setup, provide values for all prompts. In the subsequent runs, only the encryption key is mandatory.
The encryption key provided in subsequent runs should be the same as the one provided during the first time setup. To change other configuration values in the subsequent runs, provide a new value for the same
5.3. Proxy Setup (Optional)
Follow the below steps to set the proxy:
On the prompt, “Do you want to configure a proxy? (Yes/No): If Yes, fill in all the required fields, which are present below”. Leave all fields empty if the proxy was already configured once and you want to keep it the same.
Enter proxy IP (Optional if configured previously): <IP>

Enter proxy port (Optional if configured previously): <PORT>

Enter proxy username (Optional if configured previously): <PROXY_USERNAME> If configured on Proxy

Enter proxy password (Optional if configured previously): <PROXY_PASSWORD> If configured on Proxy

Enter comma-separated list of no proxy IP/DNS (leave empty if none): <IP>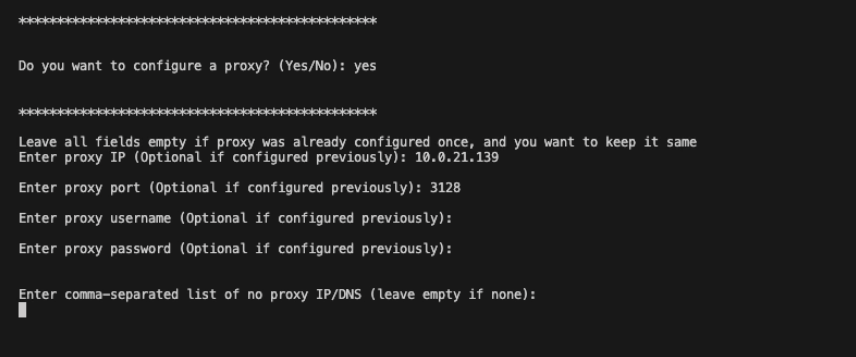
5.4. Save Configuration
Navigate to the Integrations, on the left navigation
Click on Rapid7 InsightVM. If required, enter the Site ID Filter in the Connection Details. Site ID value can be comma-separated. Example: 1,2.
Add the auto-sync frequency.
Click the Save button.
Once the configuration is saved, click the Sync Now button to trigger the on-demand sync outside the scheduled auto sync.

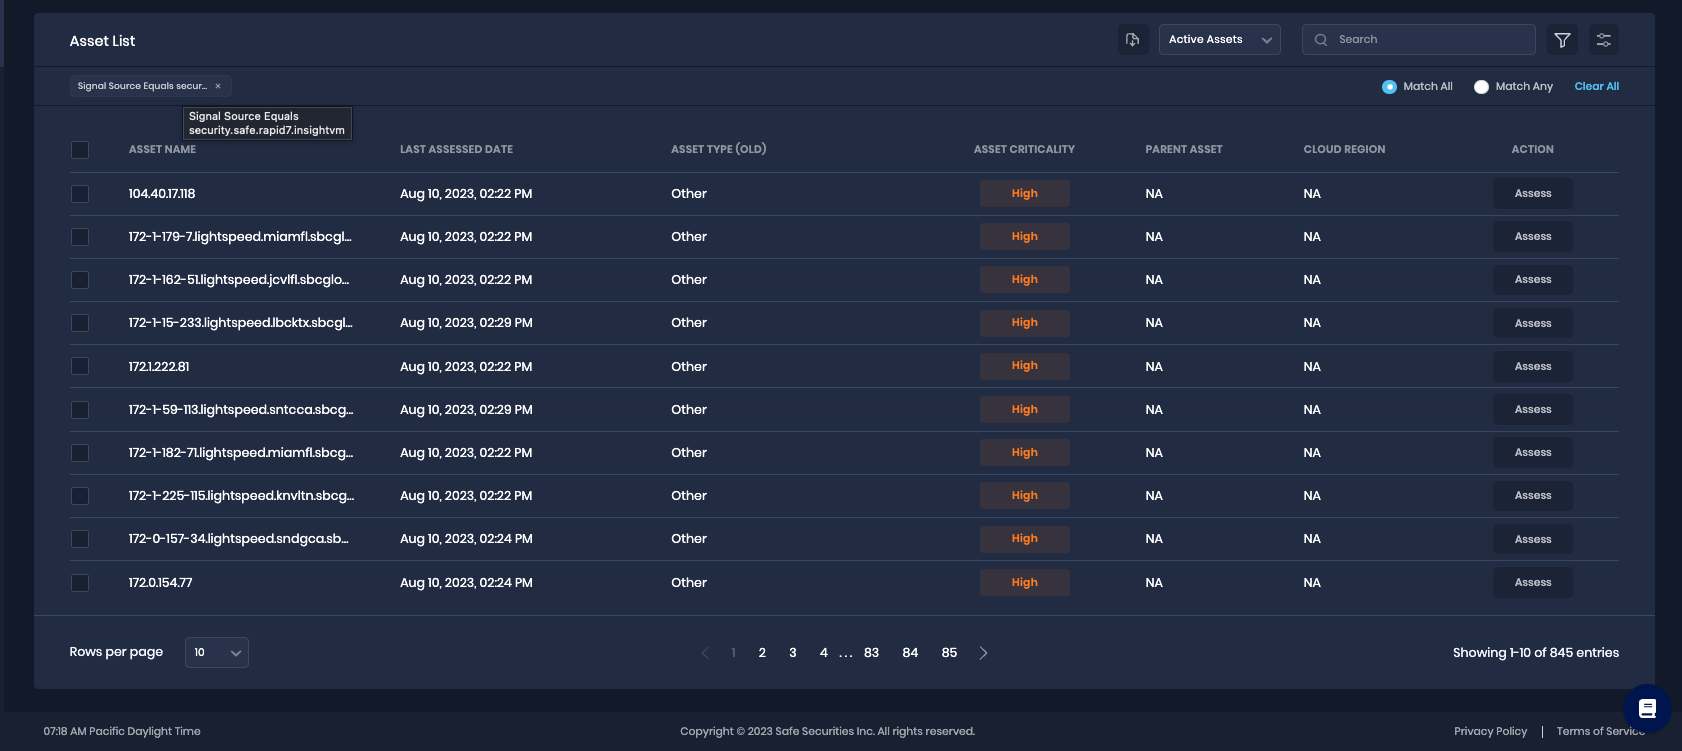
6. View results
After a successful sync, the Rapid7 InsightVM assets are automatically imported into SAFE. To view the assets pulled from Rapid7 InsightVM:
Navigate to Technology > Assets and filter the asset list for signal source equals security.safe.rapid7.insightvm.
7. FAQs
1. What to do if the Encryption Key is lost? If you lost the Encryption Key, remove the previously mounted config path directory on the host machine and reconfigure the on-premise connector.
2. How to upgrade the connector when a newer version is available from SAFE’s end? Follow the below steps to upgrade a connector to a newer version:
Stop the currently running on-premise Connector using the following command
docker rm -f safe-rapid7-connectorCopy the Docker pull command (which would have been updated with a newer version).
After pulling the latest image for the Rapid7 On-Premise Connector, go run the Docker Start command (i.e., the second command on the Rapid7 Integration).
Note
Keep the config path as earlier configured.
Enter the Encryption Key when prompted.
The user must not fill in any other details again (if configured already).
3. How to use private SSL certificates with an on-prem connector? (with Deep Packet Inspection-ing Firewalls)
In order to utilize private certificates, the customer must ensure that these certificates are accessible within a designated directory on the server or machine where the on-prem connector is being configured, denoted as "<CERTIFICATES_DIRECTORY>."
You will also need to specify the path to the certificate used for accessing the SAFE server from within the container. For example, if the certificate is named "ca-certificates.crt," the path to this certificate file should be "/etc/ssl/certs/ca-certificates.crt," which can be represented as "<CA_CERTIFICATE_FILE_PATH>."
To enable the connector to operate with these certificates, you need to adjust the Docker Start command (2nd command on the Rapid7 configuration page).
Original Command:
docker run -d -v <MOUNT_PATH_IN_HOST_MACHINE>:/app/config --name safe-rapid7-connector safesecurity/rapid7-connector:1.0.1 && docker exec -it safe-rapid7-connector bash initialise.shTo incorporate support for private certificates, modify the above command as follows:
Updated Command with Support for Private Certificates:
docker run -d -v <MOUNT_PATH_IN_HOST_MACHINE>:/app/config -v <CERTIFICATES_DIRECTORY>:/usr/local/share/ca-certificates -e NODE_EXTRA_CA_CERTS=<CA_CERTIFICATE_FILE_PATH> --name safe-rapid7-connector safesecurity/rapid7-connector:1.0.1 && docker exec -it safe-rapid7-connector bash initialise.sh