About this document
This document provides step-by-step instructions to configure "Azure - Defender for Cloud" (written as "Azure" in this document) in SAFE.
Introduction
This integration allows you to onboard assets from Azure and fetch recommendations (referred to as findings in SAFE). SAFE admins can configure this integration from the "Azure - Defender for Cloud" card available on the SAFE Hooks page. Once this integration is configured, SAFE fetches the security misconfiguration detected by Microsoft Defender for Cloud using the Azure Security Center Default policy assignment. This policy assignment depends on the Azure Security Benchmark and utilizes it to quantify cloud-related risks.
- After a successful configuration, SAFE will automatically onboard the Azure assets. You can view the Azure assets under the "Cloud-Azure" group.
- SAFE pulls in the MITRE ATT&CK Technique mapping for controls from Azure.
- In addition to the auto-sync, SAFE admins can perform an on-demand sync with Azure to pull the assets and misconfigurations.
- SAFE uses REST APIs provided by Microsoft to consume recommendations data from Microsoft Defender for Cloud. These REST APIs are available at https://management.azure.com/* endpoints.
- The current integration with Microsoft Defender for Cloud does not support recommendations from Defender CSPM (Cloud Security Posture Management). As a result, CSPM-specific insights such as identity-related risks (e.g., overprovisioned or inactive identities) may not appear in SAFE.
- SAFE pulls in the recommendations that are defined by Azure. Refer to the Azure recommendations for more details.
- To onboard multiple Azure accounts, refer to Add multiple integration accounts via APIs.
- Both Azure Commercial (Public Cloud) & Azure Government (US Gov) tenants are supported, setup is the same until the final step configuring in SAFE.
Prerequisites
- Microsoft Defender for Cloud is enabled for your Azure subscriptions.
- All subscriptions have the Defender for Cloud default policy enabled.
- The following privileges are needed for a user in Azure to generate the connection details:
- For manually creating applications and assigning permissions:
- Sufficient privileges/permissions to create an application.
- Sufficient privileges/permissions to create a Service Principal account.
- Sufficient privileges/permissions to assign the Service Principal account a "Reader" role to the relevant subscriptions.
- [Optional] For generating credentials using a script:
- Access to the Cloud Shell of your Azure subscription to execute the PowerShell script provided by SAFE.
- For manually creating applications and assigning permissions:
- SAFE access with an admin role.
Generate connection details
You have two methods for generating the connection details (Tenant ID, Client ID, and Client Secret):
- Manual method by registering an app
- PowerShell script method
Manual method by registering an app
App Registration
- Log in to the Azure Portal.
- Navigate to Azure Active Directory.
.png)
- Go to the App registrations and click the New Registration button.
.png)
- On the app registration page, enter the Name for the application, select the Account Type, and Redirect URI.
- Name: Enter a name of your choice. For example, SAFE-Azure App
- AccountType: Select the option "Accounts in the organizational directory only (Default Directory only - Single Tenant)"
- Redirect URI: This can be left blank.
.png)
- Click the Register button. The system registers the application.
Get the Client ID and Tenant ID
- Go to the Application overview page you created above.
- You can find the Client ID and Tenant ID on the application's overview page.
.png)
- Save the Client ID and Tenant ID on your system for later usage while configuring the Azure to SAFE.
Create the Client Secret
When we register a new application in Azure, it does not have any client secrets. To create a Client Secret:
- Navigate to Certificates & Secrets from the left navigation.
- Click the New Client Secret button.
.png)
- Enter the Description and Expiry for the Client Secret.
.png)
- Click the Add button.
- The system adds the Client Secret and displays the details on the same page.
.png)
- Save the Client Secret on your system for later usage while configuring the Azure in SAFE.
Assign the reader role in the subscriptions to the created app
Get the Subscription
- Go to the Azure Portal.
- Search Subscriptions in the search bar and click it.
.png)
- On the subscriptions page, the system displays all your Azure subscriptions.
- Search and click the subscription to which you want to assign the reader role for the app.
.png)
Assign Reader Role
You must assign a reader role to the subscriptions to sync Azure with SAFE. To assign the reader role:
- Go to the Subscription Overview page on the Azure Portal.
- Click the Access Control (IAM) button from the left navigation.
.png)
- Click the Add button and then click the Add role assignment option.
- On the Role tab of the Add role assignment page, select the Reader role and click Next.
.png)
- On the Member tab Add role assignment page, click the + Select Member button and select the member of the application you created above.
.png)
- Click Next and save the settings to assign the reader role.
To learn more, refer to Microsoft documentation here.
[Alternate Method] Generate connection details via a PowerShell Script
You must run a PowerShell script on your Azure portal to generate the connection details (Tenant ID, Client ID, and Client Secret). First, download the PowerShell script attached here.
Follow the step-by-step procedure below to generate the connection details:
- Log in to your Azure portal.
- Click the Cloud Shell terminal icon located at the top right corner (refer to the screenshot below).

- In the PowerShell terminal, execute the "Connect-AzureAD" command to enable the usage of Active Directory cmdlet requests.
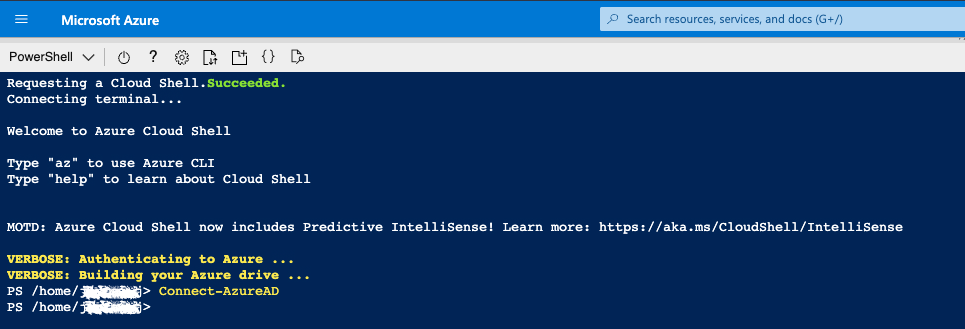
- Upload the PowerShell script (azureSafeOnboardingScript.ps1) attached above.
.png)
- Execute the PowerShell script to create a Service Principal account and assign "Reader" access to subscriptions using one of the following approaches:
ApproachA: If you want to provide "Reader" access to selected subscriptions for which your current user has privileged access, run the script with the following command-line argument:
PS /home/user1> ./azureSafeOnboardingScript.ps1 "MySubscription1" "MySubscription2"
ApproachB: If you want to provide "Reader" access to all subscriptions for which your current user has privileged access, run the script:
PS /home/user1> ./azureSafeOnboardingScript.ps1 - Once the PowerShell script execution is complete, the system creates a Service Principal account named "SAFE-Azure-App" with "Reader" access to all subscriptions.
- The system will display the TenantID, ClientID, and ClientSecret. Make sure to copy and save these values for use while configuring Azure in SAFE in the next section.
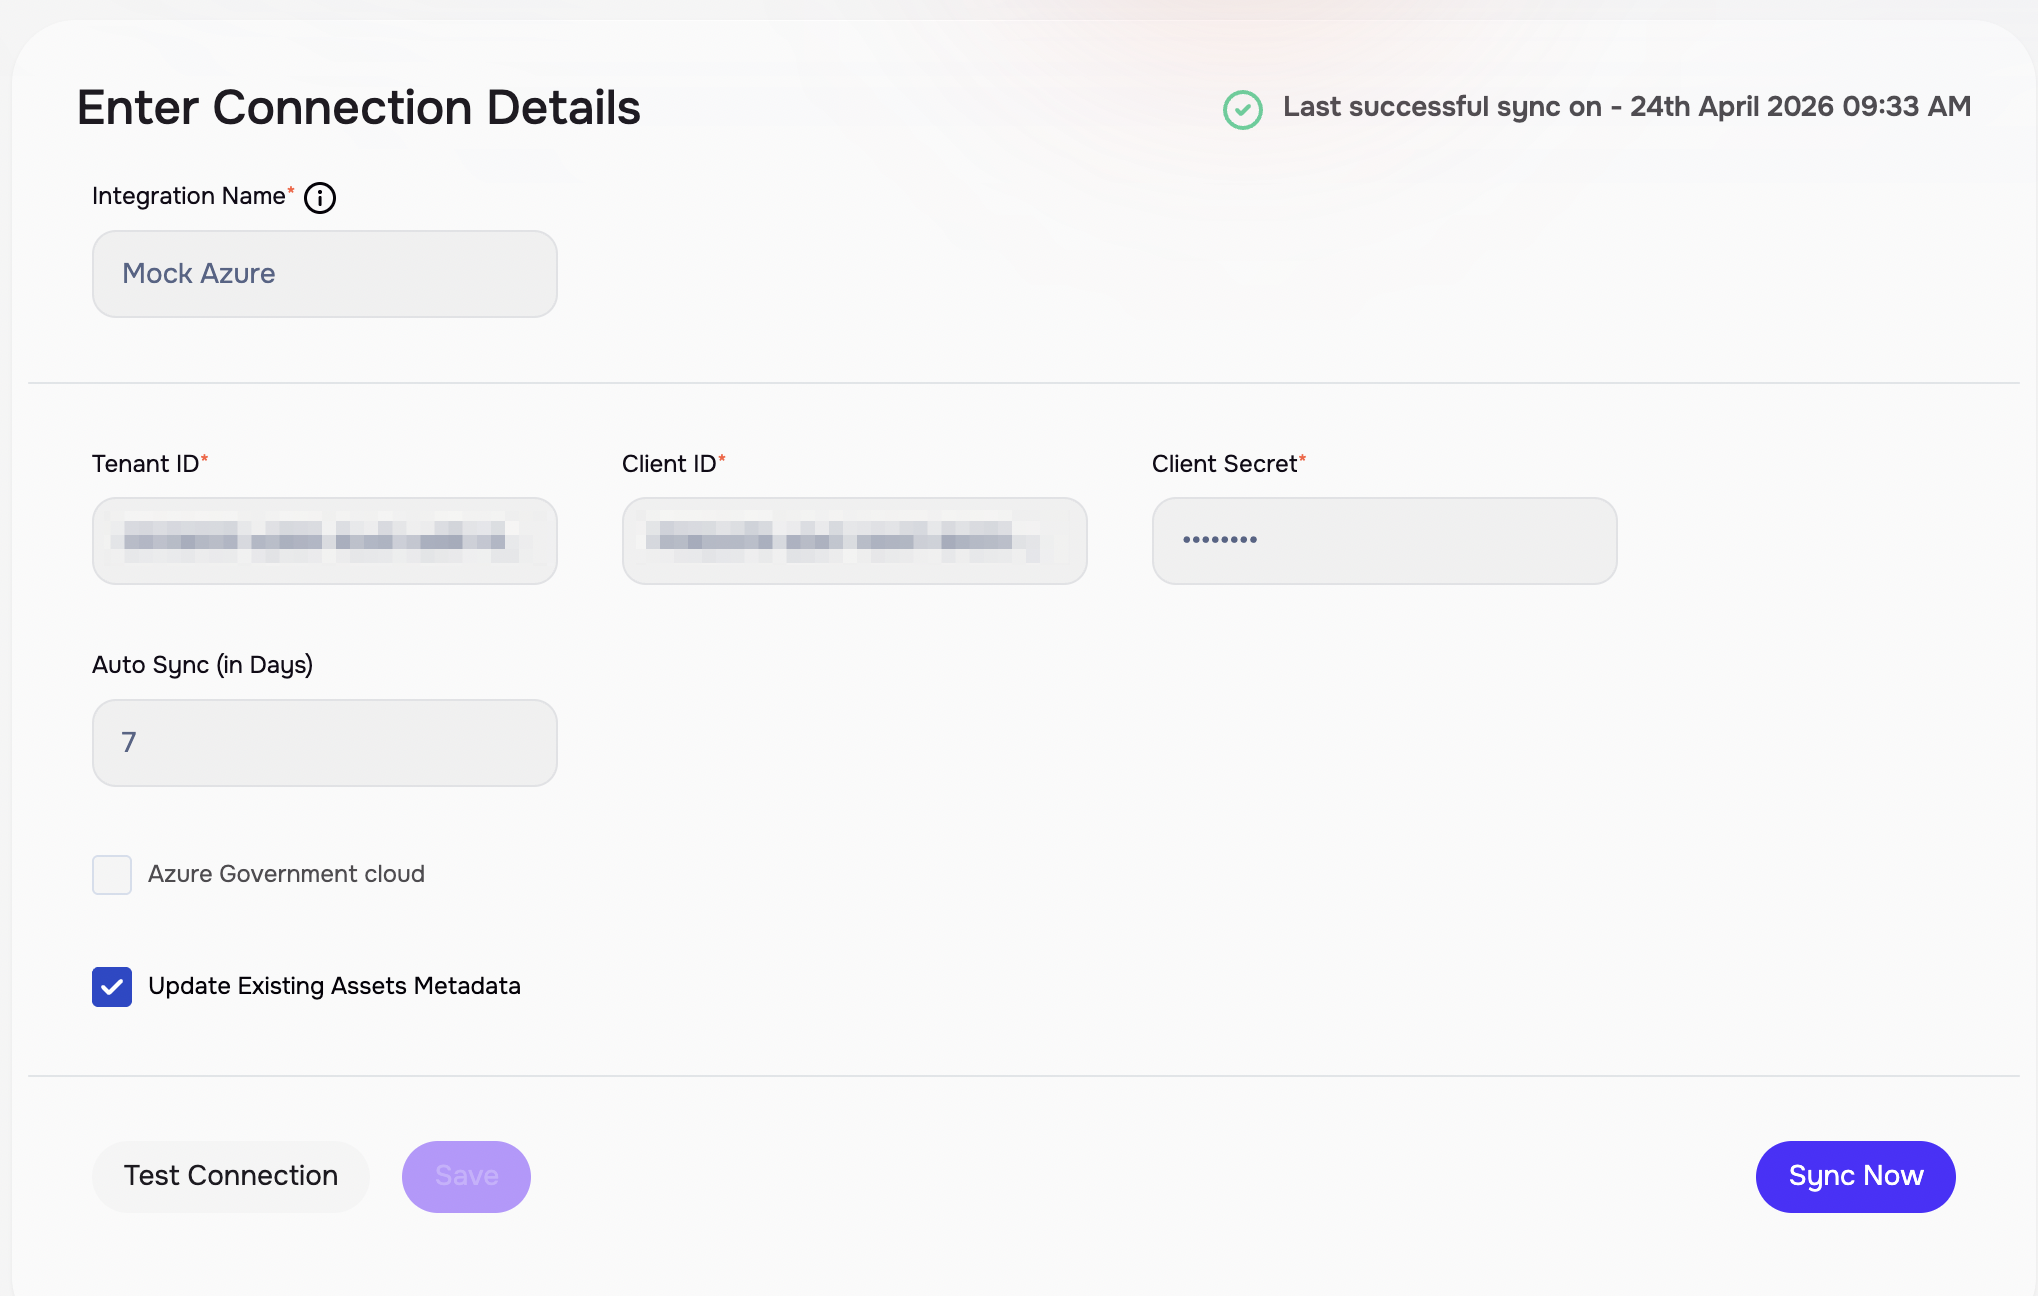
Configure Azure in SAFE
Follow the steps below to configure Azure in SAFE.
- Go to the SAFE Integrations menu.
- Click the blue + in the top right of the Integrations page to add a new integration.
- Search and click the "Azure - Defender for Cloud" card.
- Enter an Integration Name identifier and the Tenant ID, Client ID, and Client Secret generated above.
- Enter a value for the Auto-SyncFrequency. This controls how often SAFE will synchronize with Azure for the most recent data.
- (Optional) If the Azure tenant is an Azure Government (US Gov) tenant then ensure the checkbox 'Azure Government Cloud' is ticked.
- Click the Test Connection button.
- Once the connection is validated, click the Save button.
- Once the configuration is saved, click the SyncNow button to trigger the on-demand sync outside the scheduled auto sync.
View Result
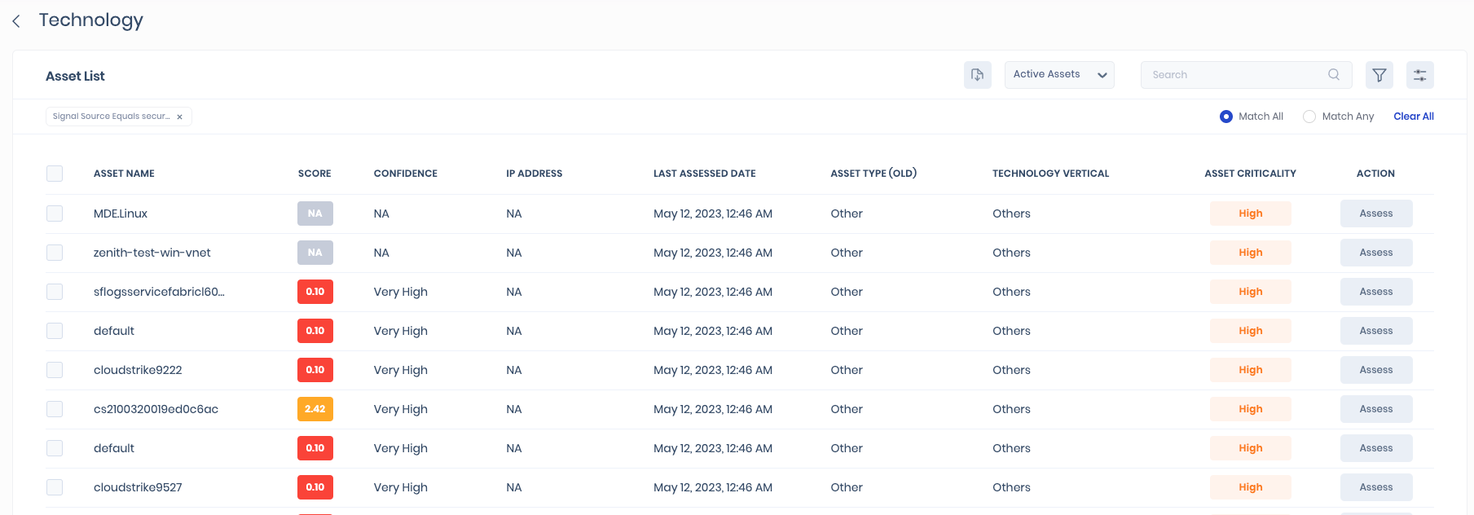
To view the assets:
- On the Azure configuration page, click the See Updated Assets option available at the top-right of the History table.
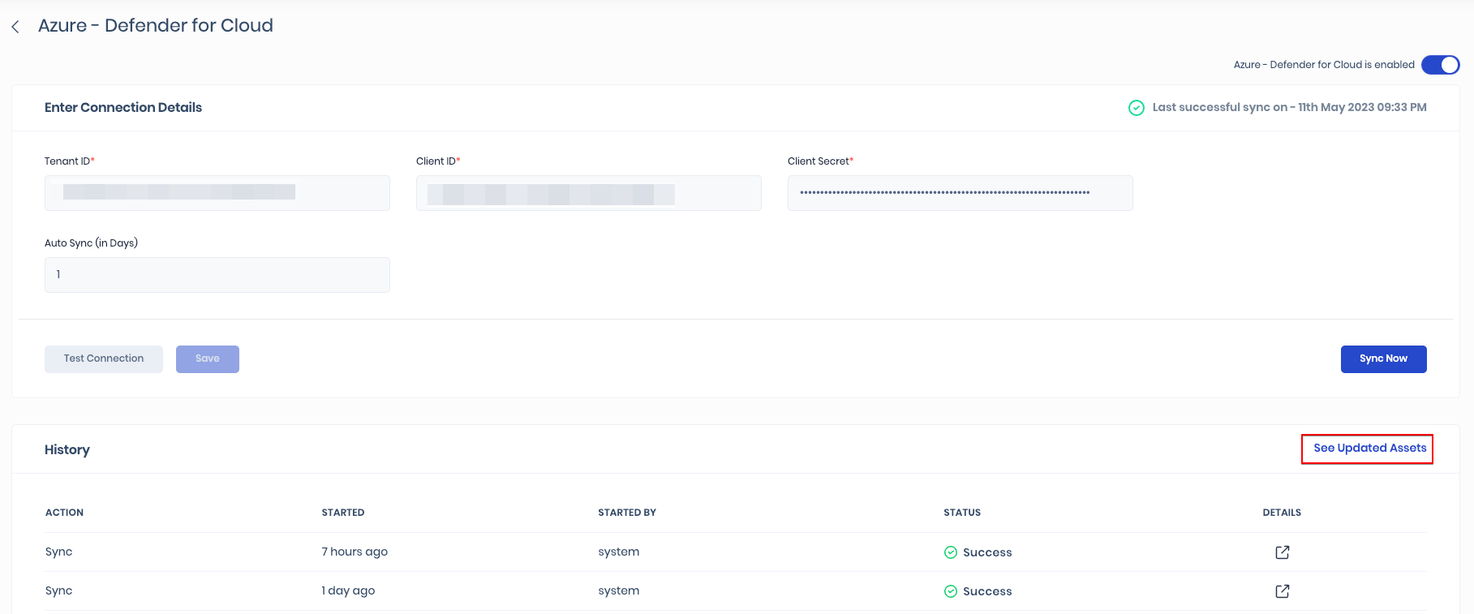
- The system redirects you to a filtered assets list of Azure assets.
- Alternatively, you can navigate to Technology > Assets and filter the asset list for signal source equals security.safe.azure.
To view the findings:
To view findings related to assets, they should be assigned to at least one group and its associated risk scenarios. The Findings view on the Risk Scenario page will display the findings list and their respective details.
- Navigate to the Risk Scenario created for the AWS assets.
- Scroll down to the Findings section. Here you can see the details of the Azure assets.
Integration History
SAFE displays the Integration Sync History table on each integration's configuration page, providing a comprehensive overview of sync history, including action, start time, started by, and sync status.
Refer to Integration History for more details.
SAFE's Outgoing IP Addresses
Click here to find the outgoing IP addresses of SAFE. All traffic to any integrations in SAFE will see one IP address as the source IP of the incoming connection.
Add additional Azure accounts in SAFE
Configure
You can add additional Azure accounts in SAFE only via the SAFE REST APIs. To add an additional Azure account, follow the step-by-step instructions below:
- Generate the connection details by following the steps discussed above in step 4.
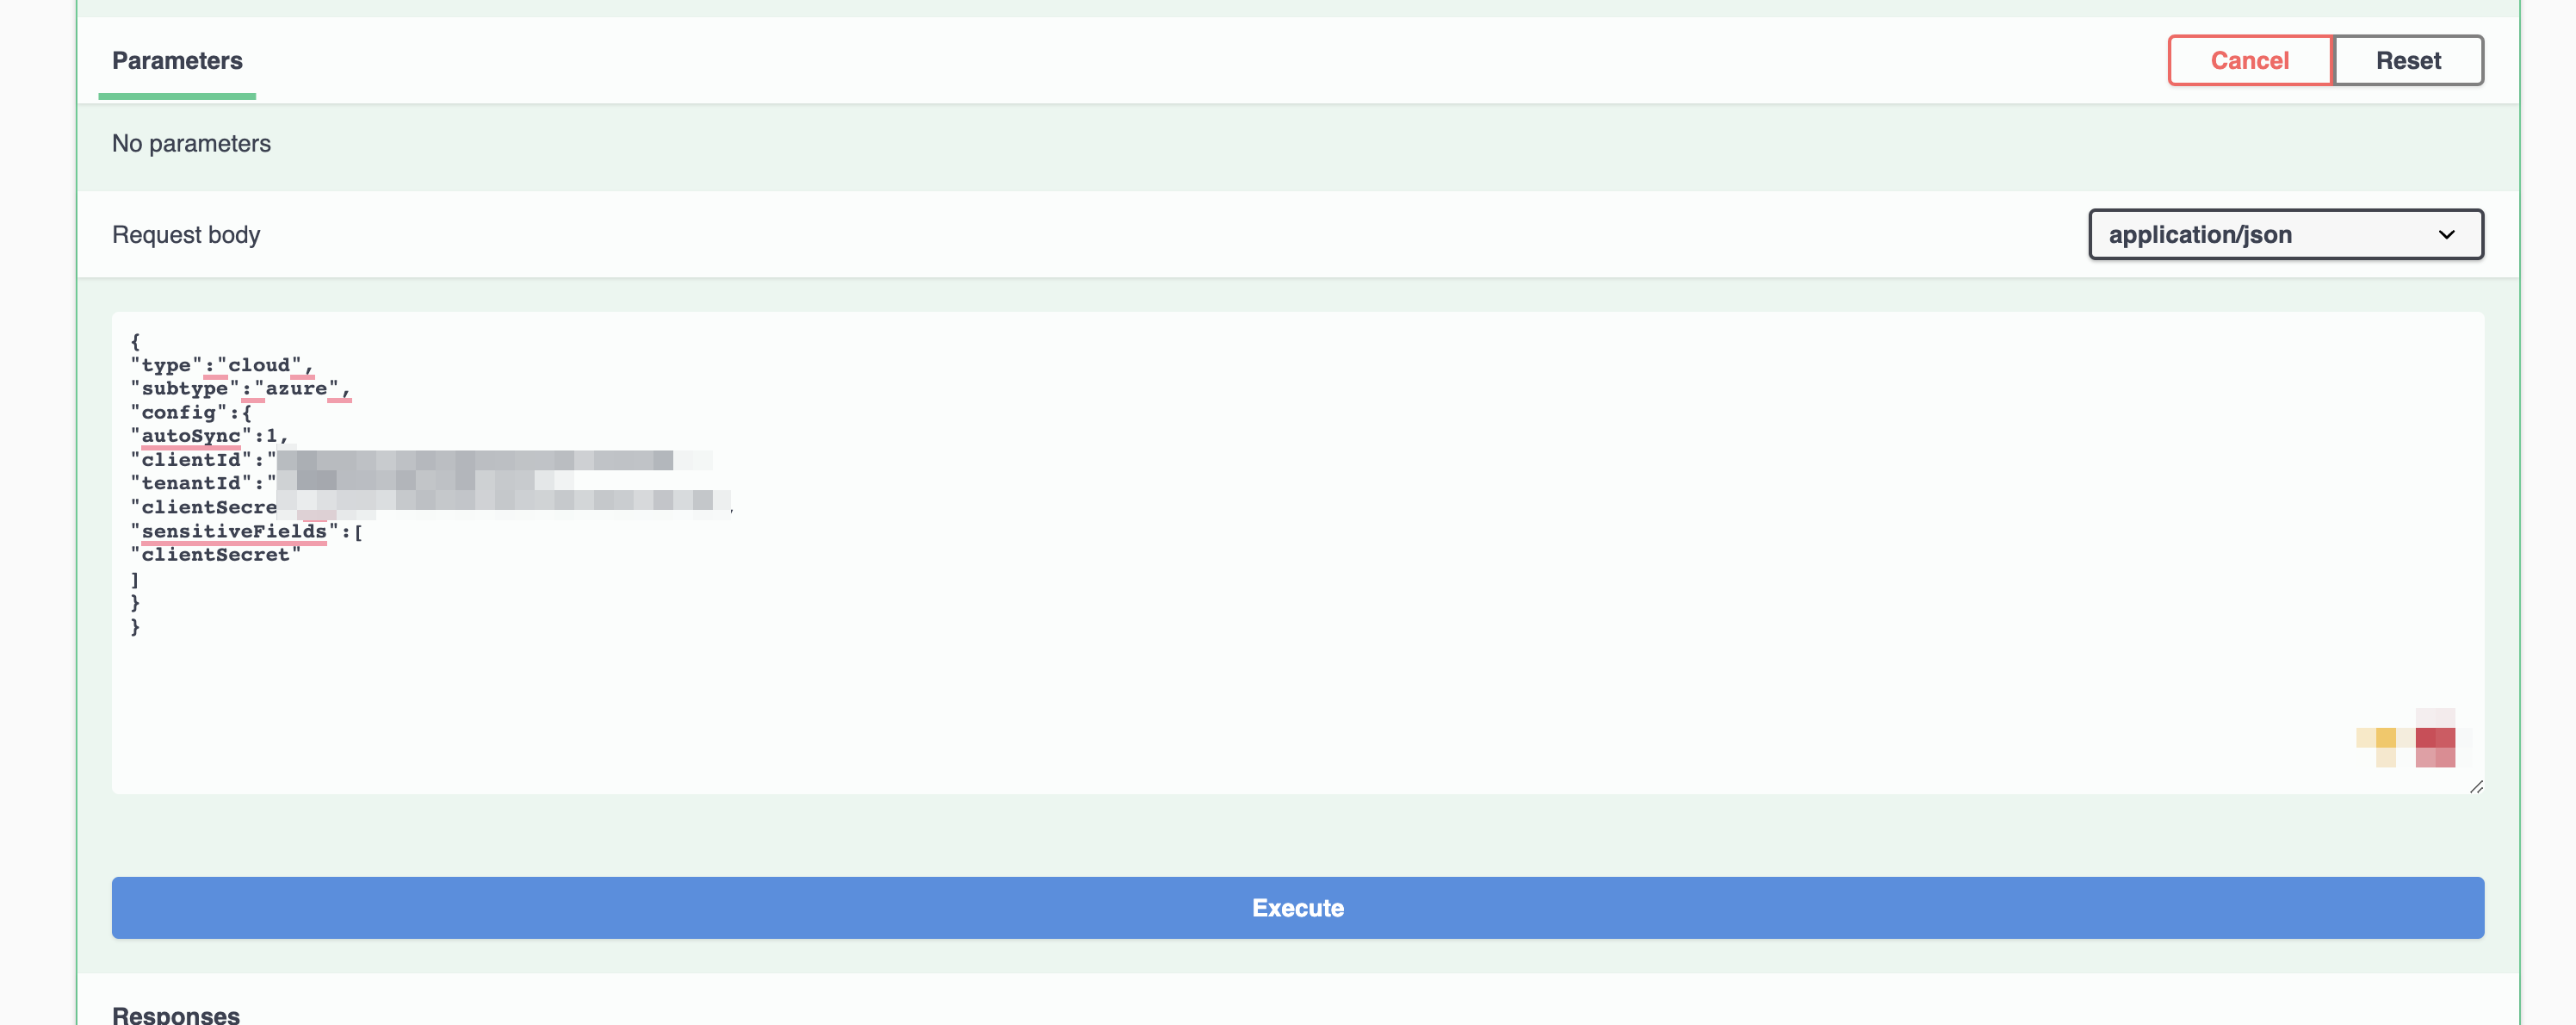
- Prepare a JSON file with the necessary configuration details (Client ID, Tenant ID, Client Secret, and Auto-sync frequency).
Here is an example JSON:
{
"type":"cloud",
"subtype":"azure",
"config":{
"autoSync":1,
"clientId":"<insert ID here>",
"tenantId":"<insert ID here>",
"clientSecret":"<insert secret here>",
"sensitiveFields":[
"clientSecret"
]
}
} - Log in to SAFE as an admin and navigate to SAFE REST APIs by clicking the help icon at the top right corner.
- Scroll down to the Integrations section, and expand POST /api/v3/integrations.
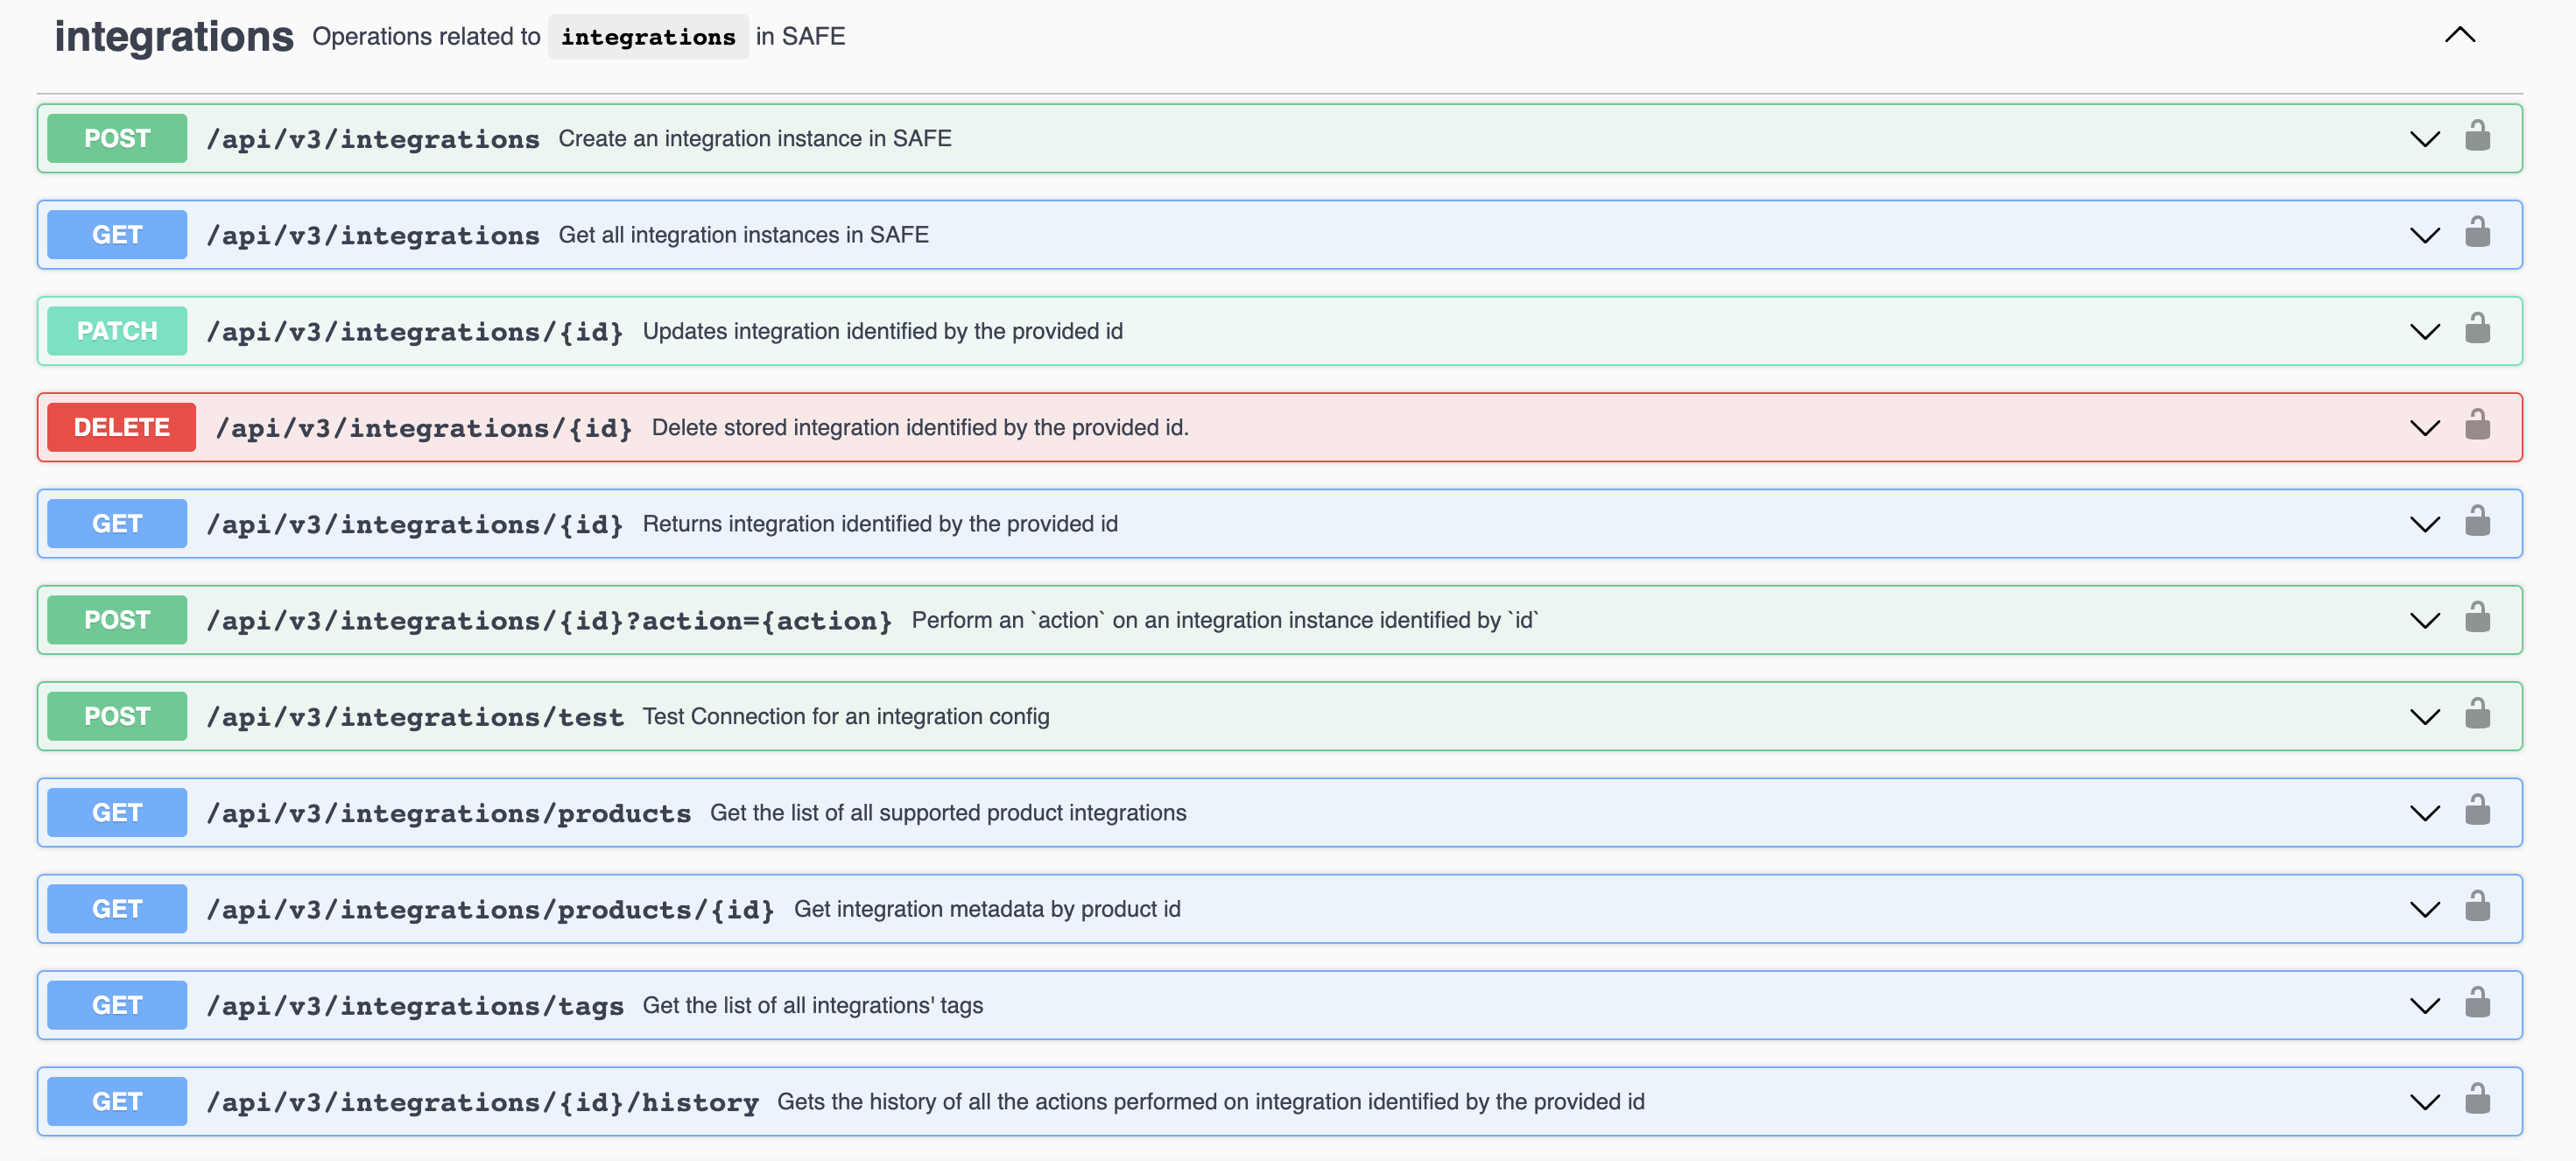
- Click the Try it out button.
- In the request body, replace the example JSON with the one you prepared with connection details.
- Click the Execute button. The system adds the integration to SAFE.
- Scroll down and check the response body and record the Integration ID.
- Now scroll down a little further and expand POST /api/v3/integrations/{id}?action={action}.
- Click the Try it out button.
- Insert the Integration ID you recorded and type "test" as the action.
- Click the Execute button.
- If the test is successful, repeat the same step using "sync" as the action
- Click the Execute button. SAFE will now start pulling in the data from Azure.
Check status
- On the SAFE REST API documentation, navigate to the integrations.
- Expand GET /api/v3/integrations/{id}.
- Click the Try it out button.
- Enter the Integration ID used when setting up the integration.
- Enter Execute. The system displays the configuration and its current status.