ServiceNow’s Configuration Management Database (CMDB) enables users to build logical representations of assets, services, and the relationships between them that comprise the infrastructure of an organization. Details about these components are stored in the CMDB and can be used to monitor the infrastructure, helping ensure integrity, stability, and continuous service operation. The Balbix integration with ServiceNow CMDB ingests infrastructure assets, basic system information, and a wide range of operational and business information configured by your IT, business and cybersecurity teams for assets managed within the ServiceNow CMDB.
Balbix leverages AI to aggregate, normalize, and deduplicate ingested data, along with information integrated from your existing IT and cybersecurity tools. This creates a unified view of your entire asset inventory, including vulnerabilities and their business and operational context. Balbix’s AI models then analyze this data to provide insights such as deployment gap analysis, risk-based vulnerability prioritization (with detailed ranking and scoring), and risk quantification. This process delivers a comprehensive assessment of risk, whether for a single asset, groups of assets, or your entire enterprise, enabling more informed and effective security decisions.
Integration summary
This table provides a summary of the Balbix integration for the ServiceNow CMDB connector.
Integration Type | Fetch: An inbound API integration to fetch assets and related metadata such as tags. |
Types of Assets Fetched | Infrastructure assets managed as configuration items (CI) within ServiceNow CMDB including applications, users, computer, firewall, router, switch, load balancer, printer, server, storage switch, telepresence device, and WLAN controller assets. |
Types of Data Fetched | Asset names, hardware information, interface information (MAC address, IP address), OS information, operational tags (e.g., asset category and subcategory, site information, geolocation/region information, IT asset owner, deployment environment, operational status), business tags (e.g., business function, business segment, associated application, associated revenue, regulatory tags, business criticality, business asset owner). |
Note: The operational and business data in the ServiceNow CMDB can vary based on your implementation. Balbix’s integration is highly configurable to capture necessary information from any data table. However, the availability and usefulness of dynamic data like IP addresses and operating systems depends on the accuracy and frequency of CMDB updates.
Prerequisites
To configure the Balbix connector, you must first create ServiceNow API credentials with the appropriate permissions. These credentials are required for completing the configuration process.
The ServiceNOW CMDB offers multiple authentication methods to ensure secure access:
Basic authentication using a username and password
OAuth 2.0 using an OAuth provider and profile
API Key
Although this guide outlines the setup of OAuth access using the Password Grant Type, it can also serve as a useful reference for other access methods.
Required permissions
cmdb_read
Note: Outbound integration such as ticketing is handled by a separate connector which requires a different set of permissions.
Set up OAuth access
To set up OAuth access, you will need to create a role, grant it read access, set up a service account, and create an OAuth application.
Create a role
You can create a role or use an existing role with the appropriate permissions.
To create a role:
In Service Now, go to All > User Administration > Roles.
Click New. Enter a role name like "balbix_integration_role".
Click Submit, then open the role.
Click Contains Roles.
Click Edit and add the cmdb_read role.
Click Save.
Create a service account
After you have a role with the proper permissions and access assigned, you need to create a service account.
To create a service account:
In ServiceNow, go to All > User Administration > Users.
Click New. Enter a User ID like "balbix_integration_role".
Enter any other required information.
Check Web service access only.
Open your new service account.
Click Set password and configure a password for the account.
Save the password and close the dialog box.
On the Roles tab, click Edit.
Add the role you created.
Click Save.
Create an OAuth application
The final step is to create an OAuth application.
To create an OAuth application:
In ServiceNow, go to All > System OAuth > Application registry.
Click New.
Select Create an OAuth API endpoint for external clients.
Enter a unique name like "balbix-integration".
Leave the Client Secret field blank to have ServiceNow generate the value.
Keep the Token Lifespan values in the default state.
Click Submit.
Open the OAuth app and copy the Client ID and Client Secret values to be entered later in the configuration step for setting up the connector.
After you have completed the prerequisites, go to the Balbix dashboard to create your connector.
Set up your ServiceNow CMDB connector
After you have completed the prerequisites, follow these steps to create and configure your Balbix connector for ServiceNow CMDB.
Step 1: Select the connector
Start by selecting a connector using the steps outlined below:
Go to Data Sources from the left navigation bar.
In the Connectors table, click + Add Connector.
Click Select a Connector to Configure to expand the window and view the list of available connectors.
Click the + icon on the ServiceNow Generic CMDB tile.
Step 2: Configure the connector
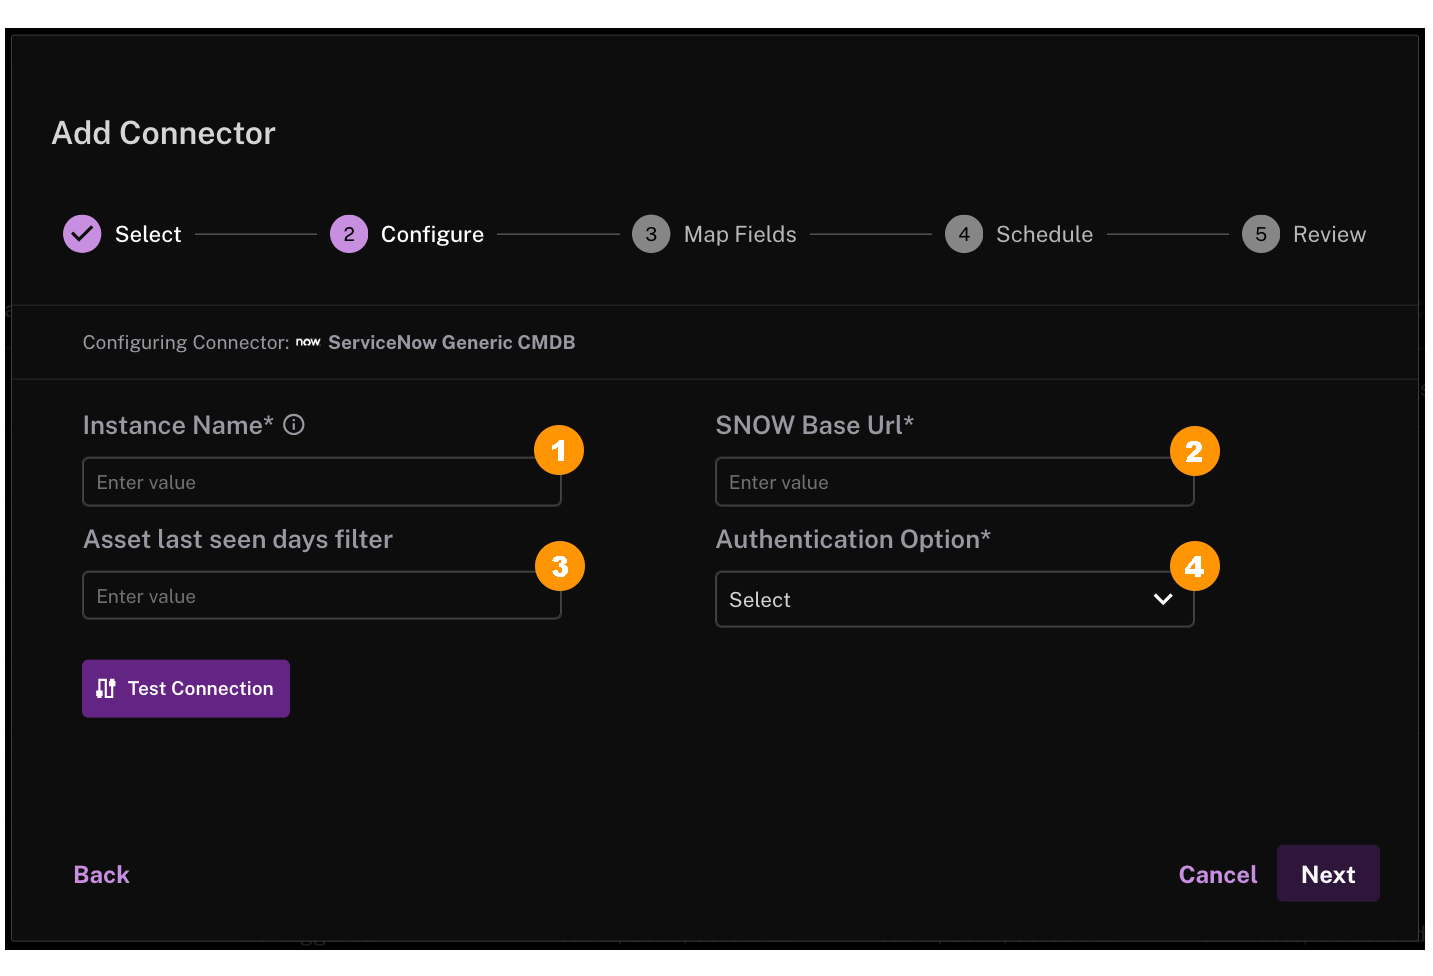
Fill in the required common configuration fields.
.png "image(334).png")
Instance Name
.png "image(335).png")
SNOW Base URL
Enter the base API URL of the server where the information will be fetched (e.g., https://<customer_url>.service-now.com/api/now/v2/table/).Make sure the authorized user for this account has the necessary privileges to access the API.
.png "image(336).png")
Asset last seen days filter
.png "image(337).png")
Authentication Option
Select a method of authentication from the drop-down menu: Key Based, Username & Password, or OAuth.
For Authentication Option: Key Based
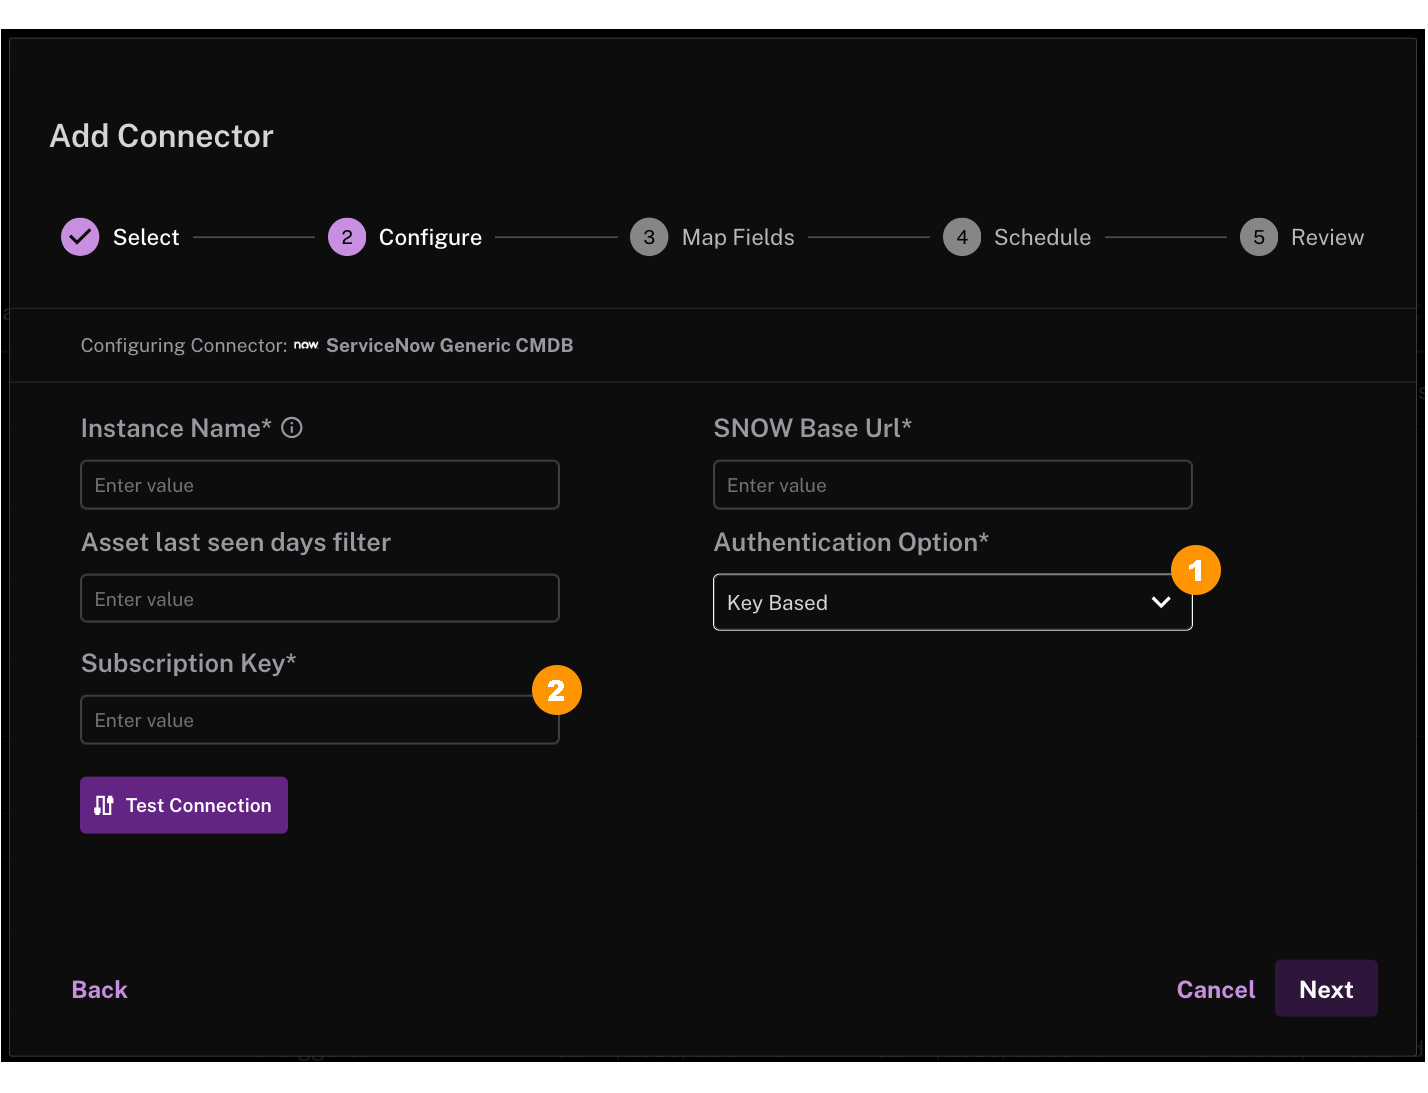
| Authentication Option | Select Key Based as the method of authentication. |
| Subscription Key | Enter the subscription key for the account configured to fetch data. For example, xxxx-xxxx-xxxxx-xxxx-xxxxx. |
For Authentication Option: Username & Password
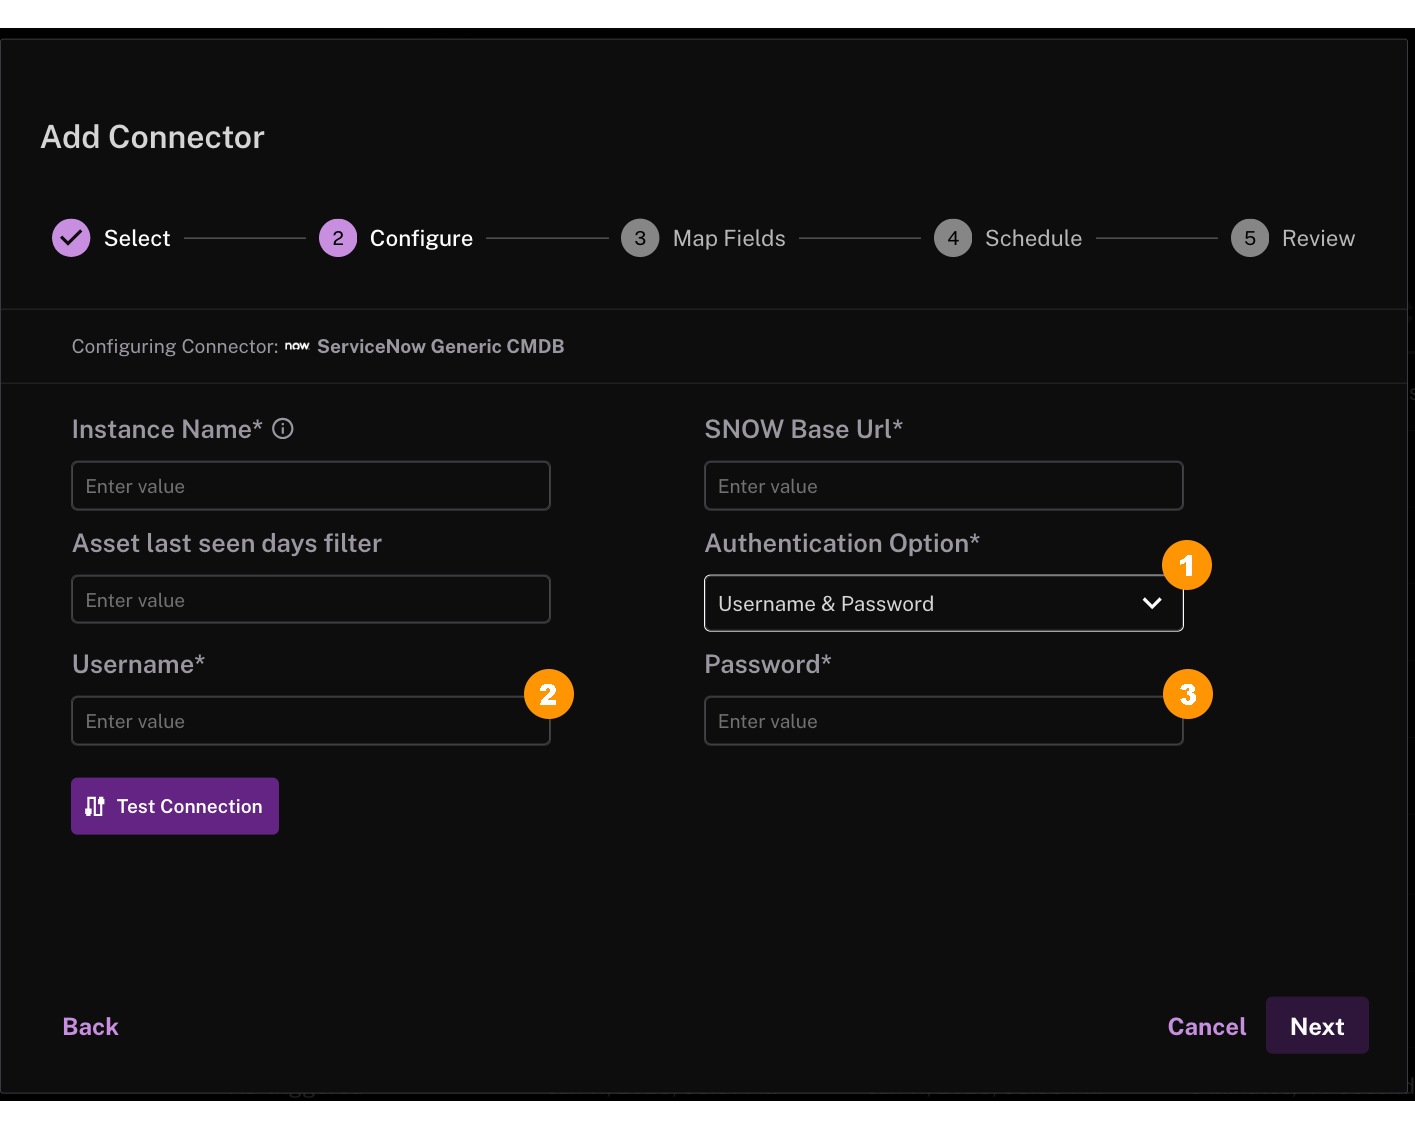
| Authentication Option | Select Username & Password as the method of authentication. |
| Username | Enter the username for the account configured to fetch data. |
| Password | Enter the password for the account configured to fetch data. |
For Authentication Option: OAuth > Client Credentials
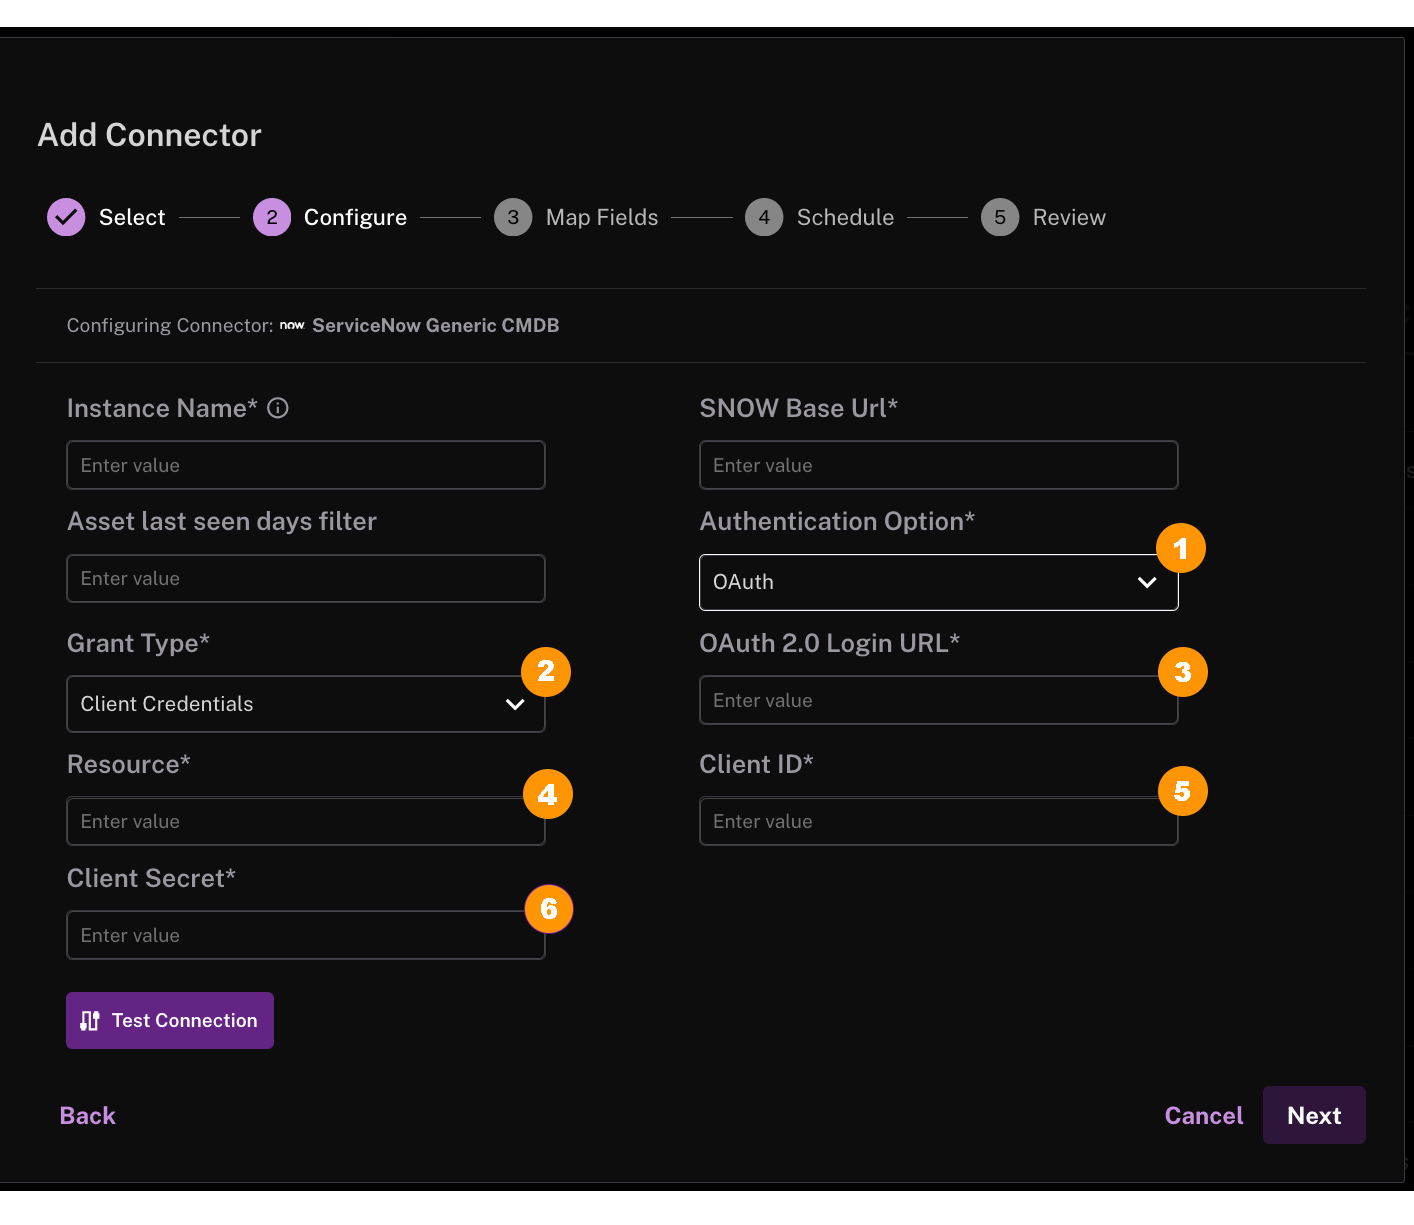
| Authentication Option | Select OAuth as the method of authentication. |
| Grant Type | Select Client Credentials as the grant type. |
| OAuth 2.0 Login URL | Enter the URL of the proxy server responsible for handling authentication. |
| Resource | Enter the access token URL. For example, https://hostname.service-now.com/oauth_token.do |
| Client ID | Enter the OAuth client ID for OAuth access to ServiceNow. |
| Client Secret | Enter the OAuth client secret for OAuth access to ServiceNow. |
.png "image(346).png")
.png "image(347).png")
For Authentication Option: OAuth > Password
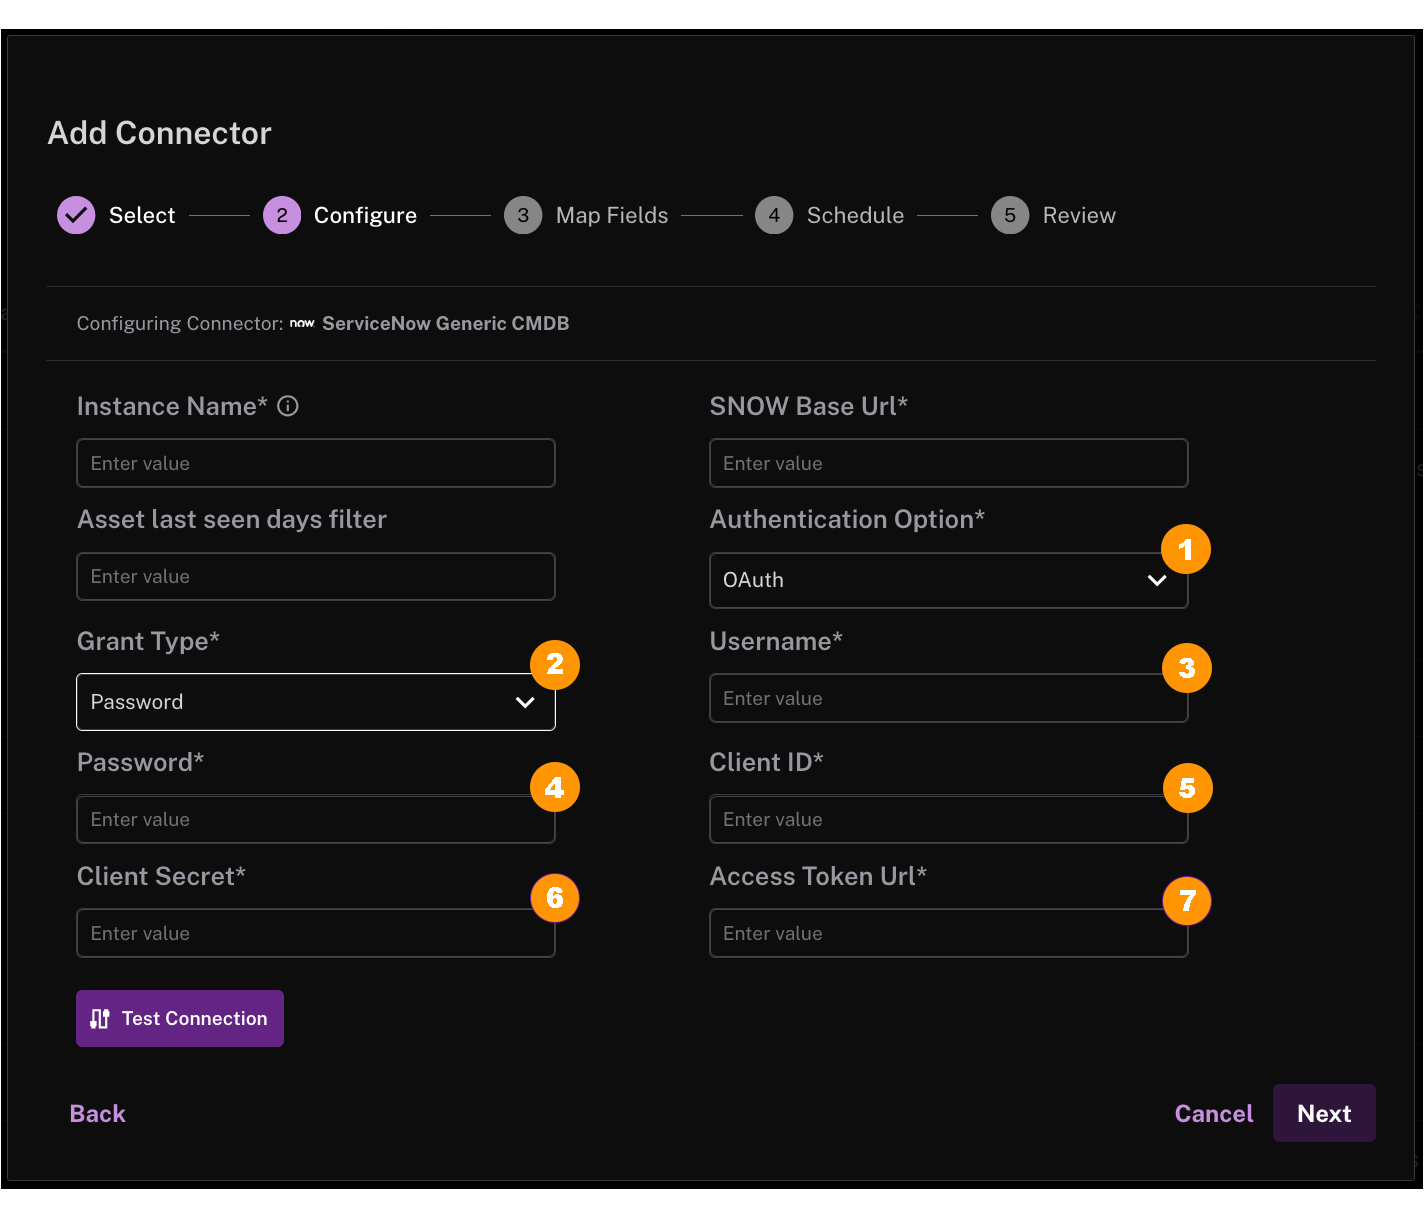
| Authentication Option | Select OAuth as the method of authentication. |
| Grant Type | Select Password as the grant type. |
| Username | Enter the username for the configured account. |
| Password | Enter the password for the configured account. |
| Client ID | Enter the OAuth client ID for OAuth access to ServiceNow. |
| Client Secret | Enter the OAuth client secret for OAuth access to ServiceNow. |
| Access Token URL | Enter the Access Token URL. For example, https://hostname.service-now.com/oauth_token.do. |
.png "image(855).png")
Test the connector
Step 3: Map fields
Balbix provides a default list of ServiceNow CMDB tables for mapping the connector. In Map Fields, you can view, edit or add tables. Specify which tables to connect to and which mapping to map all the data that they pull from those tables. Click the toggle for a table to exclude it and its mappings.
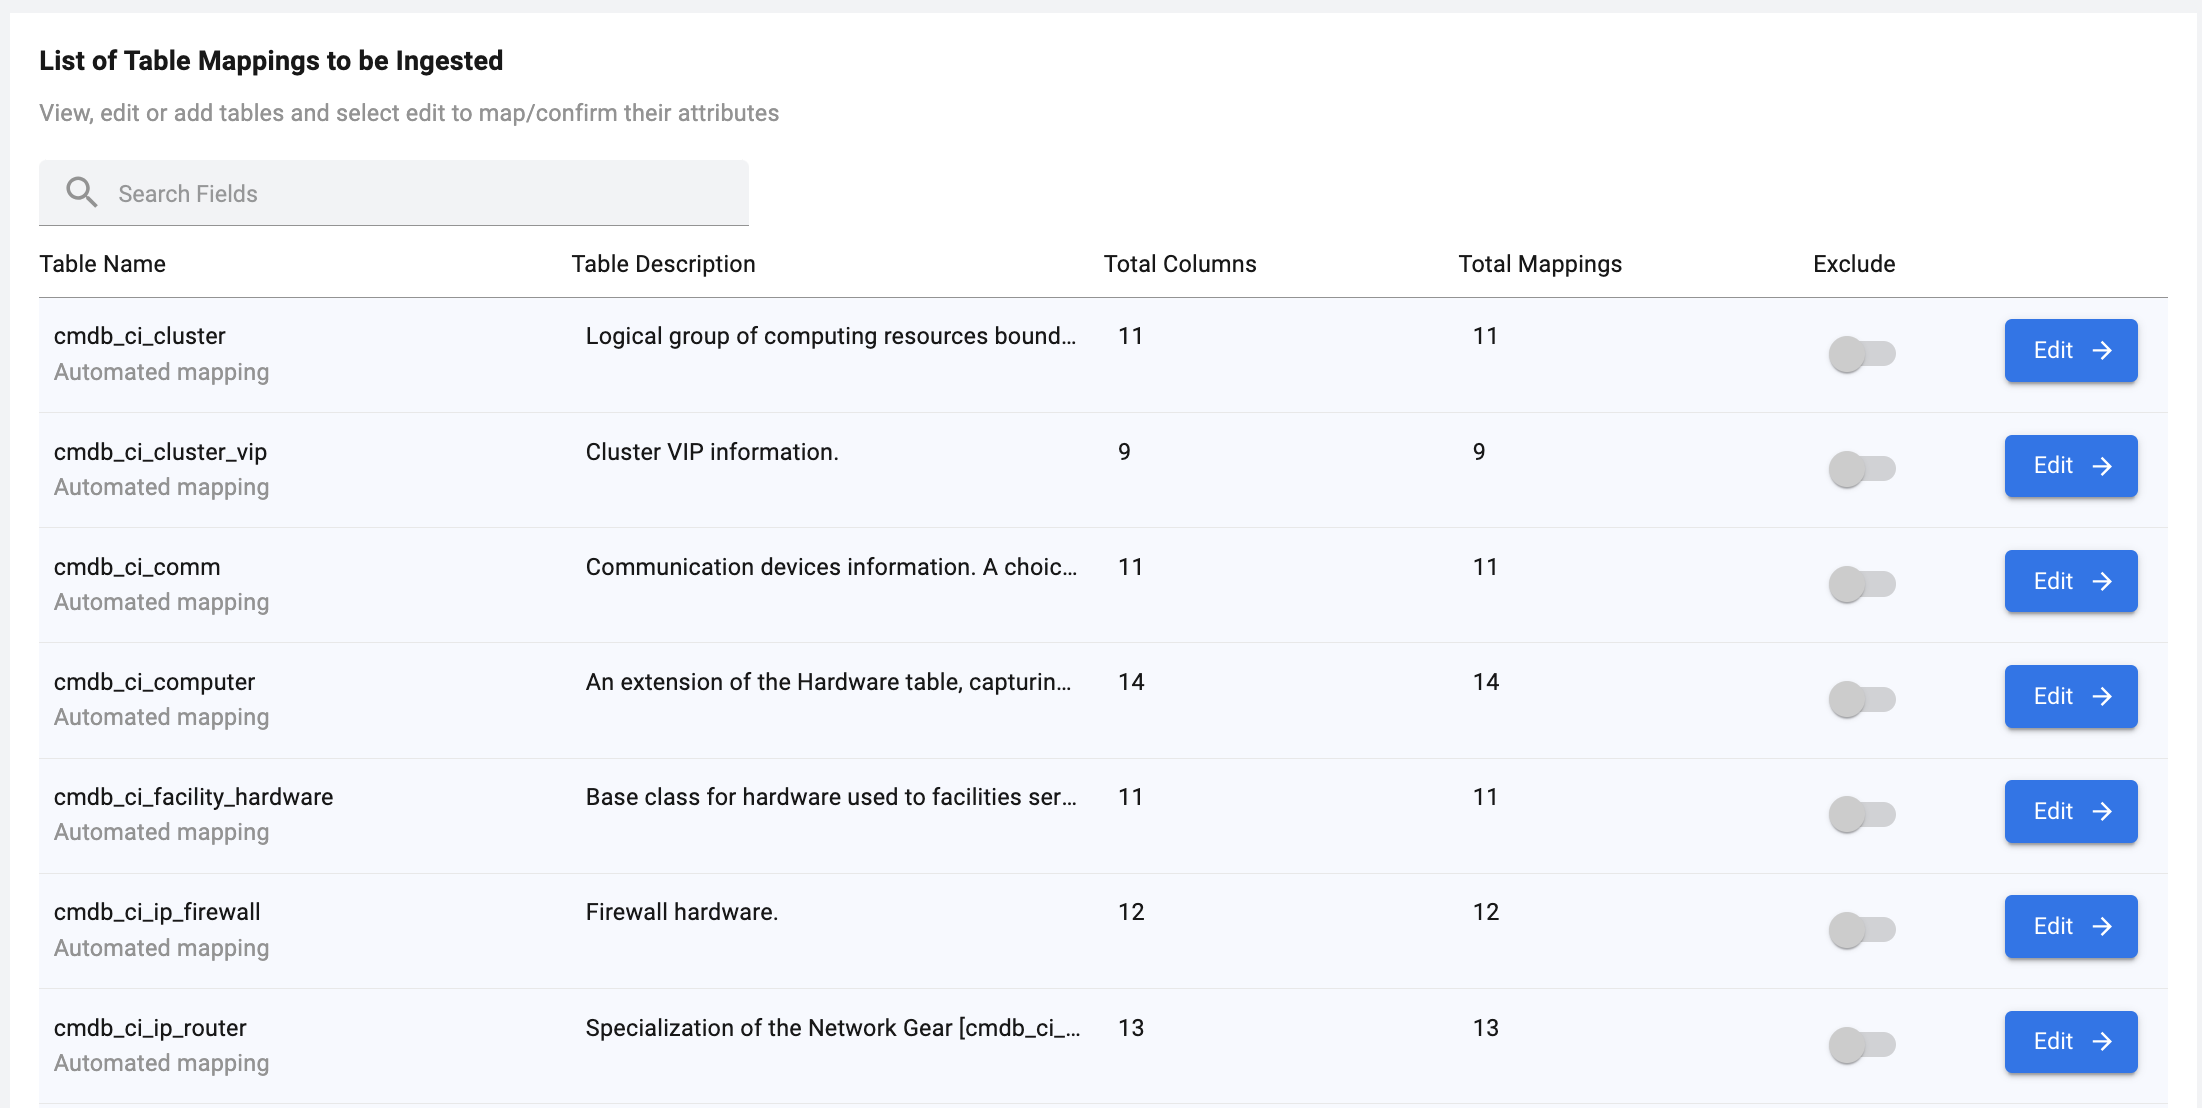
For each CMDB table, you can click on the Edit button to adjust the field mapping as well as define an API filter that allows you to query only certain records from that table. For the API filter, you can use the standard ServiceNow "sysparm_query" filter relevant to the specific table you're working with. This allows you to filter based on attributes available in the current table.
Here are a few examples:
sysparm_query=status NOT IN Elimination_Verified
sysparm_query=osLIKEwindow
sysparm_query=osCONTAINSwindows
sysparm_query=os NOT IN Mac OS 10 (OS/X),Linux Oracle
Remember to include the "sysparm_query=" prefix when entering the API filter in the field.
Warning:
When configuring API filters for CMDB tables, avoid using
sysparm_exclude_reference_link=true. This parameter, when set totrue, prevents the API from returning the actualsys_idvalues of reference fields. As a result, only string representations are fetched, which can lead to incomplete data in Balbix's ingestion process.
Generic Mapping Steps
Follow these generic mapping steps to review and adjust your ServiceNow CMDB field mappings.
1. In the Edit Connector page, under the Map Fields step, you will see a list of tables that Balbix has automatically populated for your instance. These tables correspond to Configuration Item (CI) classes in your ServiceNow CMDB and can be verified in the CI Class Manager.

For example:

2. You can add additional tables as needed to include more data sources from your ServiceNow instance. You can also exclude specific tables to prevent Balbix from fetching data from them during the next scheduled run.

3. You can map columns from your ServiceNow tables to the corresponding Balbix fields. You may also append prefixes or suffixes to field values, or apply API filters to refine the data being imported.


Step 4: Schedule the connector
Step 5: Review connector details
The final step in setting up the connector is to review the configuration details. Carefully review all configured connector details to confirm their accuracy. If changes are needed, click Backt o make corrections.
Once the details are correct, you have two options:
Check the Run Connector box to immediately start fetching data via the API.
Leave the box unchecked and click Add Connector to save it for future use.
If you choose to run the connector now, it will begin fetching data and continue until the process is complete. Once the schedule is set up it will run as per the schedule.
API reference documentation
To learn more about the ServiceNow CMDB API, see the references listed below: